59 KiB
ब्राउज़र एक्सटेंशन Pentesting Methodology
{{#include ../../banners/hacktricks-training.md}}
बुनियादी जानकारी
Browser extensions JavaScript में लिखे जाते हैं और ब्राउज़र द्वारा बैकग्राउंड में लोड किए जाते हैं। इसका अपना DOM होता है लेकिन यह अन्य साइट्स के DOM के साथ इंटरैक्ट कर सकता है। इसका मतलब यह है कि यह अन्य साइट्स की गोपनीयता, अखंडता, और उपलब्धता (CIA) को प्रभावित कर सकता है।
मुख्य घटक
Extension layouts विज़ुअलाइज़ होने पर बेहतर दिखते हैं और ये तीन घटकों से मिलकर बने होते हैं। आइए प्रत्येक घटक को गहराई से देखें।
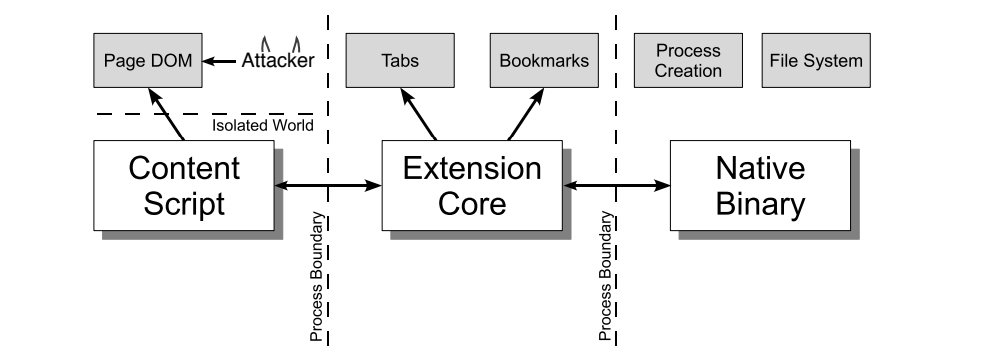
Content Scripts
हर content script का किसी एक वेब पेज के DOM तक प्रत्यक्ष पहुँच होती है और इसलिए यह संभावित हानिकारक इनपुट के संपर्क में आ सकता है। हालाँकि, content script के पास extension core को संदेश भेजने की क्षमता के अलावा कोई permissions नहीं होते।
Extension Core
extension core में extension के अधिकांश privileges/access होते हैं, लेकिन extension core केवल XMLHttpRequest और content scripts के माध्यम से web content के साथ interact कर सकता है। साथ ही, extension core को होस्ट मशीन तक direct access नहीं होता।
Native Binary
Extension एक native binary की अनुमति देता है जो user के full privileges के साथ host machine तक access कर सकता है। Native binary extension core के साथ standard Netscape Plugin Application Programming Interface (NPAPI) के माध्यम से interact करता है, जिसका उपयोग Flash और अन्य browser plug-ins करते हैं।
Boundaries
Caution
user के full privileges प्राप्त करने के लिए, किसी attacker को extension को यह यकीन दिलाना होगा कि वह malicious input को content script से extension's core तक और extension's core से native binary तक पास करे।
Extension के प्रत्येक component को एक-दूसरे से strong protective boundaries द्वारा अलग किया जाता है। प्रत्येक component एक separate operating system process में चलता है। Content scripts और extension cores sandbox processes में चलते हैं जो अधिकांश operating system services के लिए उपलब्ध नहीं होते।
इसके अलावा, content scripts अपने संबंधित वेब पेजों से अलग होते हैं क्योंकि वे एक अलग JavaScript heap में चलते हैं। Content script और वेब पेज को एक ही underlying DOM तक पहुँच होती है, लेकिन ये दोनों कभी JavaScript pointers का आदान-प्रदान नहीं करते, जिससे JavaScript functionality का leaking रोका जाता है।
manifest.json
A Chrome extension केवल एक ZIP फ़ोल्डर है जिसके पास .crx file extension होता है। Extension का core फ़ोल्डर की root में स्थित manifest.json फ़ाइल है, जो layout, permissions, और अन्य configuration विकल्पों को निर्दिष्ट करती है।
उदाहरण:
{
"manifest_version": 2,
"name": "My extension",
"version": "1.0",
"permissions": ["storage"],
"content_scripts": [
{
"js": ["script.js"],
"matches": ["https://example.com/*", "https://www.example.com/*"],
"exclude_matches": ["*://*/*business*"]
}
],
"background": {
"scripts": ["background.js"]
},
"options_ui": {
"page": "options.html"
}
}
content_scripts
Content scripts तब लोड होते हैं जब भी उपयोगकर्ता किसी मेल खाने वाले पृष्ठ पर नेविगेट करता है, हमारे मामले में कोई भी पृष्ठ जो https://example.com/* अभिव्यक्ति से मेल खाता है और *://*/*/business* regex से मेल नहीं खाता। ये पृष्ठ की अपनी scripts की तरह निष्पादित होते हैं और पृष्ठ के Document Object Model (DOM) तक मनमानी पहुँच रखते हैं।
"content_scripts": [
{
"js": [
"script.js"
],
"matches": [
"https://example.com/*",
"https://www.example.com/*"
],
"exclude_matches": ["*://*/*business*"],
}
],
अधिक URLs को शामिल या बाहर करने के लिए include_globs और exclude_globs का उपयोग भी किया जा सकता है।
यह एक उदाहरण content script है जो पृष्ठ में एक explain बटन जोड़ देगा जब the storage API का उपयोग extension’s storage से message मान प्राप्त करने के लिए किया जाएगा।
chrome.storage.local.get("message", (result) => {
let div = document.createElement("div")
div.innerHTML = result.message + " <button>Explain</button>"
div.querySelector("button").addEventListener("click", () => {
chrome.runtime.sendMessage("explain")
})
document.body.appendChild(div)
})

जब यह बटन क्लिक किया जाता है, तो content script द्वारा runtime.sendMessage() API का उपयोग करके extension pages को एक संदेश भेजा जाता है। यह इसलिए है क्योंकि content script को APIs तक सीधे पहुँच की सीमाएँ होती हैं, जिनमें storage कुछ ही अपवादों में से एक है। इन अपवादों से परे की कार्यक्षमताओं के लिए, संदेश extension pages को भेजे जाते हैं जिनसे content scripts संवाद कर सकती हैं।
Warning
ब्राउज़र के अनुसार, content script की क्षमताएँ थोड़ी भिन्न हो सकती हैं। Chromium-based browsers के लिए क्षमताओं की सूची Chrome Developers documentation में उपलब्ध है, और Firefox के लिए मुख्य स्रोत MDN है।
यह भी ध्यान देने योग्य है कि content scripts के पास background scripts के साथ संवाद करने की क्षमता होती है, जिससे वे कार्य करवा सकते हैं और उत्तर वापस भेज सकते हैं।
Chrome में content scripts को देखने और debug करने के लिए, Chrome developer tools मेनू तक पहुँचने के लिए Options > More tools > Developer tools चुनें या Ctrl + Shift + I दबाएँ।
developer tools प्रदर्शित होने पर, Source tab पर क्लिक करें, उसके बाद Content Scripts tab चुनें। इससे विभिन्न extensions के चल रहे content scripts का निरीक्षण करने और execution flow को ट्रैक करने के लिए breakpoints सेट करने की सुविधा मिलती है।
Injected content scripts
Tip
ध्यान दें कि Content Scripts अनिवार्य नहीं हैं क्योंकि scripts को dynamically वेब पेजों में inject करना और उन्हें programatically inject करना
tabs.executeScriptके माध्यम से भी संभव है। यह वास्तव में अधिक granular controls प्रदान करता है।
Content script के programmatic injection के लिए, extension को उस पृष्ठ के लिए host permissions चाहिए जिसमें scripts inject किए जाने हैं। ये permissions या तो extension के manifest में अनुरोध करके सुरक्षित किए जा सकते हैं या अस्थायी आधार पर activeTab के माध्यम से।
activeTab-आधारित एक्सटेंशन का उदाहरण
{
"name": "My extension",
...
"permissions": [
"activeTab",
"scripting"
],
"background": {
"service_worker": "background.js"
},
"action": {
"default_title": "Action Button"
}
}
- JS फ़ाइल को क्लिक पर Inject करें:
// content-script.js
document.body.style.backgroundColor = "orange"

//service-worker.js - Inject the JS file
chrome.action.onClicked.addListener((tab) => {
chrome.scripting.executeScript({
target: { tabId: tab.id },
files: ["content-script.js"],
})
})
- क्लिक पर एक फ़ंक्शन इंजेक्ट करें:
//service-worker.js - Inject a function
function injectedFunction() {
document.body.style.backgroundColor = "orange"
}

chrome.action.onClicked.addListener((tab) => {
chrome.scripting.executeScript({
target: { tabId: tab.id },
func: injectedFunction,
})
})
scripting permissions के साथ उदाहरण
// service-workser.js
chrome.scripting.registerContentScripts([
{
id: "test",
matches: ["https://*.example.com/*"],
excludeMatches: ["*://*/*business*"],
js: ["contentScript.js"],
},
])

// Another example
chrome.tabs.executeScript(tabId, { file: "content_script.js" })
अधिक URLs को शामिल या बाहर करने के लिए include_globs और exclude_globs का उपयोग भी किया जा सकता है।
कंटेंट स्क्रिप्ट्स run_at
run_at फील्ड नियंत्रित करता है कि JavaScript फाइलें वेब पेज में कब इंजेक्ट की जाती हैं। पसंदीदा और डिफ़ॉल्ट मान "document_idle" है।
संभावित मान हैं:
document_idle: संभव होने परdocument_start:cssकी किसी भी फाइल के बाद, लेकिन किसी अन्य DOM के निर्मित होने या किसी अन्य स्क्रिप्ट के चलने से पहले।document_end: DOM पूरा होने के तुरंत बाद, लेकिन images और frames जैसे subresources लोड होने से पहले।
manifest.json के माध्यम से
{
"name": "My extension",
...
"content_scripts": [
{
"matches": ["https://*.example.com/*"],
"run_at": "document_idle",
"js": ["contentScript.js"]
}
],
...
}
के माध्यम से service-worker.js
chrome.scripting.registerContentScripts([
{
id: "test",
matches: ["https://*.example.com/*"],
runAt: "document_idle",
js: ["contentScript.js"],
},
])
background
content scripts द्वारा भेजे गए संदेश background page द्वारा प्राप्त होते हैं, जो extension के components के समन्वय में एक केंद्रीय भूमिका निभाता है। खासतौर पर, background page extension के lifetime के दौरान persistent रहता है, और सीधे उपयोगकर्ता interaction के बिना सुचारू रूप से काम करता है। इसका अपना Document Object Model (DOM) होता है, जो जटिल इंटरैक्शन और state management को सक्षम करता है।
मुख्य बिंदु:
- Background Page Role: extension के लिए एक केंद्रीय नियंत्रण केंद्र के रूप में कार्य करता है, और extension के विभिन्न हिस्सों के बीच communication और coordination सुनिश्चित करता है।
- Persistence: यह हमेशा मौजूद रहता है, उपयोगकर्ता के लिए अदृश्य लेकिन extension की कार्यक्षमता के लिए अनिवार्य है।
- Automatic Generation: यदि स्पष्ट रूप से परिभाषित नहीं किया गया है, तो browser स्वतः ही एक background page बना देगा। यह auto-generated page extension के manifest में निर्दिष्ट सभी background scripts को शामिल करेगा, जिससे extension के background tasks का निर्बाध संचालन सुनिश्चित होता है।
Tip
Browser द्वारा background page को स्वचालित रूप से जनरेट करने की सुविधा (जब स्पष्ट रूप से घोषित नहीं किया गया हो) यह सुनिश्चित करती है कि सभी आवश्यक background scripts एकीकृत और कार्यशील हों, जिससे extension के सेटअप प्रक्रिया सरल हो जाती है।
उदाहरण background script:
chrome.runtime.onMessage.addListener((request, sender, sendResponse) => {
if (request == "explain") {
chrome.tabs.create({ url: "https://example.net/explanation" })
}
})
It uses runtime.onMessage API to listen to messages. When an "explain" message is received, it uses tabs API to open a page in a new tab.
बैकग्राउंड स्क्रिप्ट को डिबग करने के लिए आप extension details and inspect the service worker, पर जा सकते हैं; इससे डेवलपर टूल बैकग्राउंड स्क्रिप्ट के साथ खुलेंगे:
Options पृष्ठ और अन्य
Browser extensions विभिन्न प्रकार के पेज रख सकती हैं:
- Action pages प्रदर्शित होते हैं in a drop-down when the extension icon पर क्लिक किए जाने पर।
- वे पेज जिन्हें एक्सटेंशन load in a new tab करेगा।
- Option Pages: यह पेज क्लिक करने पर एक्सटेंशन के ऊपर प्रदर्शित होता है। पिछले manifest में, मेरे केस में मैं इस पेज को
chrome://extensions/?options=fadlhnelkbeojnebcbkacjilhnbjfjcaपर पहुँच सका या क्लिक करके:
ध्यान दें कि ये पेज बैकग्राउंड पेजों की तरह persistent नहीं होते क्योंकि वे आवश्यकता के अनुसार डायनामिक रूप से कंटेंट लोड करते हैं। इसके बावजूद, इनके पास बैकग्राउंड पेज के साथ कुछ समान क्षमताएँ होती हैं:
- Communication with Content Scripts: बैकग्राउंड पेज के समान, ये पेज content scripts से messages प्राप्त कर सकते हैं, जिससे एक्सटेंशन के अंदर इंटरैक्शन संभव होता है।
- Access to Extension-Specific APIs: ये पेज extension-specific APIs तक व्यापक पहुँच रखते हैं, जो एक्सटेंशन के लिए परिभाषित permissions पर निर्भर करती है।
permissions & host_permissions
permissions and host_permissions are entries from the manifest.json that will indicate which permissions the browser extensions has (storage, location...) and in which web pages.
As browser extensions can be so privileged, a malicious one or one being compromised could allow the attacker different means to steal sensitive information and spy on the user.
Check how these settings work and how they could get abused in:
{{#ref}} browext-permissions-and-host_permissions.md {{#endref}}
content_security_policy
A content security policy can be declared also inside the manifest.json. If there is one defined, it could be vulnerable.
The default setting for browser extension pages is rather restrictive:
script-src 'self'; object-src 'self';
CSP और संभावित बायपास के बारे में अधिक जानकारी के लिए देखें:
{{#ref}} ../content-security-policy-csp-bypass/ {{#endref}}
web_accessible_resources
एक वेबपेज द्वारा Browser Extension के किसी पेज, उदाहरण के लिए .html पेज, तक पहुँचने के लिए, उस पेज का उल्लेख manifest.json की web_accessible_resources फ़ील्ड में होना चाहिए.\
उदाहरण के लिए:
{
...
"web_accessible_resources": [
{
"resources": [ "images/*.png" ],
"matches": [ "https://example.com/*" ]
},
{
"resources": [ "fonts/*.woff" ],
"matches": [ "https://example.com/*" ]
}
],
...
}
ये पेज़ निम्नलिखित प्रकार के URL पर उपलब्ध हैं:
chrome-extension://<extension-id>/message.html
In public extensions the extension-id is accesible:
Although, if the manifest.json parameter use_dynamic_url is used, this id can be dynamic.
Tip
ध्यान दें कि भले ही कोई पेज यहाँ उल्लिखित हो, वह ClickJacking के खिलाफ protected हो सकता है, thanks to the Content Security Policy. इसलिए ClickJacking attack संभव है या नहीं, यह सुनिश्चित करने से पहले आपको इसे (frame-ancestors section) भी चेक करना होगा।
Being allowed to access these pages make these pages potentially vulnerable ClickJacking:
{{#ref}} browext-clickjacking.md {{#endref}}
Tip
इन पेजों को केवल extension द्वारा लोड होने की अनुमति देना और बेतरतीब URLs द्वारा न लोड होने देना ClickJacking attacks को रोक सकता है।
Caution
ध्यान दें कि
web_accessible_resourcesसे आए पेज और extension के अन्य पेज भी contacting background scripts करने में सक्षम होते हैं। इसलिए यदि इनमें से कोई पेज XSS के लिए vulnerable है तो यह एक बड़ा vulnerability खोल सकता है।इसके अलावा, ध्यान दें कि आप केवल वही पेज जो
web_accessible_resourcesमें बताए गए हैं को iframes के अंदर खोल सकते हैं, लेकिन एक नए टैब से extension ID जानकर extension का कोई भी पेज एक्सेस करना संभव है। इसलिए, यदि उसी पैरामीटर का दुरुपयोग करके कोई XSS मिलता है, तो इसे उस पेज केweb_accessible_resourcesमें configured न होने पर भी दुरुपयोग किया जा सकता है।
externally_connectable
A per the docs, The "externally_connectable" manifest property declares which extensions and web pages can connect to your extension via runtime.connect and runtime.sendMessage.
- If the
externally_connectablekey is not declared in your extension's manifest or it's declared as"ids": ["*"], all extensions can connect, but no web pages can connect. - If specific IDs are specified, like in
"ids": ["aaaaaaaaaaaaaaaaaaaaaaaaaaaaaaaa"], only those applications can connect. - If matches are specified, those web apps will be able to connect:
"matches": [
"https://*.google.com/*",
"*://*.chromium.org/*",
- If it's specified as empty:
"externally_connectable": {}, no app or web will be able to connect.
The less extensions and URLs indicated here, the smaller the attack surface will be.
Caution
If a web page vulnerable to XSS or takeover is indicated in
externally_connectable, an attacker will be able to send messages directly to the background script, completely bypassing the Content Script and its CSP.Therefore, this is a very powerful bypass.
Moreover, if the client installs a rouge extension, even if it isn't allowed to communicate with the vulnerable extension, it could inject XSS data in an allowed web page or abuse
WebRequestorDeclarativeNetRequestAPIs to manipulate requests on a targeted domain altering a page's request for a JavaScript file. (Note that CSP on the targeted page could prevent these attacks). This idea comes from this writeup.
Communication summary
Extension <--> WebApp
To communicate between the content script and the web page post messages are usually used. Therefore, in the web application you will usually find calls to the function window.postMessage and in the content script listeners like window.addEventListener. Note however, that the extension could also communicate with the web application sending a Post Message (and therefore the web should expect it) or just make the web load a new script.
Inside the extension
Usually the function chrome.runtime.sendMessage is used to send a message inside the extension (usually handled by the background script) and in order to receive and handle it a listener is declared calling chrome.runtime.onMessage.addListener.
It's also possible to use chrome.runtime.connect() to have a persistent connection instead of sending single messages, it's possible to use it to send and receive messages like in the following example:
chrome.runtime.connect() example
```javascript
var port = chrome.runtime.connect()
// Listen for messages from the web page window.addEventListener( "message", (event) => { // Only accept messages from the same window if (event.source !== window) { return }
// Check if the message type is "FROM_PAGE" if (event.data.type && event.data.type === "FROM_PAGE") { console.log("Content script received: " + event.data.text) // Forward the message to the background script port.postMessage({ type: "FROM_PAGE", text: event.data.text }) } }, false )
// Listen for messages from the background script port.onMessage.addListener(function (msg) { console.log("Content script received message from background script:", msg) // Handle the response message from the background script })
</details>

यह भी संभव है कि एक background script किसी specific टैब में स्थित content script को संदेश भेज सके, **`chrome.tabs.sendMessage`** कॉल करके, जहाँ आपको संदेश भेजने के लिए उस टैब का **ID** निर्दिष्ट करना होगा।

### अनुमति दिए गए `externally_connectable` से एक्सटेंशन तक

**Web apps और external browser extensions जिन्हें अनुमति दी गई है** `externally_connectable` configuration में, वे निम्न का उपयोग करके अनुरोध भेज सकते हैं :
```javascript
chrome.runtime.sendMessage(extensionId, ...
जहाँ आवश्यक हो extension ID का उल्लेख करें।
Native Messaging
यह संभव है कि background scripts सिस्टम के अंदर मौजूद binaries के साथ संचार कर सकें, जो कि यदि यह संचार ठीक से सुरक्षित न किया गया हो तो prone to critical vulnerabilities such as RCEs हो सकते हैं। More on this later.
chrome.runtime.sendNativeMessage(
"com.my_company.my_application",
{ text: "Hello" },
function (response) {
console.log("Received " + response)
}
)
Web ↔︎ Content Script संचार
वे वातावरण जहाँ content scripts चलते हैं और जहाँ host pages मौजूद हैं, वे एक-दूसरे से separated होते हैं, जिससे isolation सुनिश्चित होता है। इस isolation के बावजूद, दोनों पेज के Document Object Model (DOM) के साथ इंटरैक्ट करने में सक्षम होते हैं, जो एक साझा संसाधन है। host page को content script के साथ सीधे संवाद करने या content script के माध्यम से extension के साथ परोक्ष रूप से संवाद करने के लिए दोनों द्वारा पहुँच योग्य DOM को संचार चैनल के रूप में उपयोग करना आवश्यक है।
Post Messages
// This is like "chrome.runtime.sendMessage" but to maintain the connection
var port = chrome.runtime.connect()

window.addEventListener(
"message",
(event) => {
// We only accept messages from ourselves
if (event.source !== window) {
return
}

if (event.data.type && event.data.type === "FROM_PAGE") {
console.log("Content script received: " + event.data.text)
// Forward the message to the background script
port.postMessage(event.data.text)
}
},
false
)
document.getElementById("theButton").addEventListener(
"click",
() => {
window.postMessage(
{ type: "FROM_PAGE", text: "Hello from the webpage!" },
"*"
)
},
false
)
A secure Post Message communication should check the authenticity of the received message, this can be done checking:
event.isTrusted: This is True only if the event was triggered by a users action- The content script might expecting a message only if the user performs some action
- origin domain: might expecting a message only allowlist of domains.
- If a regex is used, be very careful
- Source:
received_message.source !== windowcan be used to check if the message was from the same window where the Content Script is listening.
ऊपर दिए गए चेक, भले ही लागू किए गए हों, कमजोर हो सकते हैं — इसलिए निम्नलिखित पेज पर संभावित Post Message bypasses देखें:
{{#ref}} ../postmessage-vulnerabilities/ {{#endref}}
Iframe
संचार का एक और संभावित तरीका Iframe URLs के माध्यम से हो सकता है; इसका एक उदाहरण आप यहाँ पा सकते हैं:
{{#ref}} browext-xss-example.md {{#endref}}
DOM
यह "बिल्कुल" एक संचार तरीका नहीं है, लेकिन web और Content Script दोनों के पास web DOM तक पहुंच होगी। इसलिए, यदि Content Script DOM से कोई जानकारी पढ़ रही है और web DOM पर भरोसा कर रही है, तो web उस data को बदल सकता है (क्योंकि web पर भरोसा नहीं किया जाना चाहिए, या web XSS के लिए vulnerable है) और Content Script को compromise कर सकता है।
DOM आधारित XSS के जरिए browser extension compromise करने का एक उदाहरण आप यहाँ पा सकते हैं:
{{#ref}} browext-xss-example.md {{#endref}}
Content Script ↔︎ Background Script Communication
एक Content Script इन फ़ंक्शनों runtime.sendMessage() या tabs.sendMessage() का उपयोग करके एक one-time JSON-serializable संदेश भेज सकता है।
response को handle करने के लिए, returned Promise का उपयोग करें। हालांकि backward compatibility के लिए, आप अभी भी last argument के रूप में एक callback पास कर सकते हैं।
एक content script से request भेजने का तरीका इस तरह दिखता है:
;(async () => {
const response = await chrome.runtime.sendMessage({ greeting: "hello" })
// do something with response here, not outside the function
console.log(response)
})()
extension से अनुरोध भेजना (आम तौर पर एक background script). चयनित टैब में content script को संदेश भेजने का उदाहरण:
// From https://stackoverflow.com/questions/36153999/how-to-send-a-message-between-chrome-extension-popup-and-content-script
;(async () => {
const [tab] = await chrome.tabs.query({
active: true,
lastFocusedWindow: true,
})
const response = await chrome.tabs.sendMessage(tab.id, { greeting: "hello" })
// do something with response here, not outside the function
console.log(response)
})()
प्राप्त करने वाले पक्ष पर, आपको संदेश को संभालने के लिए runtime.onMessage event listener सेट करना होगा। यह content script या extension page दोनों पर एक जैसा दिखता है।
// From https://stackoverflow.com/questions/70406787/javascript-send-message-from-content-js-to-background-js
chrome.runtime.onMessage.addListener(function (request, sender, sendResponse) {
console.log(
sender.tab
? "from a content script:" + sender.tab.url
: "from the extension"
)
if (request.greeting === "hello") sendResponse({ farewell: "goodbye" })
})
उदाहरण में हाइलाइट किए गए हिस्से में, sendResponse() एक सिंक्रोनस तरीके से execute हुआ था। sendResponse() को asynchronous रूप में execute करने के लिए onMessage event handler में return true; जोड़ना अनिवार्य है।
एक महत्वपूर्ण बात यह है कि जब कई पेज onMessage events प्राप्त करने के लिए सेट होते हैं, तो सबसे पहला पेज जो sendResponse() को execute करेगा वही किसी विशेष इवेंट के लिए प्रभावी रूप से response भेज पाएगा। उसी इवेंट के लिए बाद में भेजे गए किसी भी response को ध्यान में नहीं लिया जाएगा।
नए extensions बनाते समय callbacks के बजाय promises को प्राथमिकता देनी चाहिए। callbacks के उपयोग के संदर्भ में, sendResponse() function केवल तभी वैध माना जाता है जब यह सीधे synchronous context के भीतर execute हो, या जब event handler asynchronous ऑपरेशन सूचित करने के लिए true लौटाए। यदि किसी भी handler ने true नहीं लौटाया या sendResponse() function memory से हटा दिया गया (garbage-collected), तो डिफ़ॉल्ट रूप से sendMessage() से संबंधित callback ट्रिगर हो जाएगा।
Native Messaging
Browser extensions सिस्टम में मौजूद binaries in the system via stdin से संवाद करने की अनुमति भी देते हैं। एप्लिकेशन को इसके लिए एक json इंस्टॉल करना होगा जो ऐसा संकेत करे, जैसे एक json:
{
"name": "com.my_company.my_application",
"description": "My Application",
"path": "C:\\Program Files\\My Application\\chrome_native_messaging_host.exe",
"type": "stdio",
"allowed_origins": ["chrome-extension://knldjmfmopnpolahpmmgbagdohdnhkik/"]
}
जहाँ name वह स्ट्रिंग है जो ब्राउज़र एक्सटेंशन के background scripts से application से संवाद करने के लिए runtime.connectNative() या runtime.sendNativeMessage() को पास की जाती है। path binary का path है, केवल 1 मान्य type है जो stdio है (stdin और stdout का उपयोग करता है) और allowed_origins उन एक्सटेंशनों को दर्शाते हैं जो इसे एक्सेस कर सकती हैं (और इनमें wildcard नहीं हो सकता)।
Chrome/Chromium कुछ Windows registry और macOS तथा Linux के कुछ paths में इस json की खोज करेगा (अधिक जानकारी docs)।
Tip
ब्राउज़र एक्सटेंशन को इस संचार का उपयोग करने में सक्षम होने के लिए
nativeMessaingpermission भी declared होना चाहिए।
यह कुछ background script code का ऐसा दिखता है जो native application को messages भेज रहा है:
chrome.runtime.sendNativeMessage(
"com.my_company.my_application",
{ text: "Hello" },
function (response) {
console.log("Received " + response)
}
)
In this blog post, एक vulnerable pattern जो native messages का दुरुपयोग करता है प्रस्तावित किया गया है:
- Browser extension में content script के लिए एक wildcard pattern होता है।
- Content script
postMessageसंदेशों को background script कोsendMessageके जरिए पास करता है। - Background script संदेश को native application को
sendNativeMessageके जरिए पास करता है। - Native application उस संदेश को खतरनाक तरीके से हैंडल करता है, जिससे code execution हो सकता है।
और इसके अंदर एक उदाहरण बताया गया है कि किसी भी पेज से RCE तक कैसे पहुंचा जा सकता है abusing a browser extension।
Sensitive Information in Memory/Code/Clipboard
यदि कोई Browser Extension अपनी memory में sensitive information स्टोर करता है, तो इसे dumped किया जा सकता है (विशेषकर Windows मशीनों पर) और उस जानकारी के लिए searched किया जा सकता है।
इसलिए, Browser Extension की memory को secure नहीं माना जाना चाहिए और ऐसे sensitive information जैसे credentials या mnemonic phrases store नहीं किये जाने चाहिए।
बेशक, code में sensitive information न रखें, क्योंकि वह public हो जाएगा।
Browser से memory dump करने के लिए आप process memory dump कर सकते हैं या browser extension की settings में जाकर Inspect pop-up पर क्लिक करें -> Memory सेक्शन में -> Take a snaphost और CTRL+F से snapshot के अंदर sensitive info खोजें।
इसके अलावा, mnemonic keys या passwords जैसी अत्यंत संवेदनशील जानकारी को clipboard में copy करने की अनुमति नहीं दी जानी चाहिए (या कम से कम कुछ सेकंड में clipboard से हटा दें), क्योंकि clipboard मॉनिटर करने वाली processes इन्हें प्राप्त कर सकती हैं।
Loading an Extension in the Browser
- Browser Extension को डाउनलोड करें और unzip करें
chrome://extensions/पर जाएं औरDeveloper Modeको सक्षम करेंLoad unpackedबटन पर क्लिक करें
Firefox में आप about:debugging#/runtime/this-firefox पर जाएं और Load Temporary Add-on बटन पर क्लिक करें।
Getting the source code from the store
Chrome extension का source code विभिन्न तरीकों से प्राप्त किया जा सकता है। नीचे हर विकल्प के लिए विस्तृत व्याख्या और निर्देश दिए गए हैं।
Download Extension as ZIP via Command Line
Chrome extension का source code command line का उपयोग करके ZIP फाइल के रूप में डाउनलोड किया जा सकता है। इसमें curl का उपयोग करके एक विशेष URL से ZIP फ़ाइल प्राप्त करना और फिर ZIP फ़ाइल की सामग्री को किसी डायरेक्टरी में extract करना शामिल है। यहाँ चरण दिए गए हैं:
"extension_id"को उस extension के वास्तविक ID से बदलें।- निम्नलिखित commands execute करें:
extension_id=your_extension_id   # Replace with the actual extension ID
curl -L -o "$extension_id.zip" "https://clients2.google.com/service/update2/crx?response=redirect&os=mac&arch=x86-64&nacl_arch=x86-64&prod=chromecrx&prodchannel=stable&prodversion=44.0.2403.130&x=id%3D$extension_id%26uc"
unzip -d "$extension_id-source" "$extension_id.zip"
Use the CRX Viewer वेबसाइट
Use the CRX Viewer extension
एक और सुविधाजनक तरीका है Chrome Extension Source Viewer का उपयोग करना, जो एक open-source प्रोजेक्ट है। इसे Chrome Web Store से इंस्टॉल किया जा सकता है। viewer का source code इसके GitHub repository में उपलब्ध है।
View source of locally installed extension
स्थानीय रूप से इंस्टॉल किए गए Chrome एक्सटेंशन को भी निरीक्षण किया जा सकता है। तरीका इस प्रकार है:
- अपने Chrome लोकल प्रोफ़ाइल डायरेक्टरी तक पहुँचने के लिए
chrome://version/पर जाएँ और "Profile Path" फ़ील्ड खोजें। - प्रोफ़ाइल डायरेक्टरी के अंदर
Extensions/सबफ़ोल्डर पर जाएँ। - यह फ़ोल्डर सभी इंस्टॉल किए गए एक्सटेंशन रखता है, आम तौर पर उनके सोर्स कोड पठनीय फ़ॉर्मेट में होते हैं।
एक्सटेंशनों की पहचान करने के लिए, आप उनके IDs को नामों से मैप कर सकते हैं:
about:extensionsपेज पर Developer Mode सक्षम करें ताकि प्रत्येक एक्सटेंशन के IDs दिखें।- हर एक्सटेंशन के फ़ोल्डर में
manifest.jsonफ़ाइल में एक पठनीयnameफ़ील्ड होती है, जो एक्सटेंशन की पहचान करने में मदद करती है।
Use a File Archiver or Unpacker
Chrome Web Store पर जाएँ और एक्सटेंशन डाउनलोड करें। फ़ाइल का एक्सटेंशन .crx होगा। फ़ाइल एक्सटेंशन को .crx से .zip में बदलें। किसी भी फ़ाइल आर्काइवर (जैसे WinRAR, 7-Zip, आदि) का उपयोग करके ZIP फ़ाइल की सामग्री निकालें।
Use Developer Mode in Chrome
Chrome खोलें और chrome://extensions/ पर जाएँ। ऊपरी दायें में "Developer mode" सक्षम करें। "Load unpacked extension..." पर क्लिक करें। अपने एक्सटेंशन की डायरेक्टरी पर नेविगेट करें। यह सोर्स कोड डाउनलोड नहीं करता, लेकिन पहले डाउनलोड या विकसित किए गए एक्सटेंशन के कोड को देखने और संशोधित करने के लिए उपयोगी है।
Chrome extension manifest dataset
कमज़ोर browser एक्सटेंशनों को खोजने के लिए आप https://github.com/palant/chrome-extension-manifests-dataset का उपयोग कर सकते हैं और उनके manifest फ़ाइलों में संभावित कमजोर संकेतों की जाँच कर सकते हैं। उदाहरण के लिए ऐसे एक्सटेंशन चेक करने के लिए जिनके 25000 से अधिक users हैं, जिनमें content_scripts और permission nativeMessaing मौजूद हैं:
# Query example from https://spaceraccoon.dev/universal-code-execution-browser-extensions/
node query.js -f "metadata.user_count > 250000" "manifest.content_scripts?.length > 0 && manifest.permissions?.includes('nativeMessaging')"
Post-exploitation: Forced extension load & persistence (Windows)
Stealthy technique to backdoor Chromium by directly editing per-user Preferences and forging valid HMACs, causing the browser to accept and activate an arbitrary unpacked extension without prompts or flags.
{{#ref}} forced-extension-load-preferences-mac-forgery-windows.md {{#endref}}
सिक्योरिटी ऑडिट चेकलिस्ट
हालाँकि Browser Extensions का attack surface सीमित होता है, फिर भी उनमें कुछ में vulnerabilities या hardening सुधार की आवश्यकता हो सकती है। नीचे दिए गए बिंदु सबसे आम हैं:
- अनुरोध किए गए
permissionsको यथासंभव सीमित करें - यथासंभव
host_permissionsको सीमित करें - एक मजबूत
content_security_policyका उपयोग करें externally_connectableको यथासंभव सीमित रखें — यदि आवश्यकता नहीं है तो डिफ़ॉल्ट रूप से छोड़ने की बजाय{}निर्दिष्ट करें- यदि यहाँ कोई URL जो XSS या takeover के लिए vulnerable है उल्लिखित है, तो attacker सीधे background scripts को messages भेज पाएगा। यह बहुत शक्तिशाली bypass हो सकता है।
web_accessible_resourcesको यथासंभव सीमित रखें, यदि संभव हो तो खाली रखें।- यदि
web_accessible_resourcesnone नहीं है, तो ClickJacking के लिए जाँच करें - यदि किसी भी प्रकार का communication extension से वेब पेज की ओर हो रहा है, तो उस communication में होने वाली XSS vulnerabilities की जाँच करें
- यदि Post Messages का उपयोग किया जा रहा है, तो Post Message vulnerabilities के लिए जाँच करें
- यदि Content Script DOM तक पहुँचती है, तो सुनिश्चित करें कि वे वेब द्वारा modify होने पर किसी XSS को introduce न करें
- विशेष ध्यान दें यदि यह communication Content Script -> Background script communication में भी शामिल है
- यदि background script native messaging के माध्यम से communicate कर रहा है तो सुनिश्चित करें कि communication secure और sanitized हो
- संवेदनशील जानकारी Browser Extension के code में संग्रहीत नहीं होनी चाहिए
- संवेदनशील जानकारी Browser Extension की memory में संग्रहीत नहीं होनी चाहिए
- संवेदनशील जानकारी file system में अनप्रोटेक्टेड रूप में संग्रहीत नहीं होनी चाहिए
Browser Extension Risks
- ऐप https://crxaminer.tech/ कुछ डेटा जैसे कि extension द्वारा request किए गए permissions का विश्लेषण कर के एक जोखिम स्तर देता है कि उस extension का उपयोग कितना जोखिम भरा है।
टूल्स
Tarnish
- किसी दिए गए Chrome webstore लिंक से किसी भी Chrome extension को खींचता है।
- manifest.json viewer: extension के manifest का JSON-prettified वर्शन दिखाता है।
- Fingerprint Analysis:
web_accessible_resourcesका पता लगाना और Chrome extension fingerprinting JavaScript का automatic generation। - Potential Clickjacking Analysis: उन extension HTML पेजों का पता लगाना जिनमें
web_accessible_resourcesनिर्देश सेट है। यह पेज उनके उद्देश्य के आधार पर संभावित रूप से clickjacking के प्रति vulnerable हो सकते हैं। - Permission Warning(s) viewer: जो उन सभी Chrome permission prompt warnings की सूची दिखाता है जो user द्वारा extension install करने पर दिखाई जाएंगी।
- Dangerous Function(s): संभावित रूप से exploit किए जाने योग्य dangerous functions का स्थान दिखाता है (जैसे innerHTML, chrome.tabs.executeScript जैसी functions)।
- Entry Point(s): दिखाता है कि extension user/external input कहाँ लेता है। यह extension की surface area समझने और maliciously-crafted data भेजने के संभावित बिंदु खोजने के लिए उपयोगी है।
- Dangerous Function(s) और Entry Point(s) दोनों scanners के जनरेट किए गए alerts के लिए निम्न प्रदान करते हैं:
- संबंधित code snippet और वह line जिसने alert उत्पन्न किया।
- समस्या का विवरण।
- “View File” बटन ताकि संपूर्ण source file देखा जा सके।
- alerted file का path।
- alerted file का पूरा Chrome extension URI।
- उस file का प्रकार, जैसे Background Page script, Content Script, Browser Action, आदि।
- यदि vulnerable line JavaScript file में है, तो उन सभी पृष्ठों के paths जहाँ यह शामिल है तथा उन पृष्ठों के प्रकार और
web_accessible_resourcestatus।
- Content Security Policy (CSP) analyzer and bypass checker: यह आपकी extension की CSP में कमजोरियों को इंगित करेगा और whitelisted CDNs आदि के कारण संभावित bypass तरीकों को भी रोशनी में लाएगा।
- Known Vulnerable Libraries: यह Retire.js का उपयोग कर किसी भी ज्ञात-खतरनाक JavaScript libraries के उपयोग की जाँच करता है।
- Extension और formatted versions डाउनलोड करने का विकल्प।
- Original extension डाउनलोड करने का विकल्प।
- Beautified version (auto prettified HTML और JavaScript) डाउनलोड करने का विकल्प।
- Scan results का automatic caching — पहली बार scan चलाने पर समय लग सकता है, पर दूसरी बार (यदि extension अपडेट नहीं हुआ है) results cached होने की वजह से लगभग instant होगा।
- Linkable Report URLs, ताकि Tarnish द्वारा जनरेट किए गए extension report को आसानी से किसी और के साथ share किया जा सके।
Neto
Project Neto एक Python 3 पैकेज है जिसे Firefox और Chrome जैसे well-known browsers के browser plugins और extensions की hidden features का विश्लेषण और उदघाटन करने के लिए बनाया गया है। यह पैकेज पैकेज्ड फाइलों को unzip करके relevant resources जैसे manifest.json, localization folders या Javascript और HTML source files से इन features को extract करने के प्रोसेस को automate करता है।
संदर्भ
- Thanks to @naivenom for the help with this methodology
- https://www.cobalt.io/blog/introduction-to-chrome-browser-extension-security-testing
- https://palant.info/2022/08/10/anatomy-of-a-basic-extension/
- https://palant.info/2022/08/24/attack-surface-of-extension-pages/
- https://palant.info/2022/08/31/when-extension-pages-are-web-accessible/
- https://help.passbolt.com/assets/files/PBL-02-report.pdf
- https://developer.chrome.com/docs/extensions/develop/concepts/content-scripts
- https://developer.chrome.com/docs/extensions/mv2/background-pages
- https://thehackerblog.com/kicking-the-rims-a-guide-for-securely-writing-and-auditing-chrome-extensions/
- https://gist.github.com/LongJohnCoder/9ddf5735df3a4f2e9559665fb864eac0
{{#include ../../banners/hacktricks-training.md}}