10 KiB
Pentesting BLE - Bluetooth Low Energy
{{#include ../../banners/hacktricks-training.md}}
소개
Bluetooth 4.0 규격부터 사용 가능한 BLE는 2400 ~ 2483.5 MHz 대역을 커버하는 단 40개의 채널만 사용합니다. 반면 전통적인 Bluetooth는 같은 대역에서 79개의 채널을 사용합니다.
BLE 장치는 advertising packets (beacons)를 전송하여 통신합니다. 이 패킷들은 주변 기기들에게 해당 BLE 장치의 존재를 브로드캐스트합니다. 이런 비콘은 때때로 데이터를 전송하기도 합니다.
리스닝 장치(또는 central device라고도 함)는 advertising packet에 대해 특정 advertising 장치로 전송되는 SCAN request로 응답할 수 있습니다. 그 스캔에 대한 response는 초기 advertising 요청에 담기지 못한 추가 정보를 포함하여 광고 패킷과 동일한 구조를 사용합니다(예: 전체 장치 이름).
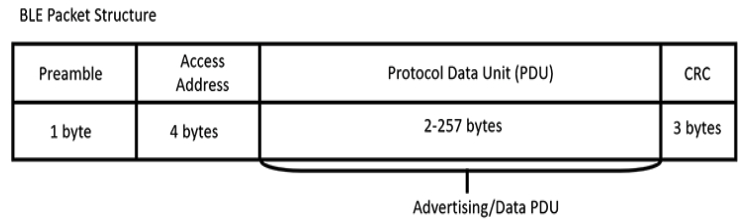
프리앰블 바이트는 주파수 동기화를 수행하며, 4바이트의 access address는 connection identifier로 동일 채널에서 여러 장치가 연결을 시도하는 시나리오에서 사용됩니다. 다음으로 Protocol Data Unit (PDU)는 advertising data를 포함합니다. PDU에는 여러 타입이 있으며, 가장 흔히 사용되는 것은 ADV_NONCONN_IND와 ADV_IND입니다. 장치가 연결을 허용하지 않을 경우 ADV_NONCONN_IND PDU 타입을 사용하여 광고 패킷에만 데이터를 전송합니다. 장치가 연결을 허용할 경우 ADV_IND를 사용하고, connection이 성립되면 광고 패킷 전송을 멈춥니다.
GATT
Generic Attribute Profile (GATT)은 장치가 데이터를 어떻게 포맷하고 전송할지를 정의합니다. BLE 장치의 공격 표면을 분석할 때는 GATT(또는 GATTs)에 주로 집중하는데, 이는 장치 기능이 어떻게 트리거되고 데이터가 어떻게 저장·그룹화·수정되는지를 보여주기 때문입니다. GATT는 장치의 characteristics, descriptors, services를 16비트 또는 32비트 값으로 표 형태로 나열합니다. characteristic은 central 장치와 peripheral 간에 주고받는 데이터 값입니다. 이러한 characteristics는 추가 정보를 제공하는 descriptors를 가질 수 있습니다. 관련 동작을 수행하는 경우, characteristics는 종종 services로 그룹화됩니다.
열거
hciconfig #Check config, check if UP or DOWN
# If DOWN try:
sudo modprobe -c bluetooth
sudo hciconfig hci0 down && sudo hciconfig hci0 up

# Spoof MAC
spooftooph -i hci0 -a 11:22:33:44:55:66
GATTool
GATTool는 다른 장치와 연결을 설정하고 해당 장치의 특성을 나열하며 그 속성을 읽고 쓸 수 있게 해줍니다.
GATTTool는 -I 옵션으로 대화형 셸을 실행할 수 있습니다:
gatttool -i hci0 -I
[ ][LE]> connect 24:62:AB:B1:A8:3E Attempting to connect to A4:CF:12:6C:B3:76 Connection successful
[A4:CF:12:6C:B3:76][LE]> characteristics
handle: 0x0002, char properties: 0x20, char value handle:
0x0003, uuid: 00002a05-0000-1000-8000-00805f9b34fb
handle: 0x0015, char properties: 0x02, char value handle:
0x0016, uuid: 00002a00-0000-1000-8000-00805f9b34fb
[...]

# Write data
gatttool -i <Bluetooth adapter interface> -b <MAC address of device> --char-write-req <characteristic handle> -n <value>
gatttool -b a4:cf:12:6c:b3:76 --char-write-req -a 0x002e -n $(echo -n "04dc54d9053b4307680a"|xxd -ps)

# Read data
gatttool -i <Bluetooth adapter interface> -b <MAC address of device> --char-read -a 0x16

# Read connecting with an authenticated encrypted connection
gatttool --sec-level=high -b a4:cf:12:6c:b3:76 --char-read -a 0x002c
Bettercap
# Start listening for beacons
sudo bettercap --eval "ble.recon on"
# Wait some time
>> ble.show # Show discovered devices
>> ble.enum <mac addr> # This will show the service, characteristics and properties supported

# Write data in a characteristic
>> ble.write <MAC ADDR> <UUID> <HEX DATA>
>> ble.write <mac address of device> ff06 68656c6c6f # Write "hello" in ff06
Sniffing 및 페어링되지 않은 BLE 장치의 능동적 제어
많은 저가형 BLE 주변 장치는 pairing/bonding을 강제하지 않습니다. bonding이 없으면 Link Layer 암호화가 활성화되지 않으므로 ATT/GATT 트래픽이 평문으로 전송됩니다. An off-path sniffer는 연결을 추적하여 GATT 연산을 디코딩해 characteristic handle과 값을 알아낼 수 있고, 근처의 어떤 호스트든 연결하여 그 쓰기 동작을 재생(replay)해 장치를 제어할 수 있습니다.
Sniffing with Sniffle (CC26x2/CC1352)
하드웨어: Sonoff Zigbee 3.0 USB Dongle Plus (CC26x2/CC1352)에 NCC Group’s Sniffle firmware를 재플래시한 장치.
Install Sniffle and its Wireshark extcap on Linux:
if [ ! -d /opt/sniffle/Sniffle-1.10.0/python_cli ]; then
echo "[+] - Sniffle not installed! Installing at 1.10.0..."
sudo mkdir -p /opt/sniffle
sudo chown -R $USER:$USER /opt/sniffle
pushd /opt/sniffle
wget https://github.com/nccgroup/Sniffle/archive/refs/tags/v1.10.0.tar.gz
tar xvf v1.10.0.tar.gz
# Install Wireshark extcap for user and root only
mkdir -p $HOME/.local/lib/wireshark/extcap
ln -s /opt/sniffle/Sniffle-1.10.0/python_cli/sniffle_extcap.py $HOME/.local/lib/wireshark/extcap
sudo mkdir -p /root/.local/lib/wireshark/extcap
sudo ln -s /opt/sniffle/Sniffle-1.10.0/python_cli/sniffle_extcap.py /root/.local/lib/wireshark/extcap
popd
else
echo "[+] - Sniffle already installed at 1.10.0"
fi
Flash Sonoff with Sniffle firmware (직렬 장치가 일치하는지 확인하세요, 예: /dev/ttyUSB0):
pushd /opt/sniffle/
wget https://github.com/nccgroup/Sniffle/releases/download/v1.10.0/sniffle_cc1352p1_cc2652p1_1M.hex
git clone https://github.com/sultanqasim/cc2538-bsl.git
cd cc2538-bsl
python3 -m venv .venv
source .venv/bin/activate
python3 -m pip install pyserial intelhex
python3 cc2538-bsl.py -p /dev/ttyUSB0 --bootloader-sonoff-usb -ewv ../sniffle_cc1352p1_cc2652p1_1M.hex
deactivate
popd
Sniffle extcap를 통해 Wireshark에서 캡처한 뒤, filtering을 통해 state-changing writes로 빠르게 전환:
_ws.col.info contains "Sent Write Command"
이는 클라이언트의 ATT Write Commands를 강조합니다; handle과 value는 종종 디바이스 동작에 직접 매핑됩니다(예: buzzer/alert characteristic에 0x01을 쓰면 동작, 0x00을 쓰면 정지).
Sniffle CLI 빠른 예시:
python3 scanner.py --output scan.pcap
# Only devices with very strong signal
python3 scanner.py --rssi -40
# Filter advertisements containing a string
python3 sniffer.py --string "banana" --output sniff.pcap
대안 sniffer: Nordic’s nRF Sniffer for BLE + Wireshark plugin도 작동합니다. 작고 저렴한 Nordic dongles에서는 일반적으로 USB bootloader를 덮어써 sniffer firmware를 로드하므로, 전용 sniffer dongle을 유지하거나 나중에 bootloader를 복원하기 위해 J-Link/JTAG가 필요합니다.
GATT를 통한 활성 제어
스니프한 트래픽에서 writable characteristic handle과 value를 확인한 후, 어떤 central으로 접속하여 동일한 write를 수행합니다:
-
Nordic nRF Connect for Desktop (BLE app) 사용:
-
nRF52/nRF52840 dongle를 선택하고, scan 하여 target에 connect 합니다.
-
GATT database를 탐색하여 target characteristic을 찾습니다 (종종 친숙한 이름, 예: Alert Level).
-
sniffed bytes로 Write를 수행합니다 (예: 01은 trigger, 00은 stop).
-
Windows에서 Nordic dongle로 Python + blatann을 사용해 자동화:
import time
import blatann

# CONFIG
COM_PORT = "COM29"  # Replace with your COM port
TARGET_MAC = "5B:B1:7F:47:A7:00"  # Replace with your target MAC

target_address = blatann.peer.PeerAddress.from_string(TARGET_MAC + ",p")

# CONNECT
ble_device = blatann.BleDevice(COM_PORT)
ble_device.configure()
ble_device.open()
print(f"[-] Connecting to {TARGET_MAC}...")
peer = ble_device.connect(target_address).wait()
if not peer:
print("[!] Connection failed.")
ble_device.close()
raise SystemExit(1)

print("Connected. Discovering services...")
peer.discover_services().wait(5, exception_on_timeout=False)

# Example: write 0x01/0x00 to a known handle
for service in peer.database.services:
for ch in service.characteristics:
if ch.handle == 0x000b:  # Replace with your handle
print("[!] Beeping.")
ch.write(b"\x01")
time.sleep(2)
print("[+] And relax.")
ch.write(b"\x00")

print("[-] Disconnecting...")
peer.disconnect()
peer.wait_for_disconnect()
ble_device.close()
운영 노트 및 완화책
- 강력한 채널 호핑과 연결 추적을 위해 Linux에서 Sonoff+Sniffle를 선호하세요. 예비용 Nordic sniffer를 준비해 두세요.
- pairing/bonding 없이, 근처의 공격자는 writes를 관찰하고 replay하거나 자신의 writes를 unauthenticated writable characteristics에 전송할 수 있습니다.
- 완화책: pairing/bonding을 요구하고 암호화를 적용하세요; characteristic permissions을 authenticated writes를 요구하도록 설정하세요; unauthenticated writable characteristics를 최소화하세요; Sniffle/nRF Connect로 GATT ACLs를 검증하세요.
References
- Start hacking Bluetooth Low Energy today! (part 2) – Pentest Partners
- Sniffle – A sniffer for Bluetooth 5 and 4.x LE
- Firmware installation for Sonoff USB Dongle (Sniffle README)
- Sonoff Zigbee 3.0 USB Dongle Plus (ZBDongle-P)
- Nordic nRF Sniffer for Bluetooth LE
- nRF Connect for Desktop
- blatann – Python BLE library for Nordic devices
{{#include ../../banners/hacktricks-training.md}}